
Setup and Teardown of Tracetest Tests with Test Suites
.avif)

Learn how to create setup and teardown of trace-based tests with Test Suites, allowing for codeless setup to chain together several tests into one comprehensive flow!
Table of Contents
A customer recently asked what the best way to run setup or tear down steps before running a test. Since this is a common pattern, we felt a pair of articles discussing it would be helpful. This article will focus on using the test suite capability to chain together and pass variables between Tracetest tests.
We also support using the `@tracetest/client` NPM package to programmatically execute setup steps and call the Tracetest test as part of a JavaScript or TypeScript program.
> Want to write your setup process in JavaScript or TypeScript instead? Read “[Automating Tracetest Tests via TypeScript or JavaScript](https://tracetest.io/blog/automating-tracetest-tests-via-typescript-or-javascript)”.
## What is Trace-based Testing and Why You Should Care?
Before we dive in, let me answer the first question: **“What the heck is Tracetest?”**
It’s an observability-enabled testing tool for Cloud Native architectures. Distributed tracing was needed to empower SREs to troubleshot the complex, interconnected systems being used in microservices and FaaS-based architectures. Tracetest can be leveraged in your preproduction environments by DevOps, QAs, or SREs to test critical flows. Since it uses your existing observability tooling, its tests have more visibility into the overall system. This technique is called trace-based testing, and has several compelling advantages:
- Makes it easier to write tests, as you can see all the systems involved in the flow.
- Tests can be more powerful and assert on conditions that are not visible to black box tests.
- When troubleshooting failed tests, you have the full distributed trace available, decreasing MTTR.
## How to Handle Setup and Teardown of Tracetest Tests with Test Suites?
Tracetest’s codeless approach for this requirement utilizes [test suites](https://docs.tracetest.io/concepts/test-suites) to chain together several tests into one comprehensive flow. Tracetest tests have the ability to trigger activity in the system under test, triggering activity based on the following types of calls:
- HTTP
- GRPC
- Message queue
Using this capability, you can run “setup tests” before the main test and “clean up” tests after it.
This article describes a test scenario, the two tests involved, and provides instructions so you can download and run the examples yourself.
## The Test Scenario
This test scenario is a common one. Adding an entity so you can then test the deletion of it.
The system we will be testing if a Pokemon was deleted successfully. You’ll add and delete a Pokemon with two tests. The tests are:
- Adds an entity as a setup step. For this example, we are adding the Pokemon Fearow!
- Run a `delete test` to verify that the deletion removes the entity we added in the setup step. This is the main flow we are interested in testing. Hopefully we can say “Goodbye Fearow!”.
We are going to use a pre-deployed version of our Pokeshop demo which is sending its telemetry information to Jaeger. This instance is publicly available so you can run tests against it.
You can even [view the UI, here](https://demo-pokeshop.tracetest.io/). The code for this Pokeshop Demo is available at [on GitHub at kubeshop/pokeshop](https://github.com/kubeshop/pokeshop).
To follow the examples and see the code below, clone our main repo:
```bash
git clone https://github.com/kubeshop/tracetest
cd tracetest/examples/setup-of-tracetest-tests
```
## The Delete Test
The delete test is contained in the file named `delete_pokemon.yaml`. This test does a DELETE call against a specific Pokemon based on the `id` of the Pokemon. We are passing the `id` of the Pokemon into this test using an environment variable using the syntax `${env:pokemon_id}`.
This trace-based test has four test specifications. The first is a typical assertion you might see with any black box test framework:
- **Delete returns a 200 status code:** Ensures the REST API returns a successful status.
The next 3, however, leverage the visibility enabled by trace-based testing to look deeper into the execution, allowing you to assert on what actually happened by looking at the data contained in the captured distributed trace:
- **Ensure we are deleting from the Redis cache also**: A more insightful assertion, and one you cannot make with a normal, black box test.
- **All Database Spans: Processing time is less than 10ms**: Check performance as part of the test so it will fail if a slow query is introduced.
- **Check that number of deleted rows from Postgres is one**: Verify the delete actually occurs.
Here is the `delete_pokemon.yaml` test:
```yaml
type: Test
spec:
id: delete-pokemon
name: Delete Pokemon
trigger:
type: http
httpRequest:
method: DELETE
url: https://demo-pokeshop.tracetest.io/pokemon/${env:pokemon_id}
headers:
- key: Content-Type
value: application/json
specs:
- selector: span[tracetest.span.type="general" name="Tracetest trigger"]
name: Delete returns a 200 status code
assertions:
- attr:tracetest.response.status = 200
- selector: span[tracetest.span.type="database" db.system="redis" db.operation="del" db.redis.database_index="0"]
name: Ensure we are deleting from the redis cache also
assertions:
- attr:tracetest.selected_spans.count = 1
- selector: span[tracetest.span.type="database"]
name: "All Database Spans: Processing time is less than 10ms"
assertions:
- attr:tracetest.span.duration < 10ms
- selector: span[tracetest.span.type="database" name="delete pokeshop.pokemon" db.system="postgres" db.name="pokeshop" db.user="ashketchum" db.operation="delete" db.sql.table="pokemon"]
name: Check that number of deleted rows from Postgres is one
assertions:
- attr:db.result = 1
```
Now, lets look at the setup step which we will run before to add the Pokemon.
## Using Another Tracetest Test to Set up the Data
We can define a new test to create the Pokemon, and then chain the creation and deletion test together within a test suite. First, let’s look at the `setup_pokemon.yaml` test. It is fairly basic, with 3 primary areas of interest:
- It is doing a `POST` against the `/pokemon` endpoint and passing body data to create the Pokemon.
- We are checking for a 201 response from this `POST` to ensure the creation of the Pokemon worked. This is just a basic sanity check so the entire test suite will fail if something goes wrong in this setup step.
- We are getting the `id` of the Pokemon by selecting data returned in the trace, parsing it with a `json_path` statement, and assigning it to the output variable `pokemon_id`. This is enabled with Tracetest’s [test output](https://docs.tracetest.io/web-ui/creating-test-outputs) capability.
```yaml
type: Test
spec:
id: setup-pokemon
name: Setup Pokemon
trigger:
type: http
httpRequest:
method: POST
url: https://demo-pokeshop.tracetest.io/pokemon
body: "{\n \"name\": \"fearow\",\n \"type\":\"normal,flying\",\n \"imageUrl\":\"https://raw.githubusercontent.com/PokeAPI/sprites/master/sprites/pokemon/22.png\",\n \"isFeatured\": false\n}\n"
headers:
- key: Content-Type
value: application/json
specs:
- selector: span[tracetest.span.type="general" name="Tracetest trigger"]
name: Check to see the post worked
assertions:
- attr:tracetest.response.status = 201
outputs:
- name: pokemon_id
selector: span[tracetest.span.type="general" name="Tracetest trigger"]
value: attr:tracetest.response.body| json_path '$.id'
skipTraceCollection: true
```
## Combining the Two Tests into a Test Suite
We can then create a test suite, include the `setup_pokemon.yaml` test as the first to run, then call our main test, `delete_pokemon.yaml`. [Creating test suites is covered in our docs](https://docs.tracetest.io/web-ui/creating-test-suites).
When you have finished creating a test suite, the automate tab provides the YAML definition for the suite. Below is the definition for the `delete_test_suite.yaml` test suite we created:
```yaml
type: TestSuite
spec:
name: Delete with Setup
description: A test of the deletion end point with setup test which adds the pokemon as a setup step.
steps:
- setup-pokemon
- delete-pokemon
```
The `setup-pokemon` test outputs the `pokemon_id` variable, and the `delete-pokemon` test expects a variable with this name via the `${env:pokemon_id}`. With this syntax, when you run them as part of a test suite the first test will automatically pass the value and the second test will consume it. This lets the `delete-pokemon` test know to delete the Pokemon that was created in the `setup-pokemon` setup test.
### How do we Run the Example?
Enough talking - lets see this test suite run! First, clone the repo if you did not earlier:
```bash
git clone https://github.com/kubeshop/tracetest
cd tracetest/examples/setup-of-tracetest-tests
```
We are going to do several steps so we can see the test suite run:
- Join the Tracetest ***pokeshop-demo*** environment so you can run and view your tests
- Install the Tracetest command line tool (CLI) so you can upload the two tests
- Use the CLI to run the test suite and view the test output
- Open the test suite in [Tracetest](https://app.tracetest.io) and examine the results from the suite and the delete test.
## Let’s Do It!
Let’s run the test suite inside of the ***pokeshop-demo*** environment which we have available as part of our ***tracetest-demo*** organization at [`app.tracetest.io`](https://app.tracetest.io). In order to connect and run tests in this environment, you will need to join it with this link:
➡︎ [**Join the Pokeshop Demo**](https://app.tracetest.io/organizations/ttorg_2179a9cd8ba8dfa5/invites/invite_760904a64b4b9dc9/accept) ⬅︎
You will be promoted to sign in with either your GitHub or Google account. Once logged in, click the “Join organization” button to get access to the Pokeshop demo environment.

Great - you are now a member of the organization with access to the Pokeshop demo environment! We will be running the test suite against this environment from the command line interface (CLI) tool, so you will need to install the CLI. The instructions are [documented here](https://docs.tracetest.io/getting-started/installation), but for Mac, you can just type:
```bash
brew install kubeshop/tracetest/tracetest
```
Now, tell the command line what organization and environment we want to issue commands against by typing:
```bash
tracetest configure
```
You will need to select the ***tracetest-demo*** organization and the ***pokeshop-demo*** environment as shown below:

You’re ready to add the two tests to this environment so they can be run by the test suite. The tests are part of the repo you cloned, so just type the following:
```bash
tracetest apply test -f setup_pokemon.yaml
tracetest apply test -f delete_pokemon.yaml
```
Now that the definitions for the two tests have been created in the test environment, you can run the test suite, which chains the two tests together and executes them.
```bash
tracetest run testsuite -f delete_test_suite.yaml
```
Here is the output you should see after running the test suite:

This output shows that the “Delete with Setup” test suite was run successfully. It also shows the two tests that were run as part of the suite. Both the suite and the two tests show links which will allow you to view the results.

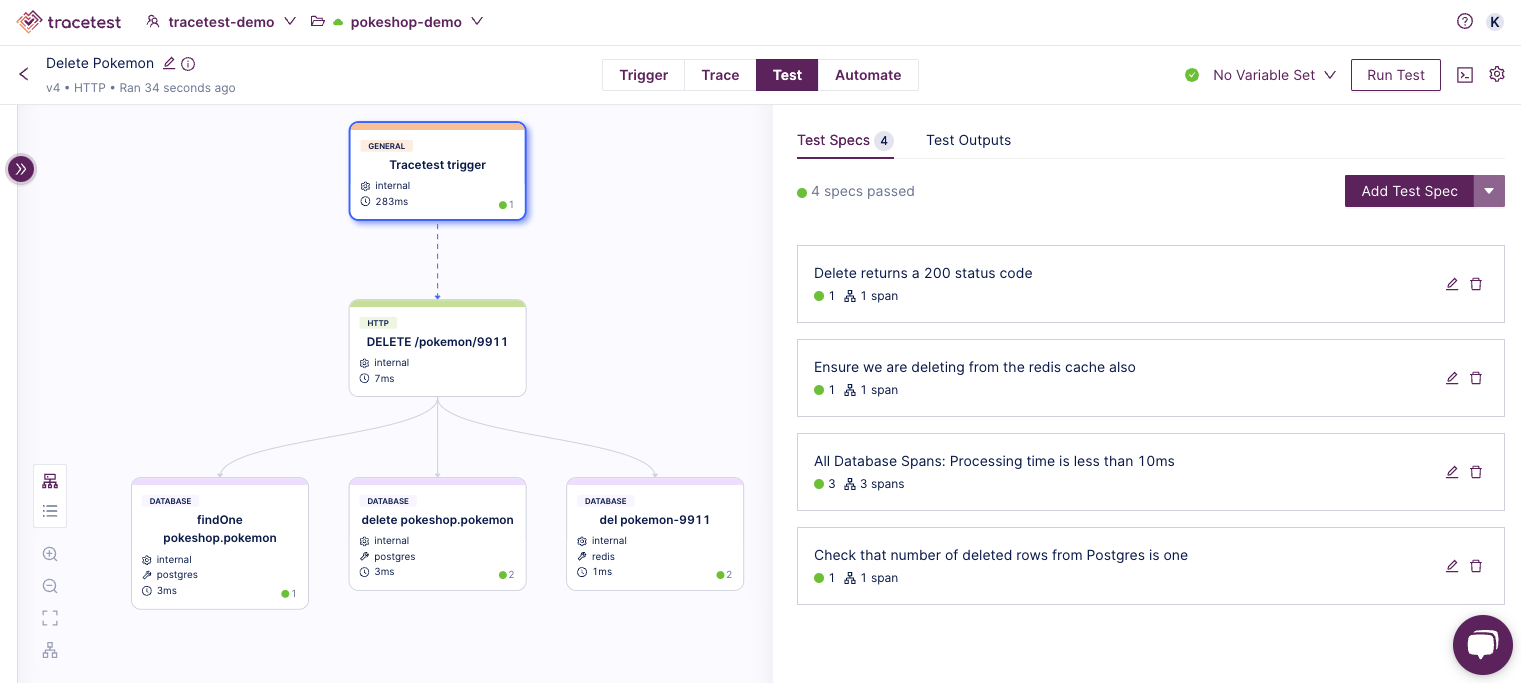
And here is what you will see if you click on the Delete Pokemon test results and click to see the “Test” tab results. It shows the 4 test specs you are running as part of the delete test.
Congratulations! You have walked through the process needed to create two tests, combine them into a test suite, and pass a test output from one to another. This is an easy way to chain tests together in order to perform setup tasks.
## What’s next?
While I did not show an example, you can use the same test suite technique to run a teardown or cleanup process after a test. Rename the processes “teardown” rather than “setup” and run them after the test! 😃
Now that you have seen how to run setup steps with test suites, you are now ready to create your own tests! Follow these steps:
- Create a new [organization](https://docs.tracetest.io/concepts/organizations) and [environment](https://docs.tracetest.io/concepts/environments).
- Use the environment setup wizard to enable your Tracetest environment to run tests against and collect distributed trace information from your system under test.
- Start creating tests!
To learn how to automate this same setup process in JavaScript or TypeScript instead, check out part 2 of called “[Automating Tracetest Tests via Typescript or Javascript](https://tracetest.io/blog/automating-tracetest-tests-via-typescript-or-javascript)”.
Have questions? The devs and I hang out in the [Tracetest Slack channel](https://dub.sh/tracetest-community) - join, ask, and we will answer!
.jpg)
.avif)
.avif)