
Integration Testing Vercel Serverless Functions with OpenTelemetry
.avif)

Simplify troubleshooting in your Vercel functions with OpenTelemetry and Tracetest! Uncover the power of distributed tracing and see how trace-based testing is changing the game!
Table of Contents
Today you’ll learn how to create production-ready [serverless functions using Vercel](https://vercel.com/docs/functions/serverless-functions). It will include adding [distributed tracing with OpenTelemetry](https://www.cncf.io/blog/2023/05/03/opentelemetry-demystified-a-deep-dive-into-distributed-tracing/) for troubleshooting and integration testing with Tracetest for [trace-based testing](https://opentelemetry.io/blog/2023/testing-otel-demo/).
Once you’re done reading you’ll have a complete boilerplate project to use for your own Vercel serverless functions interacting with [Vercel Postgres as storage](https://vercel.com/docs/storage/vercel-postgres). More importantly I’ll explain how to locally test your serverless functions in a typical development lifecycle and create integration tests for CI pipelines packaged in Docker.
> *If you can’t wait until the end, [clone the example from GitHub](https://github.com/kubeshop/tracetest/tree/main/examples/integration-testing-vercel-functions), get your API keys and tokens after signing up at [`app.tracetest.io`](https://app.tracetest.io), and create a Vercel Postgres instance. Add the Vercel Postgres env vars to your `.env` files and spin up the tests with Docker. Make sure to have Docker and Docker Compose installed for the quick start!*
```bash
git clone git@github.com:kubeshop/tracetest.git
cd tracetest/examples/integration-testing-vercel-functions
docker compose up -d --build
docker compose run integration-tests
```
## Why Serverless Functions?
[Serverless functions](https://en.wikipedia.org/wiki/Serverless_computing) are server-side code run on cloud servers without the need to be deployed to a server. They are instead executed in cloud environments and eliminate traditional infrastructure needs.
Platforms like [Vercel](https://vercel.com/) that host serverless functions and front-end code offer developers scalability and flexibility with no infrastructure overhead.
## **Observability for Serverless Architecture**
Serverless Architecture often struggles with visibility. However, observability tools can help. They trace events from start to finish, collect metrics, and evaluate how systems manage these events.
[OpenTelemetry](https://opentelemetry.io/), an open-source observability framework, is one such tool. It helps gather, process, and export data like traces, metrics, and logs. Traces are especially useful as they provide insights into how distributed systems perform by tracing requests across various services.
Luckily for us, Vercel has [built-in support for OpenTelemetry](https://nextjs.org/docs/app/building-your-application/optimizing/open-telemetry)! 🔥
## Testing Serverless Architecture
How does this tie into testing? Running tests against serverless can be quite tiresome since you can only run black box tests.
But, what if you can use distributed tracing for testing as well? Now you can. Using OpenTelemetry and Tracetest in your development lifecycle enables both local testing and integration testing in your CI pipelines. Let’s jump in and you’ll learn exactly how to do it yourself!
## Vercel Function Architecture
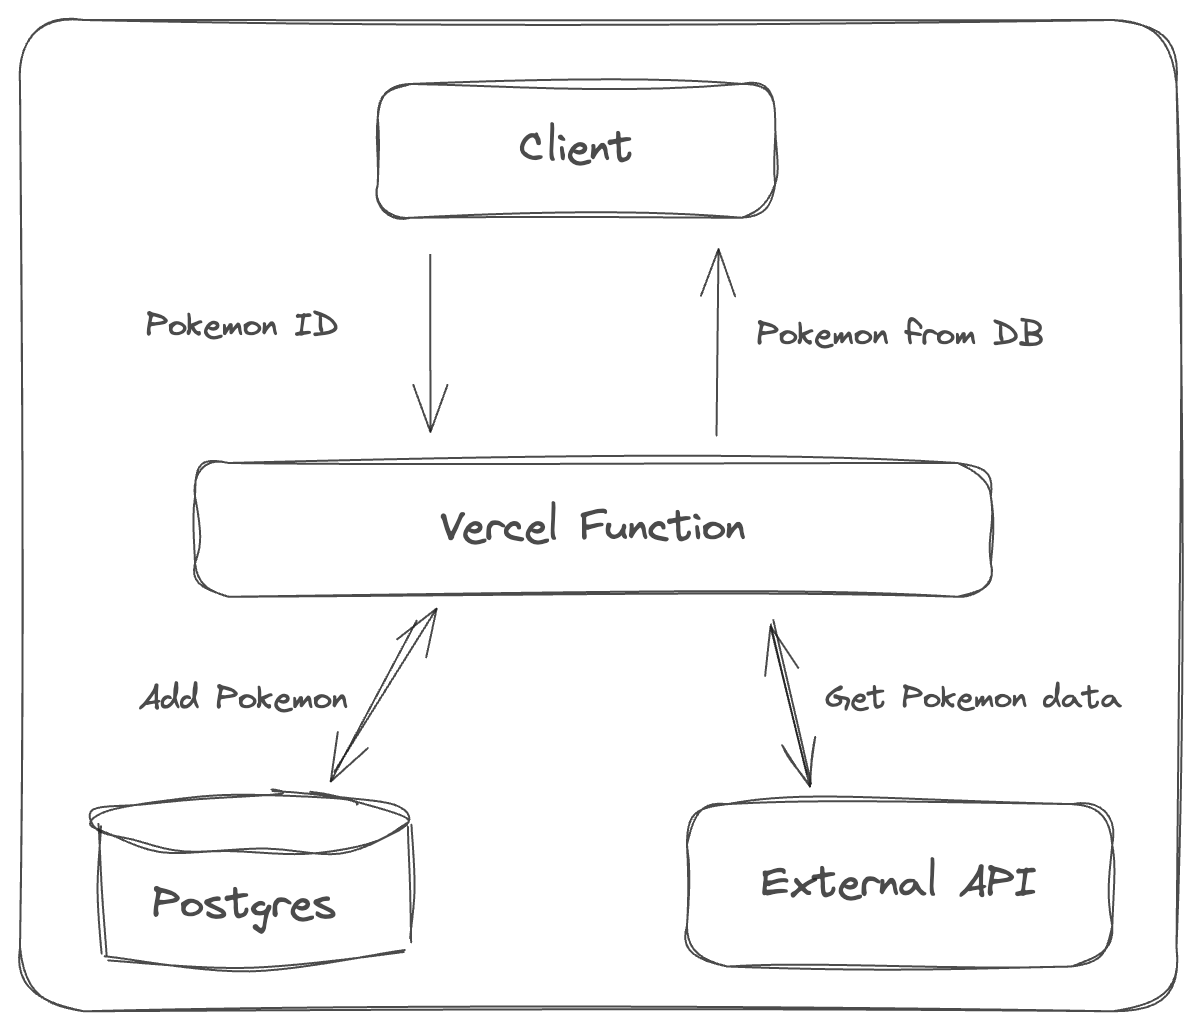
Today you’ll build a Vercel function that imports a Pokemon into a Pokedex!
The function will fetch data from an external API, transform the data and insert it into a Vercel Postgres database. This particular flow has two failure points that are difficult to test.
1. Validating that an external API request from a Vercel function is successful.
2. Validating that a Postgres insert request is successful.
## Install Vercel and Create a Boilerplate
Deployment and development is managed with the [Vercel Command Line Interface (CLI)](https://github.com/vercel/vercel), and I'll be using [Next.js](https://nextjs.org/) to simplify the setup and development of serverless functions.
The initial step involves [creating a Vercel account](https://vercel.com/signup), [installing the CLI](https://vercel.com/docs/cli), and authenticating through the CLI.
```bash
npm i -g vercel@latest
vercel login
```
Next create the Next.js boilerplate.
```bash
vercel init nextjs
```
Rename the `nextjs` directory to `integration-testing-vercel-functions`. Now you’re ready to deploy it to Vercel.
```bash
vercel deploy
```
This will create a project in the Vercel Dashboard.
## Create a Vercel Postgres Database
Go to the Storage tab in your Vercel account and create a Postgres database. Give it a name. I’ll use `pokedex` since I’ll show how to catch some Pokemon!
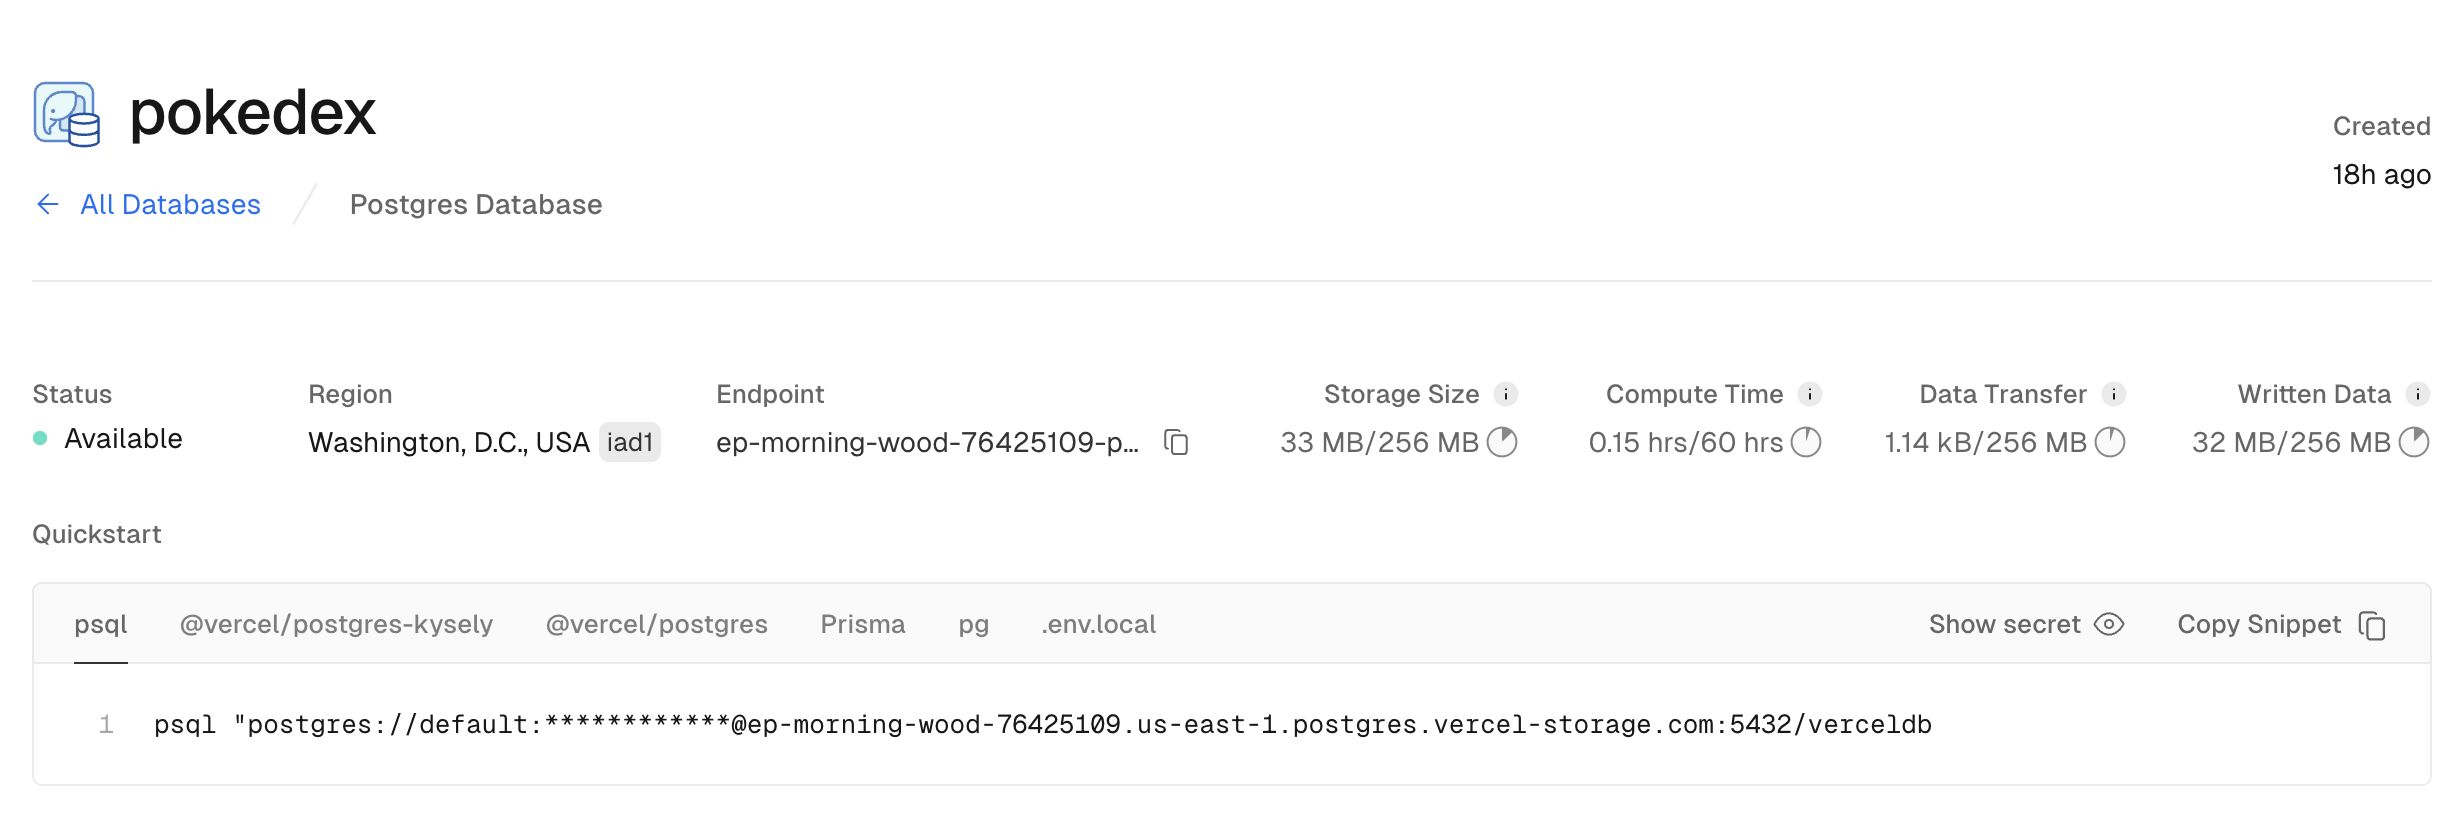
Use `psql` to connect to the database.
```bash
psql "postgres://default:************@ep-morning-wood-76425109.us-east-1.postgres.vercel-storage.com:5432/verceldb
```
And, create a table.
```sql
CREATE TABLE IF NOT EXISTS pokemon (
id SERIAL PRIMARY KEY,
name VARCHAR(255) NOT NULL,
"createdAt" TIMESTAMP WITH TIME ZONE DEFAULT CURRENT_TIMESTAMP
);
```
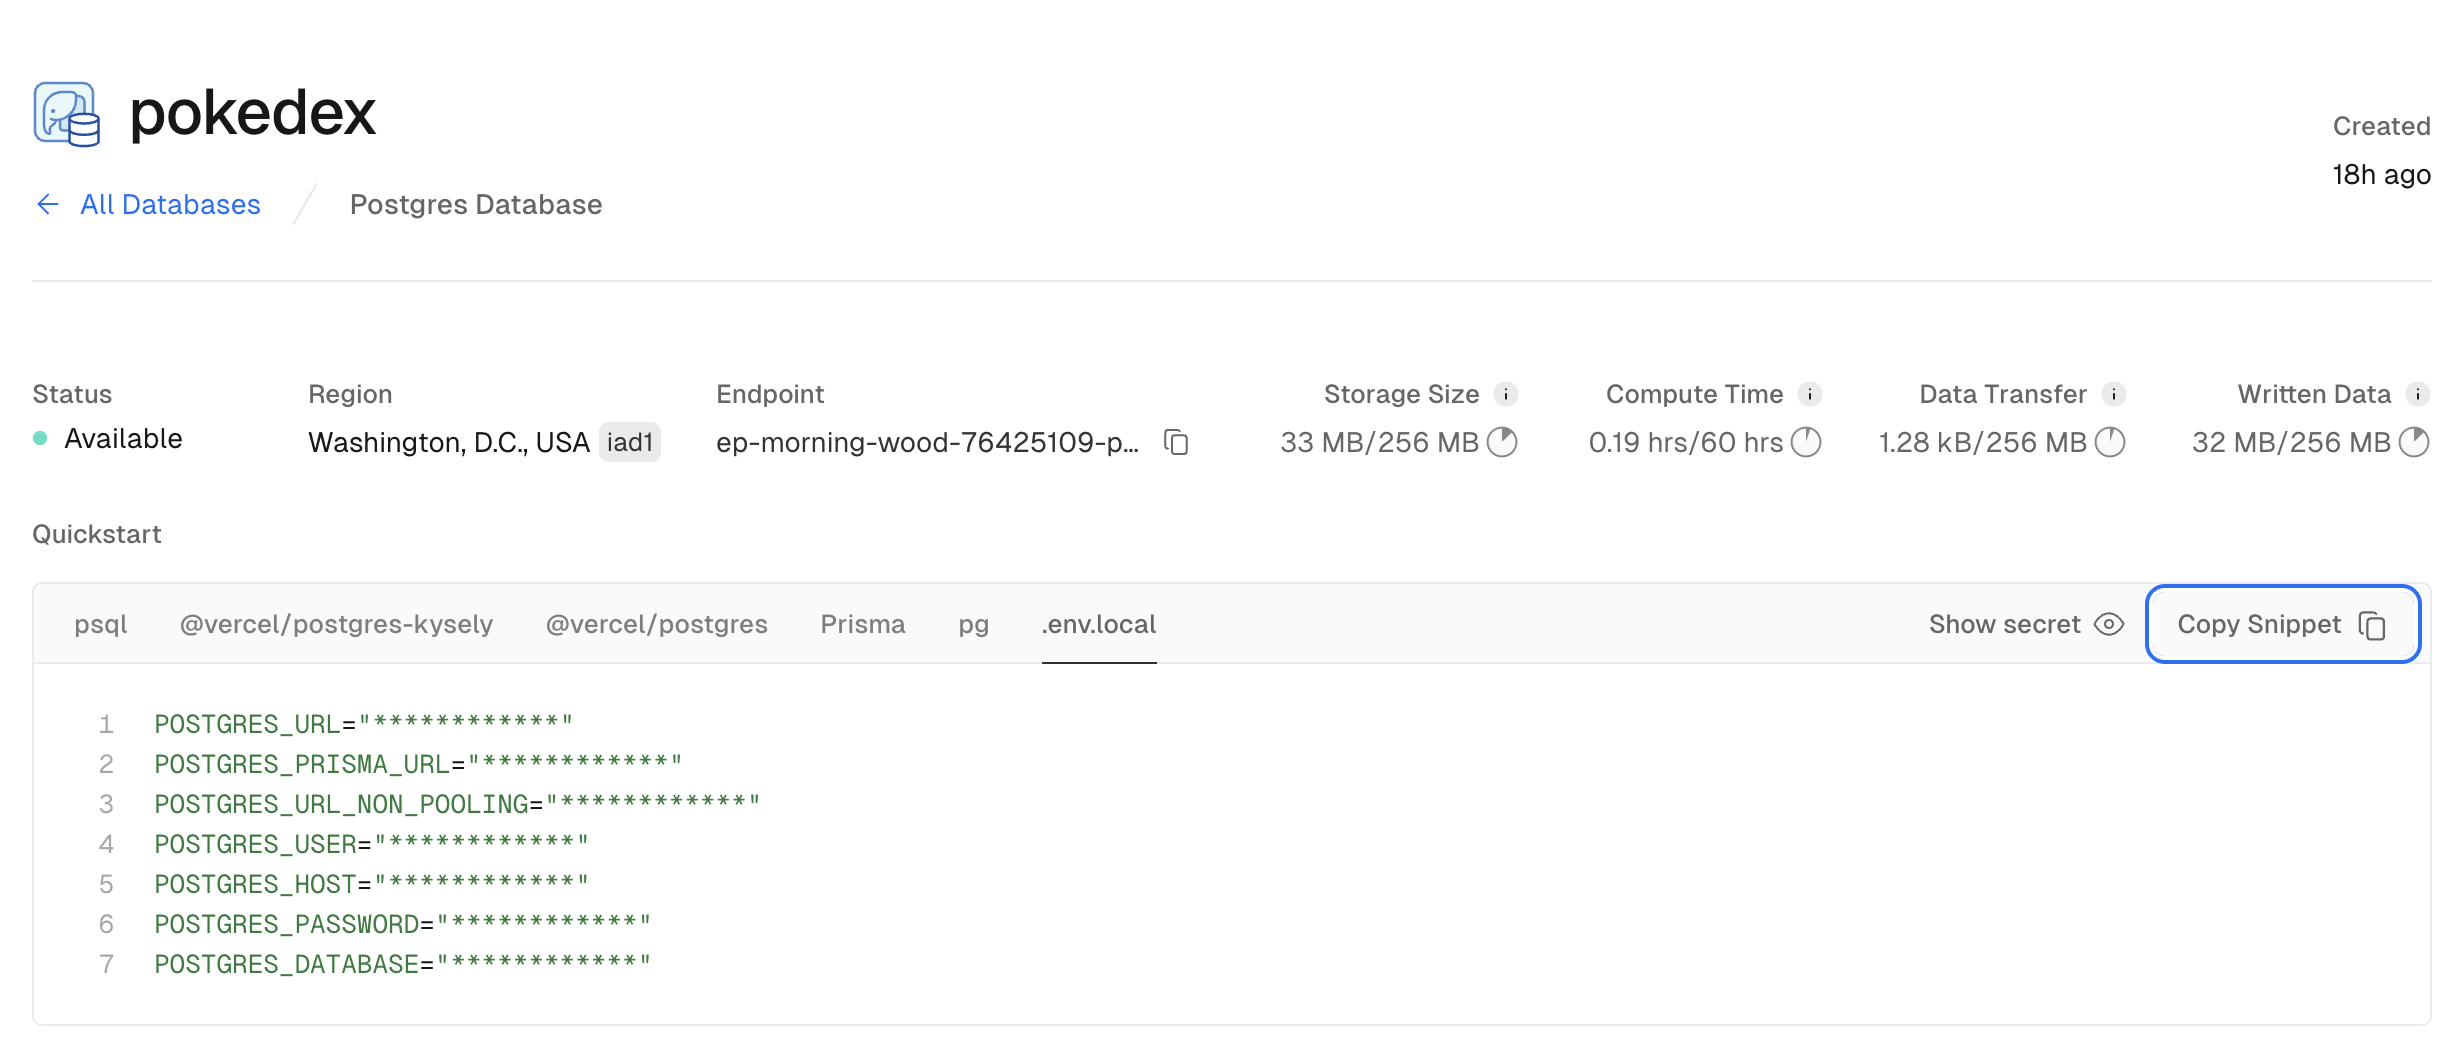
Proceed to connect the database to your project and pull the environment variables to your local development.
```bash
vercel link
vercel env pull .env.development.local
```
This will create a `.env.development.local` file in your local directory that contains all the Postgres connection details.
```bash
# Vercel Postgres
POSTGRES_DATABASE="**********"
POSTGRES_HOST="**********"
POSTGRES_PASSWORD="**********"
POSTGRES_PRISMA_URL="**********"
POSTGRES_URL="**********"
POSTGRES_URL_NON_POOLING="**********"
POSTGRES_USER="**********"
# ...
```
Finally install the Vercel Postgres SDK to interact with the database via code
```bash
npm install @vercel/postgres
```
You’re ready to start building!
## Create a Serverless Function
You’ll create an import flow. Send the ID of a Pokemon to the serverless function, it handles getting the Pokemon info from an external API and stores it in the `pokedex` database.
In the root directory create a `/pages` directory with an `/api` directory inside of it, and create `pokemon.ts` there.
Your structure should look like this.
```text
/pages
/api
/pokemon.ts
```
Every file within the `/api` directory maps to a specific API route. The function you’ll create will be accessible at the URL [`http://localhost:3000/api/pokemon`](http://localhost:3000/api/pokemon).
Each function takes a request as input and is expected to return a response. Failing to return a response will result in a timeout.
To return JSON data, you’ll use the `res.status(200).json({...})` method. Async/Await flows are enabled by default as well!
Here’s an example of a POST request with a GET request to an external API from within the serverless function and then inserting the data into Postgres. It’s a common point-of-failure that is hard to troubleshoot and test.
```jsx
import type { NextApiRequest, NextApiResponse } from 'next'
import { sql } from '@vercel/postgres'
export async function addPokemon(pokemon: any) {
return await sql`
INSERT INTO pokemon (name)
VALUES (${pokemon.name})
RETURNING *;
`
}
export async function getPokemon(pokemon: any) {
return await sql`
SELECT * FROM pokemon where id=${pokemon.id};
`
}
export default async function handler(
req: NextApiRequest,
res: NextApiResponse
) {
try {
const requestUrl = `https://pokeapi.co/api/v2/pokemon/${req.body.id || '6'}`
const response = await fetch(requestUrl)
const resPokemon = await response.json()
const { rowCount, rows: [addedPokemon, ...addedPokemonRest] } = await addPokemon(resPokemon)
res.status(200).json(addedPokemon)
} catch (err) {
res.status(500).json({ error: 'failed to load data' })
}
}
```
Go ahead and run the function.
```bash
npm run dev
```
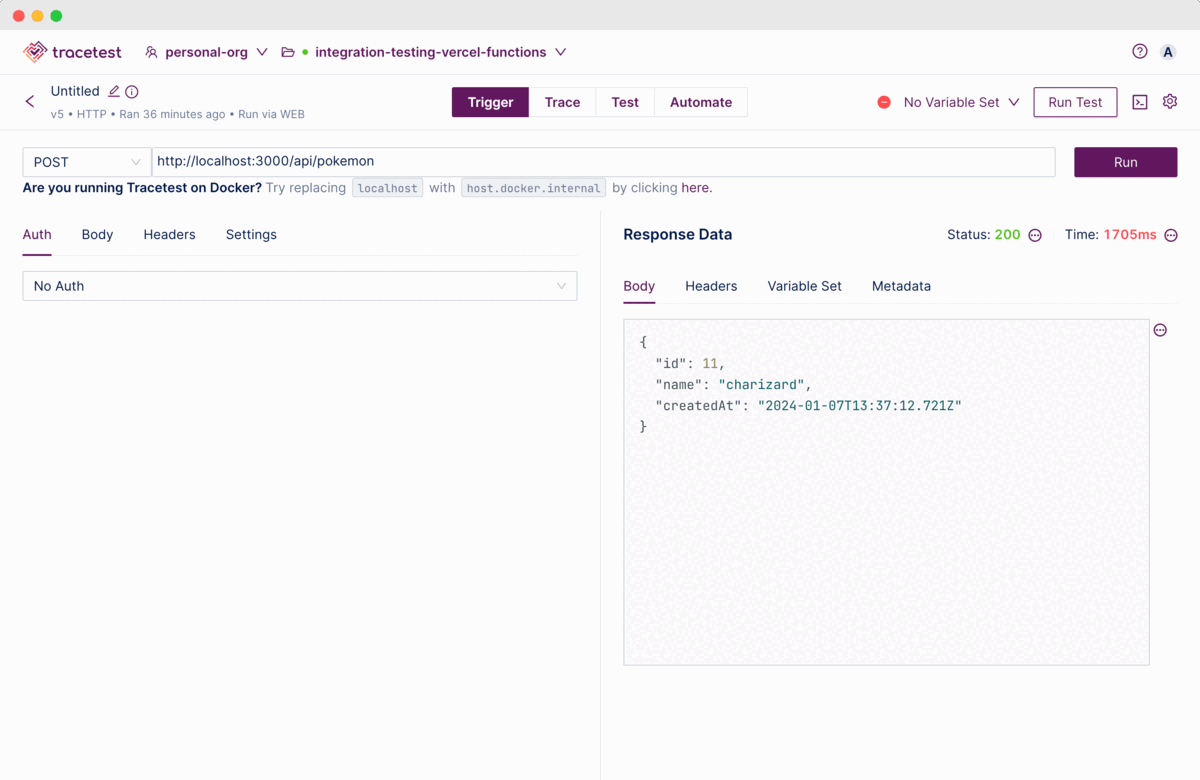
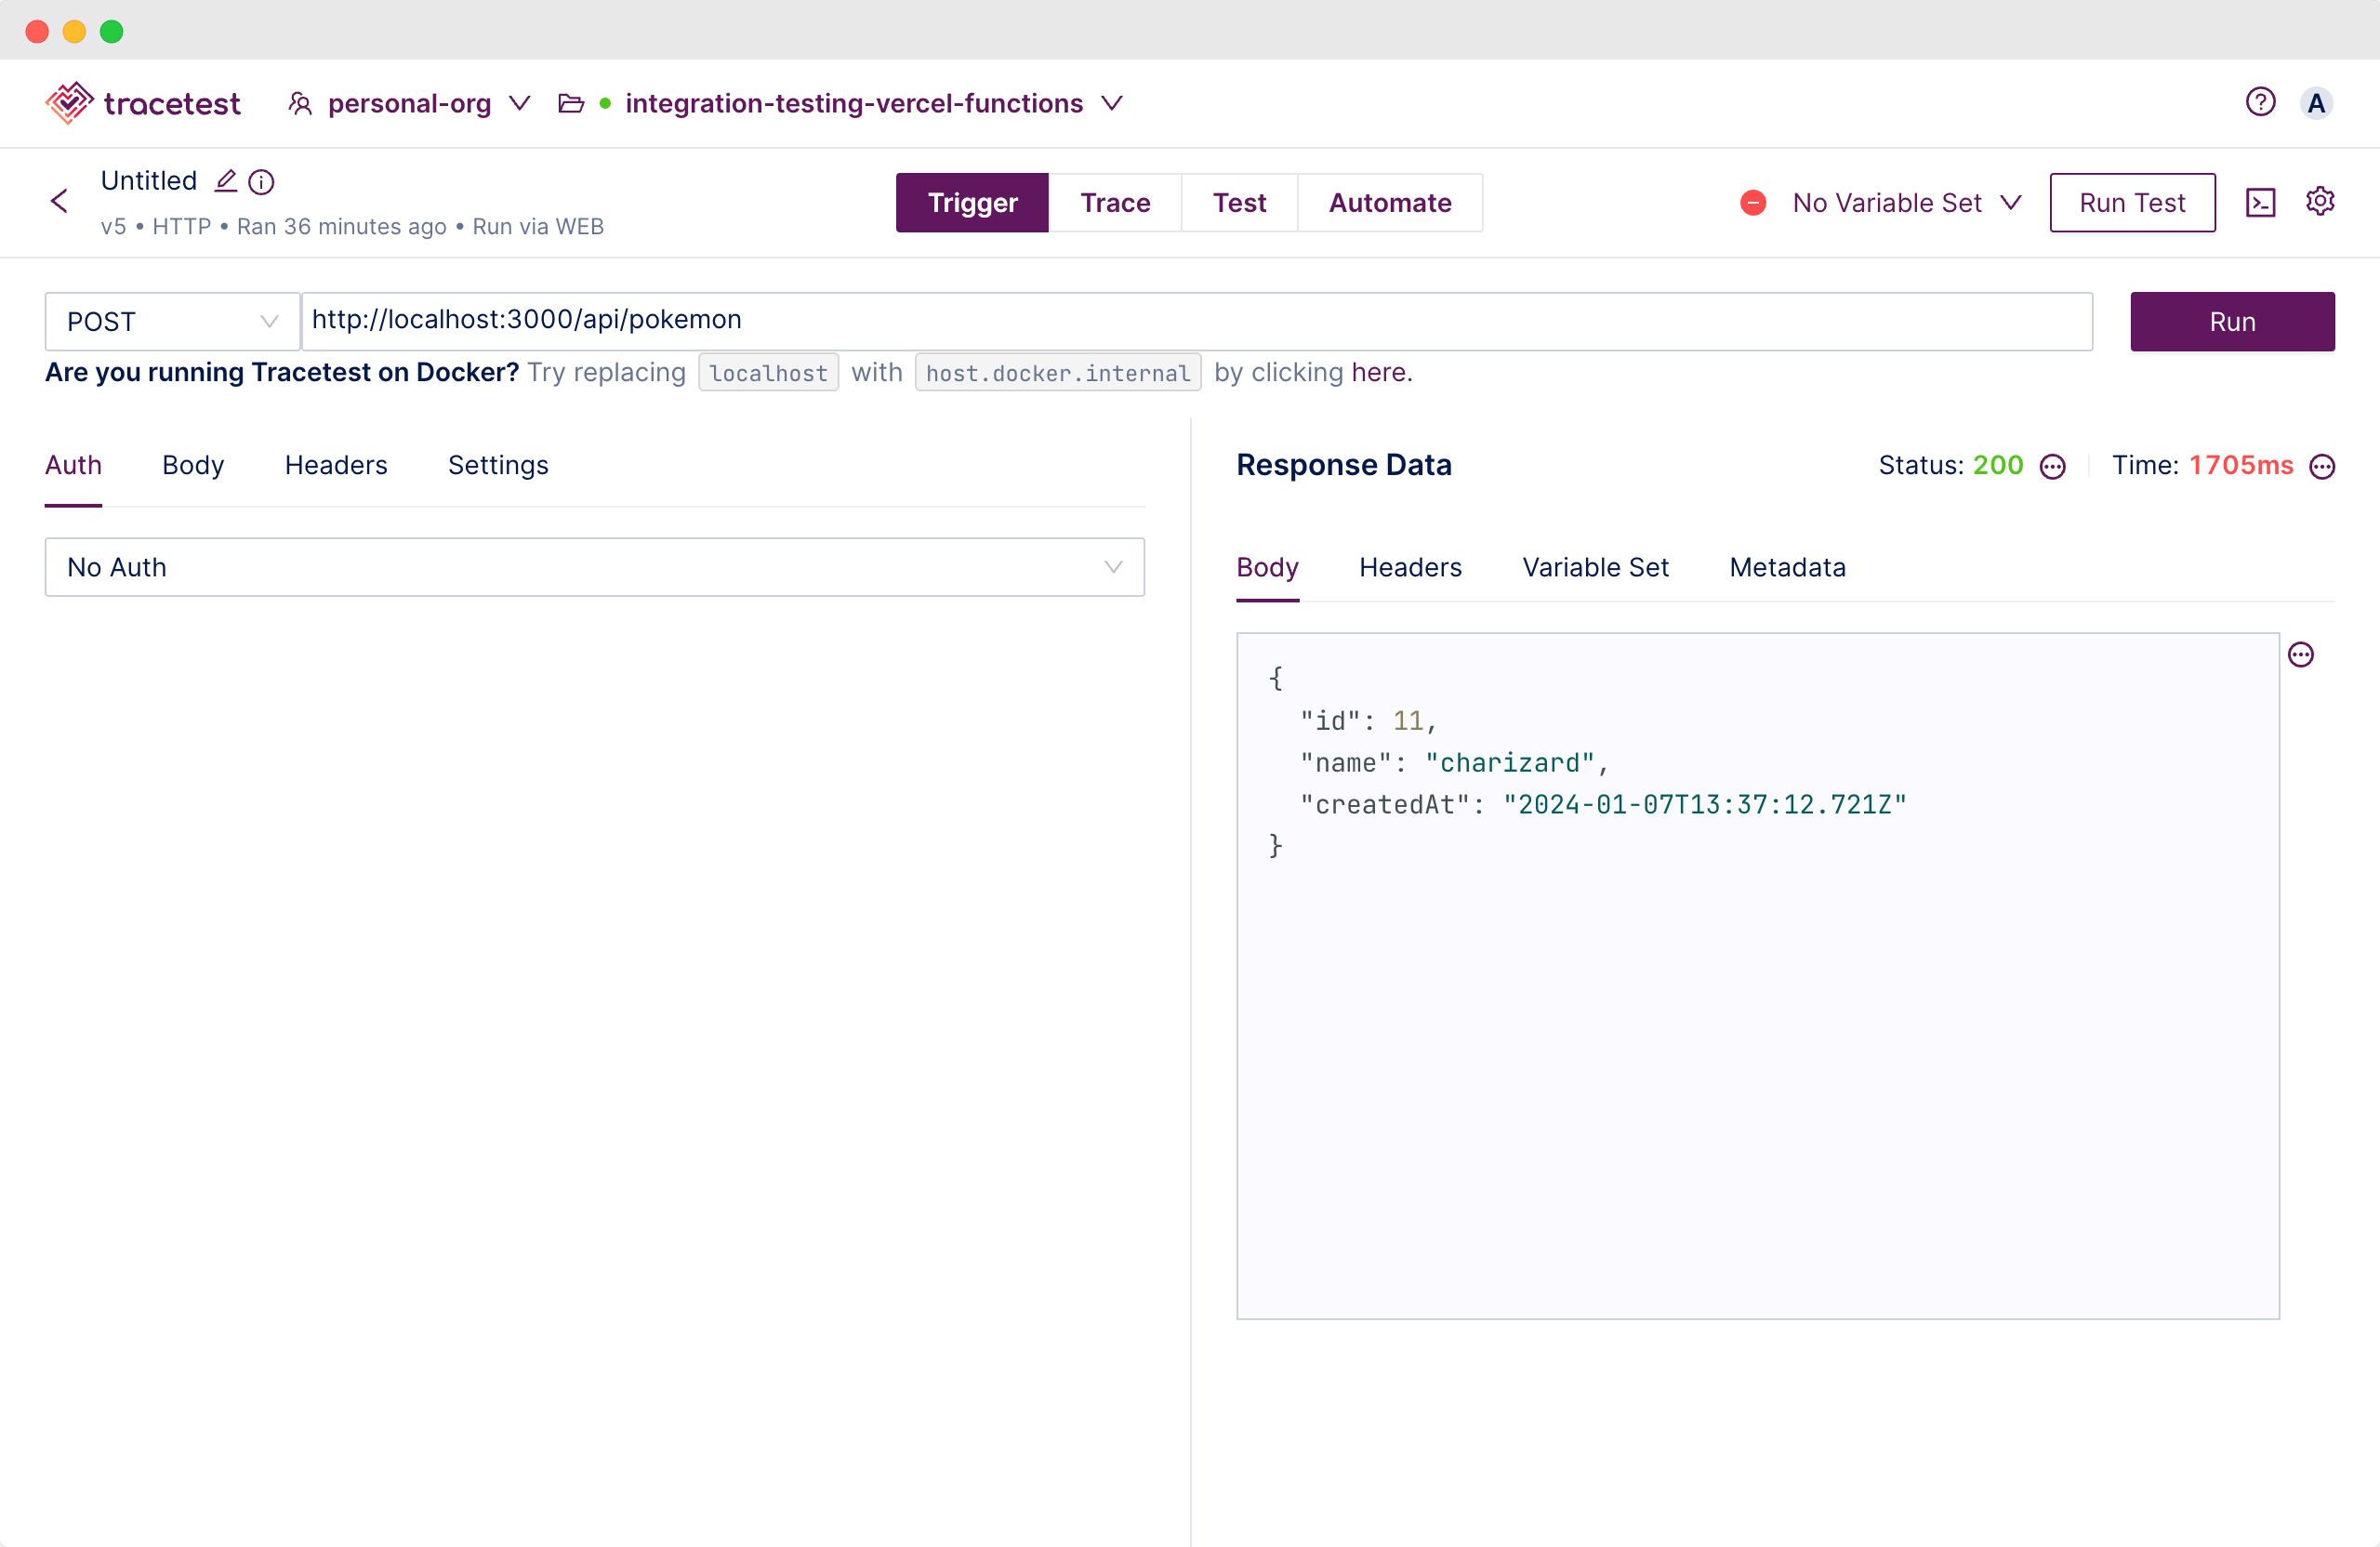
Navigate to `http://localhost:3000/api/pokemon` to see the response from your serverless function.
```json
{"id":13,"name":"charizard","createdAt":"2024-01-07T13:56:12.379Z"}
```
## Configure Troubleshooting with OpenTelemetry and Distributed Tracing
OpenTelemetry libraries for Node.js are stable and include auto-instrumentation. I’d like to say it’s *automagical* since it gives you distributed tracing out of the box by just adding a few modules and a single preloaded JavaScript file.
> *Note: To learn more check out the [official Vercel docs about OpenTelemetry](https://nextjs.org/docs/pages/building-your-application/optimizing/open-telemetry#manual-opentelemetry-configuration) or take a look at the [official OpenTelemetry docs](https://opentelemetry.io/docs/instrumentation/js/automatic/).*
Firstly you need to install OpenTelemetry packages:
```bash
npm install \
@opentelemetry/sdk-node \
@opentelemetry/resources \
@opentelemetry/semantic-conventions \
@opentelemetry/sdk-trace-node \
@opentelemetry/exporter-trace-otlp-http \
@opentelemetry/exporter-trace-otlp-grpc \
@opentelemetry/api \
@opentelemetry/auto-instrumentations-node \
@opentelemetry/instrumentation-fetch
```
> *Note: OpenTelemetry APIs are not compatible with the edge runtime, so you need to make sure that you are importing them only when `process.env.NEXT_RUNTIME === 'nodejs'`. The [official Vercel docs](https://nextjs.org/docs/pages/building-your-application/optimizing/open-telemetry#manual-opentelemetry-configuration) recommend creating a new file `instrumentation.node.ts` to import only when using Node.*
Start by enabling OpenTelemetry instrumentation in the Next.js app by setting the `experimental.instrumentationHook: true` in the `next.config.js` like below.
```jsx
/** @type {import('next').NextConfig} */
const nextConfig = {
experimental: {
instrumentationHook: true,
},
// ...
}
module.exports = nextConfig
```
Then, create a file called `instrumentation.ts` to initialize the `NodeSDK` for OpenTelemetry in your serverless functions.
```jsx
// instrumentation.ts
export async function register() {
if (process.env.NEXT_RUNTIME === 'nodejs') {
await import('./instrumentation.node')
}
}
```
Since you need a custom configuration and a dedicated file for the Node.js runtime, create another file called `instrumentation.node.ts` and paste this code into it.
```jsx
import { NodeSDK } from '@opentelemetry/sdk-node'
import { OTLPTraceExporter } from '@opentelemetry/exporter-trace-otlp-http'
import { Resource } from '@opentelemetry/resources'
import { SemanticResourceAttributes } from '@opentelemetry/semantic-conventions'
import { getNodeAutoInstrumentations } from '@opentelemetry/auto-instrumentations-node'
import { FetchInstrumentation } from '@opentelemetry/instrumentation-fetch'
const sdk = new NodeSDK({
// The OTEL_EXPORTER_OTLP_ENDPOINT env var is passed into "new OTLPTraceExporter" automatically.
// If the OTEL_EXPORTER_OTLP_ENDPOINT env var is not set the "new OTLPTraceExporter" will
// default to use "http://localhost:4317" for gRPC and "http://localhost:4318" for HTTP.
// This sample is using HTTP.
traceExporter: new OTLPTraceExporter(),
instrumentations: [
getNodeAutoInstrumentations(),
new FetchInstrumentation(),
],
resource: new Resource({
[SemanticResourceAttributes.SERVICE_NAME]: 'integration-testing-vercel-functions',
}),
})
sdk.start()
```
This will configure the OpenTelemetry libraries and trace exporters. The `OTLPTraceExporter` will look for an environment variable called `OTEL_EXPORTER_OTLP_ENDPOINT`. If not found it’ll default to using [`http://localhost:4318`](http://localhost:4318) for HTTP traffic. Add it to your `.env.development.local` file.
```bash
# OTEL
OTEL_EXPORTER_OTLP_ENDPOINT="http://localhost:4318"
```
Now, you need to add a tracer to the Vercel function. Replace the code in your `pages/api/pokemon.ts` with this.
```jsx
import { trace, SpanStatusCode } from '@opentelemetry/api'
import type { NextApiRequest, NextApiResponse } from 'next'
import { sql } from '@vercel/postgres'
export async function addPokemon(pokemon: any) {
return await sql`
INSERT INTO pokemon (name)
VALUES (${pokemon.name})
RETURNING *;
`
}
export async function getPokemon(pokemon: any) {
return await sql`
SELECT * FROM pokemon where id=${pokemon.id};
`
}
export default async function handler(
req: NextApiRequest,
res: NextApiResponse
) {
const activeSpan = trace.getActiveSpan()
const tracer = await trace.getTracer('integration-testing-vercel-functions')
try {
const externalPokemon = await tracer.startActiveSpan('GET Pokemon from pokeapi.co', async (externalPokemonSpan) => {
const requestUrl = `https://pokeapi.co/api/v2/pokemon/${req.body.id || '6'}`
const response = await fetch(requestUrl)
const { id, name } = await response.json()
externalPokemonSpan.setStatus({ code: SpanStatusCode.OK, message: String("Pokemon fetched successfully!") })
externalPokemonSpan.setAttribute('pokemon.name', name)
externalPokemonSpan.setAttribute('pokemon.id', id)
externalPokemonSpan.end()
return { id, name }
})
const addedPokemon = await tracer.startActiveSpan('Add Pokemon to Vercel Postgres', async (addedPokemonSpan) => {
const { rowCount, rows: [addedPokemon, ...rest] } = await addPokemon(externalPokemon)
addedPokemonSpan.setAttribute('pokemon.isAdded', rowCount === 1)
addedPokemonSpan.setAttribute('pokemon.added.name', addedPokemon.name)
addedPokemonSpan.end()
return addedPokemon
})
res.status(200).json(addedPokemon)
} catch (err) {
activeSpan?.setAttribute('error', String(err))
activeSpan?.recordException(String(err))
activeSpan?.setStatus({ code: SpanStatusCode.ERROR, message: String(err) })
res.status(500).json({ error: 'failed to load data' })
} finally {
activeSpan?.end()
}
}
```
What is going on here?
1. You first import the `@vercel/postgres` SDK.
2. Then, define two functions for interacting with Vercel Postgres, `addPokemon` and `getPokemon`.
3. The code instantiates a tracer with `trace.getTracer`.
4. You get the `activeSpan` and instantiate a tracer with `trace.getTracer`. The active span in this context is the span from the Vercel function itself.
5. It uses the `tracer.startActiveSpan` to wrap the external HTTP request and a Vercel Postgres database call. This will generate a trace span that will attach any child spans to it. What I want you to care about is making sure the `fetch` request’s trace spans are attached the correct parent span. This happens automatically with the `tracer.startActiveSpan`.
6. It uses `span.setStatus` and `span.setAttribute` to attach values to the span itself.
7. It uses `span.recordException(String(err))` in the exception handler to make sure to record an exception if it happens.
8. Finally, pun intended, it ends the span with the `span.end` method.
With this, your Next.js app will emit distributed traces! But, you’re not sending them anywhere. Let’s fix that by adding Tracetest to the development lifecycle.
## The Modern Way of Testing Serverless Functions Locally
Spin up your Next.js app.
```bash
npm run dev
```
This starts the server and function on `http://localhost:3000/api/pokemon`.
[Tracetest](https://tracetest.io/features) is a trace-based testing tool for building integration tests in minutes using [OpenTelemetry](https://opentelemetry.io/docs/getting-started/) traces. Create test specs against trace data at every point of a request transaction. It’s [open source](https://github.com/kubeshop/tracetest) and has a [managed cloud offering](https://app.tracetest.io/) as well.
Since it’s easier to get started with no dependencies, I’ll show how to use [Tracetest](https://docs.tracetest.io/getting-started/installation) instead of [Tracetest Core](https://docs.tracetest.io/core/getting-started/installation). But, you can still get the same functionality with Tracetest Core!
To get started with Tracetest:
1. You’ll need to [download the CLI](https://docs.tracetest.io/getting-started/installation#install-the-tracetest-cli) for your operating system. *Sample for MacOS below*.
```bash
brew install kubeshop/tracetest/tracetest
```
2. And, [sign up for an account](https://app.tracetest.io/). Go ahead and do that now.
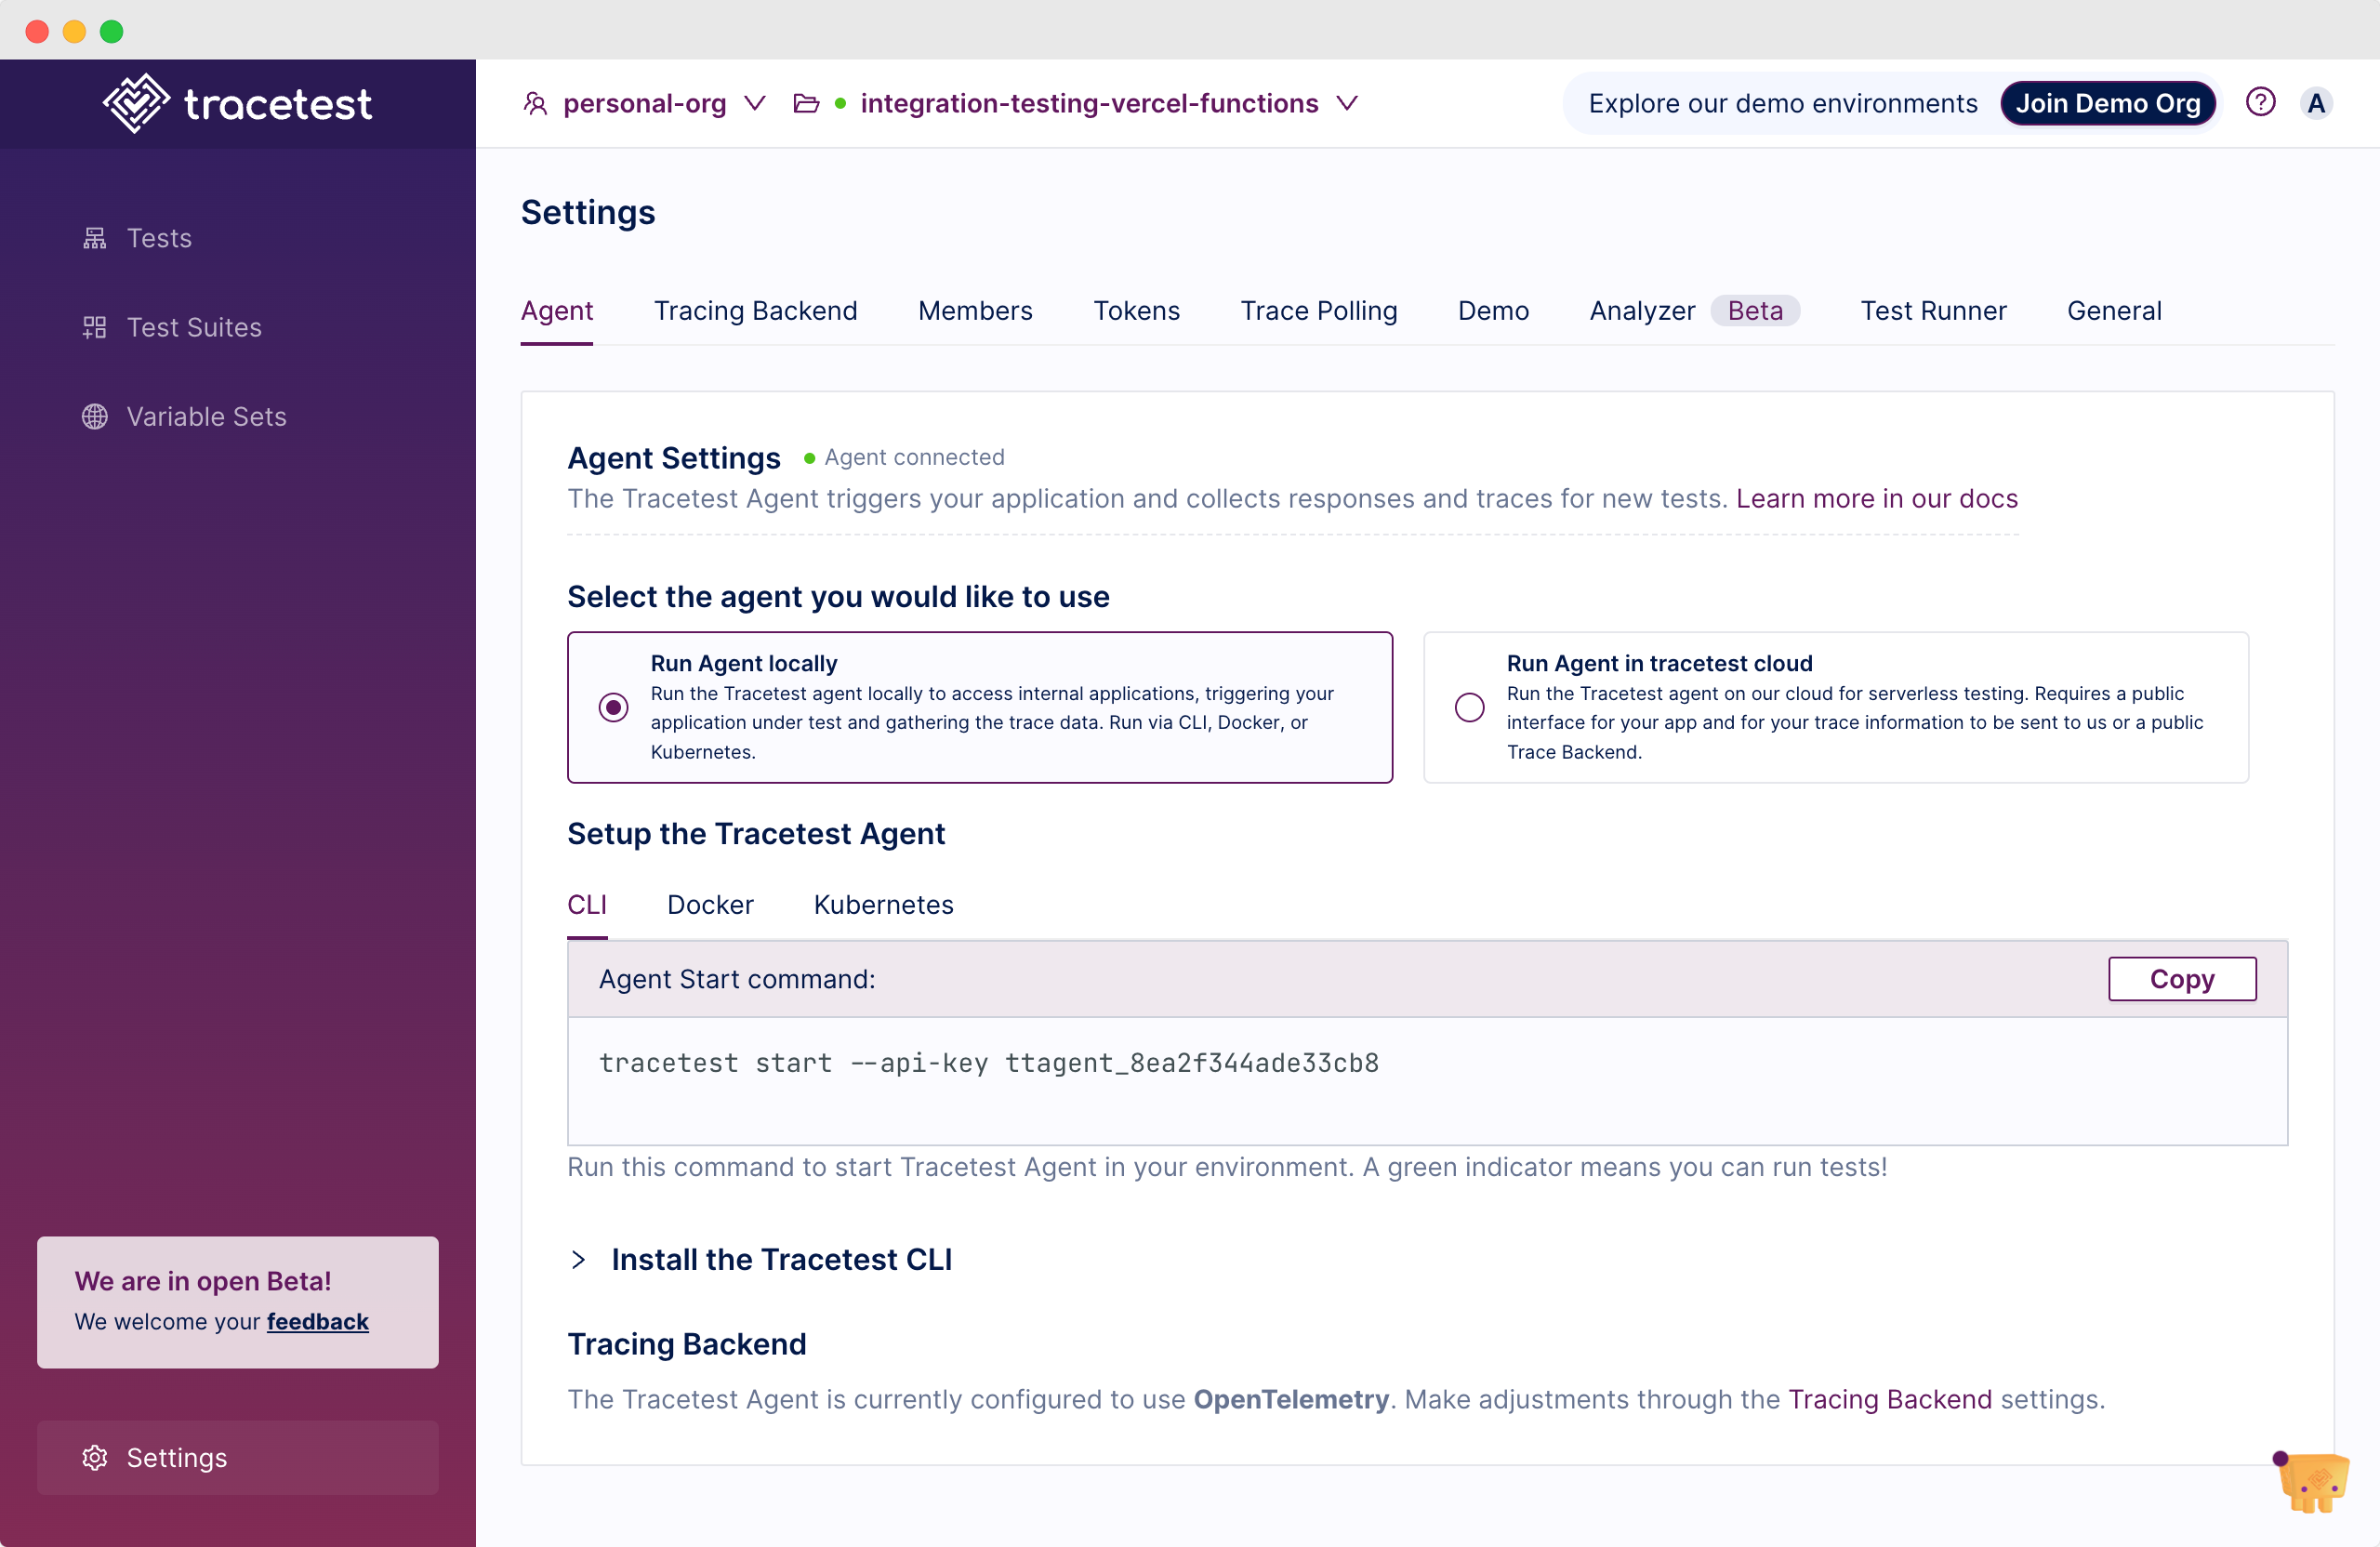
The CLI is bundled with Tracetest Agent that runs in your infrastructure to collect responses and traces for tests. [Learn more in the docs here.](https://docs.tracetest.io/concepts/agent)
To start Tracetest Agent add the `--api-key` flag manually at startup or, just run `tracetest start` and pick your env from the menu.
You can find the organization and environment values in the `Settings > Agent` in the Tracetest app.
Now, go ahead and start Tracetest Agent.
```bash
tracetest start --api-key <ttagent_key>
```
With the Tracetest Agent started, go back to [`app.tracetest.io`](http://app.tracetest.io) and trigger the serverless function.
Switch to the `Trace` tab to see the full preview of the distributed trace.
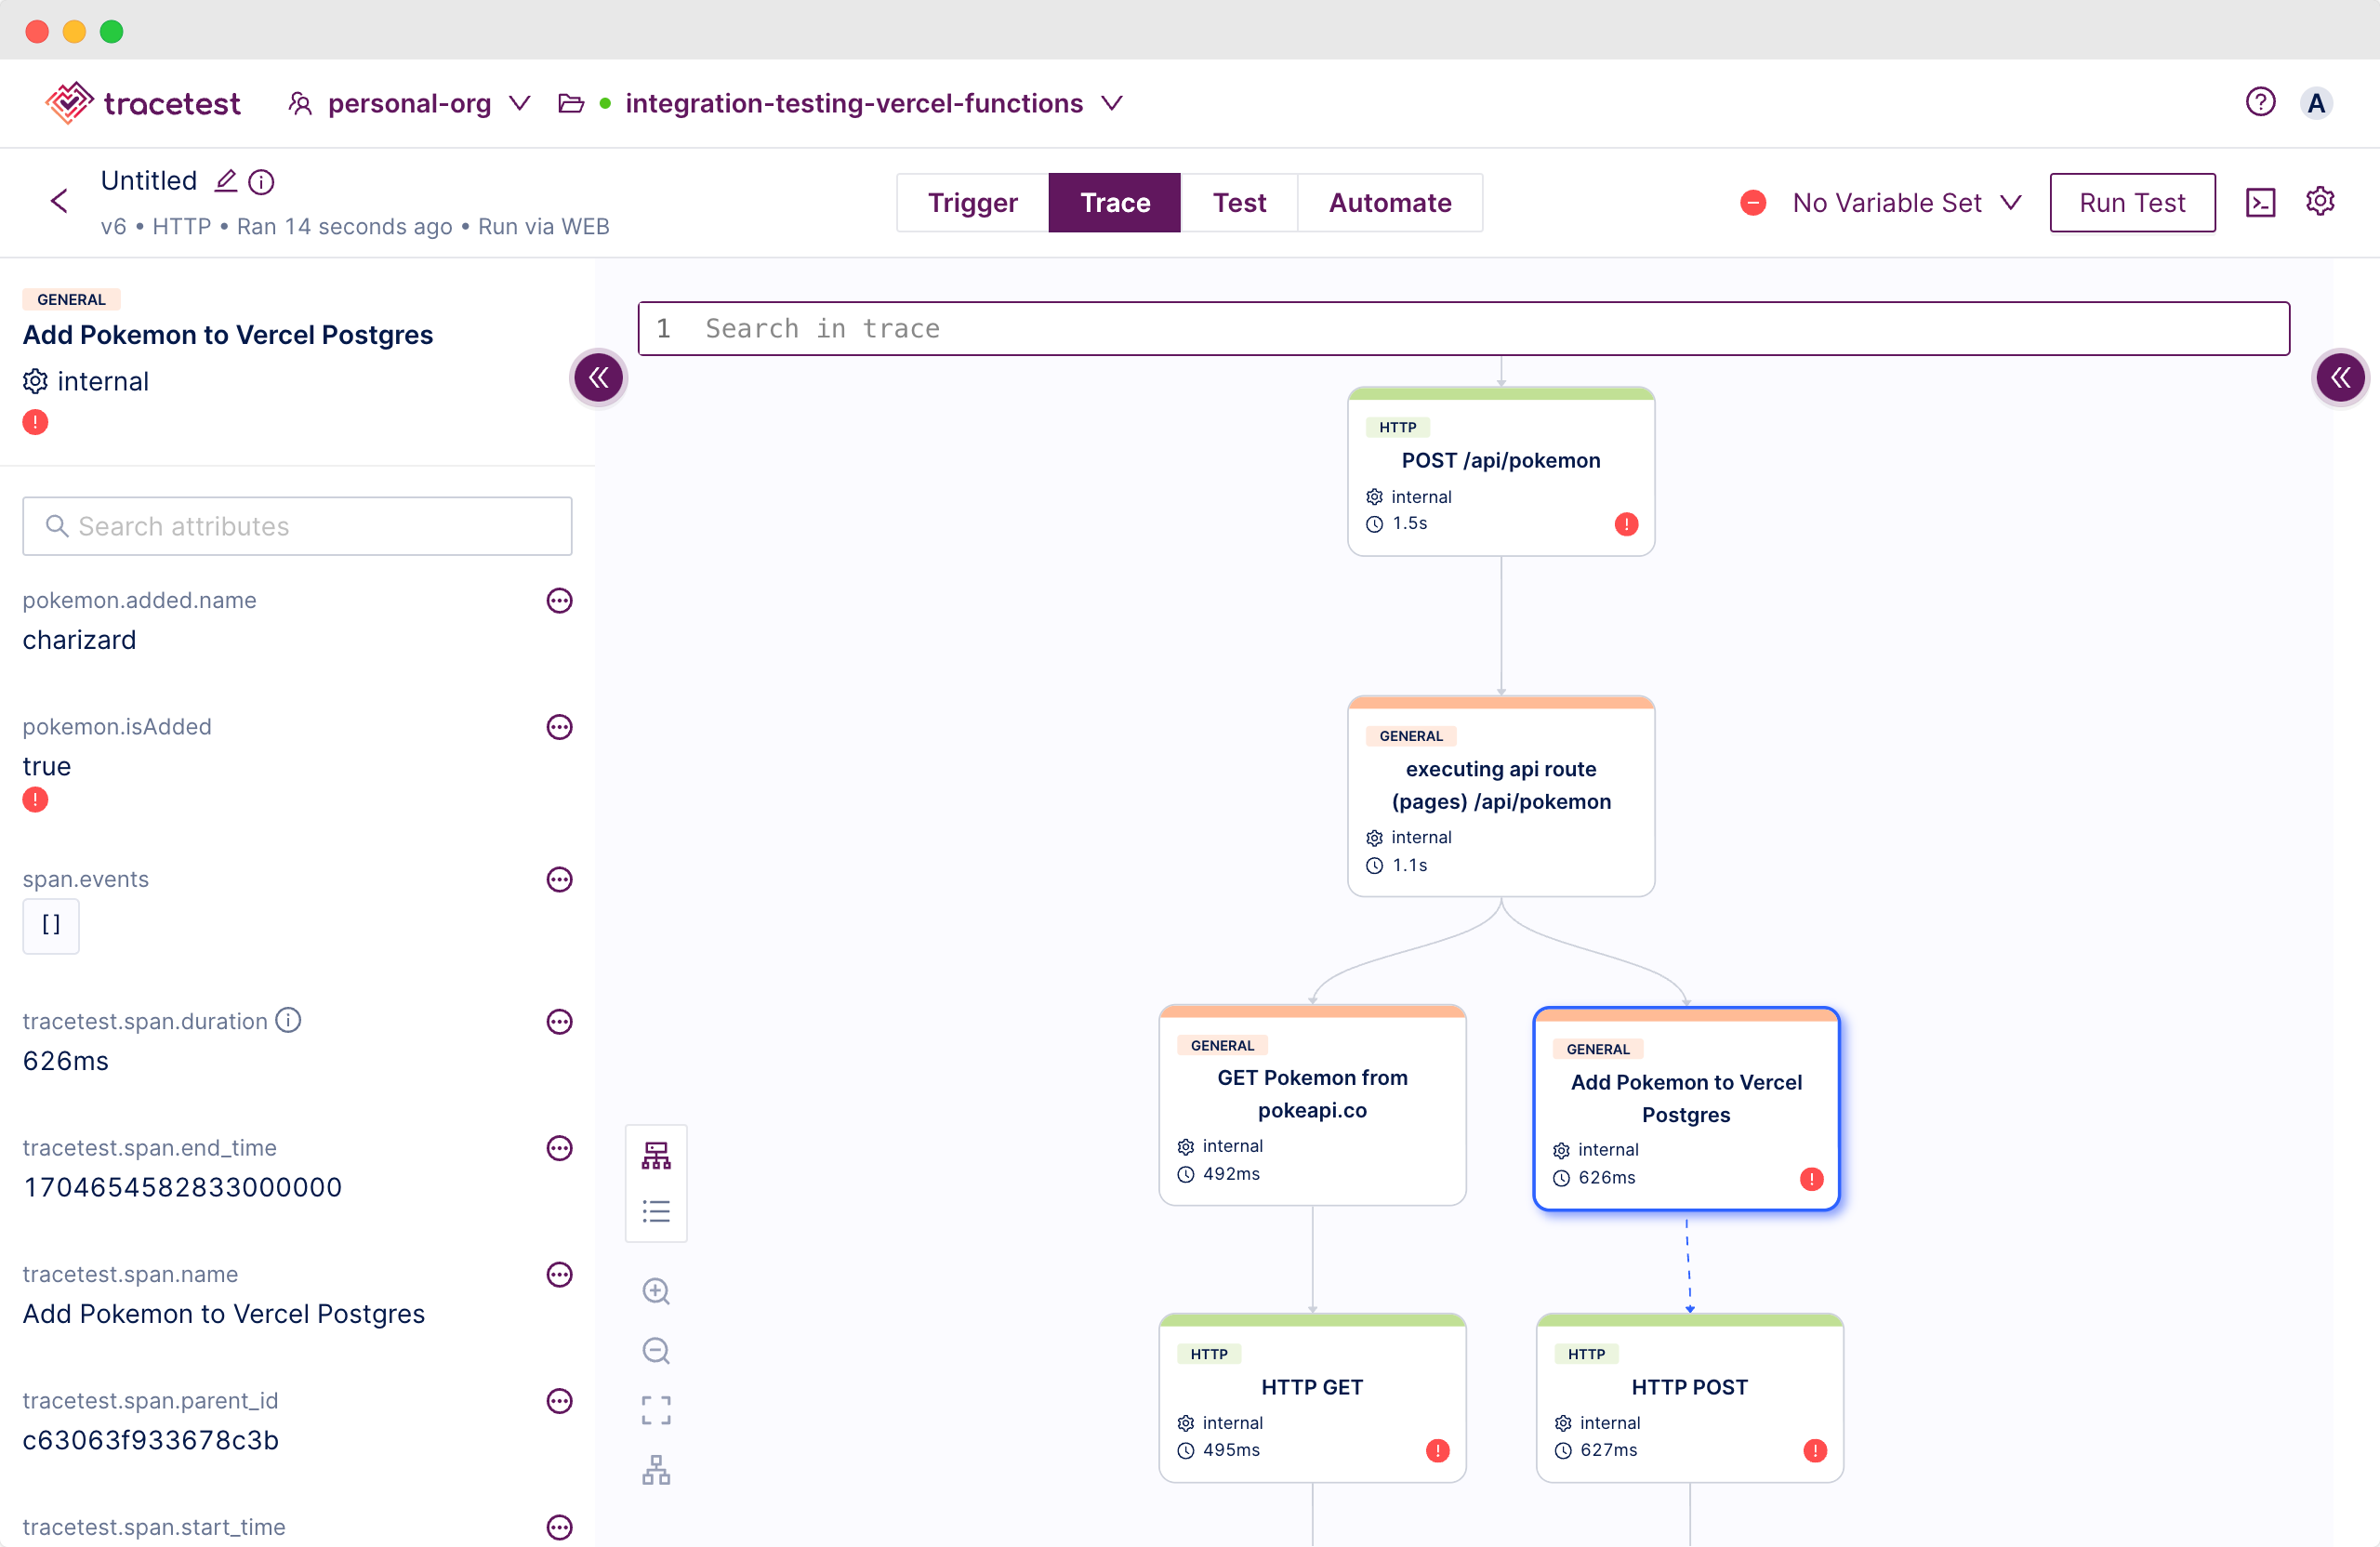
From here you can add test specs to validate that the HTTP request never fails. Including both the downstream API and both Vercel Postgres database connections.
Click the `Test` tab and add a test spec from the snippets. Select `All HTTP Spans: Status code is 200`.
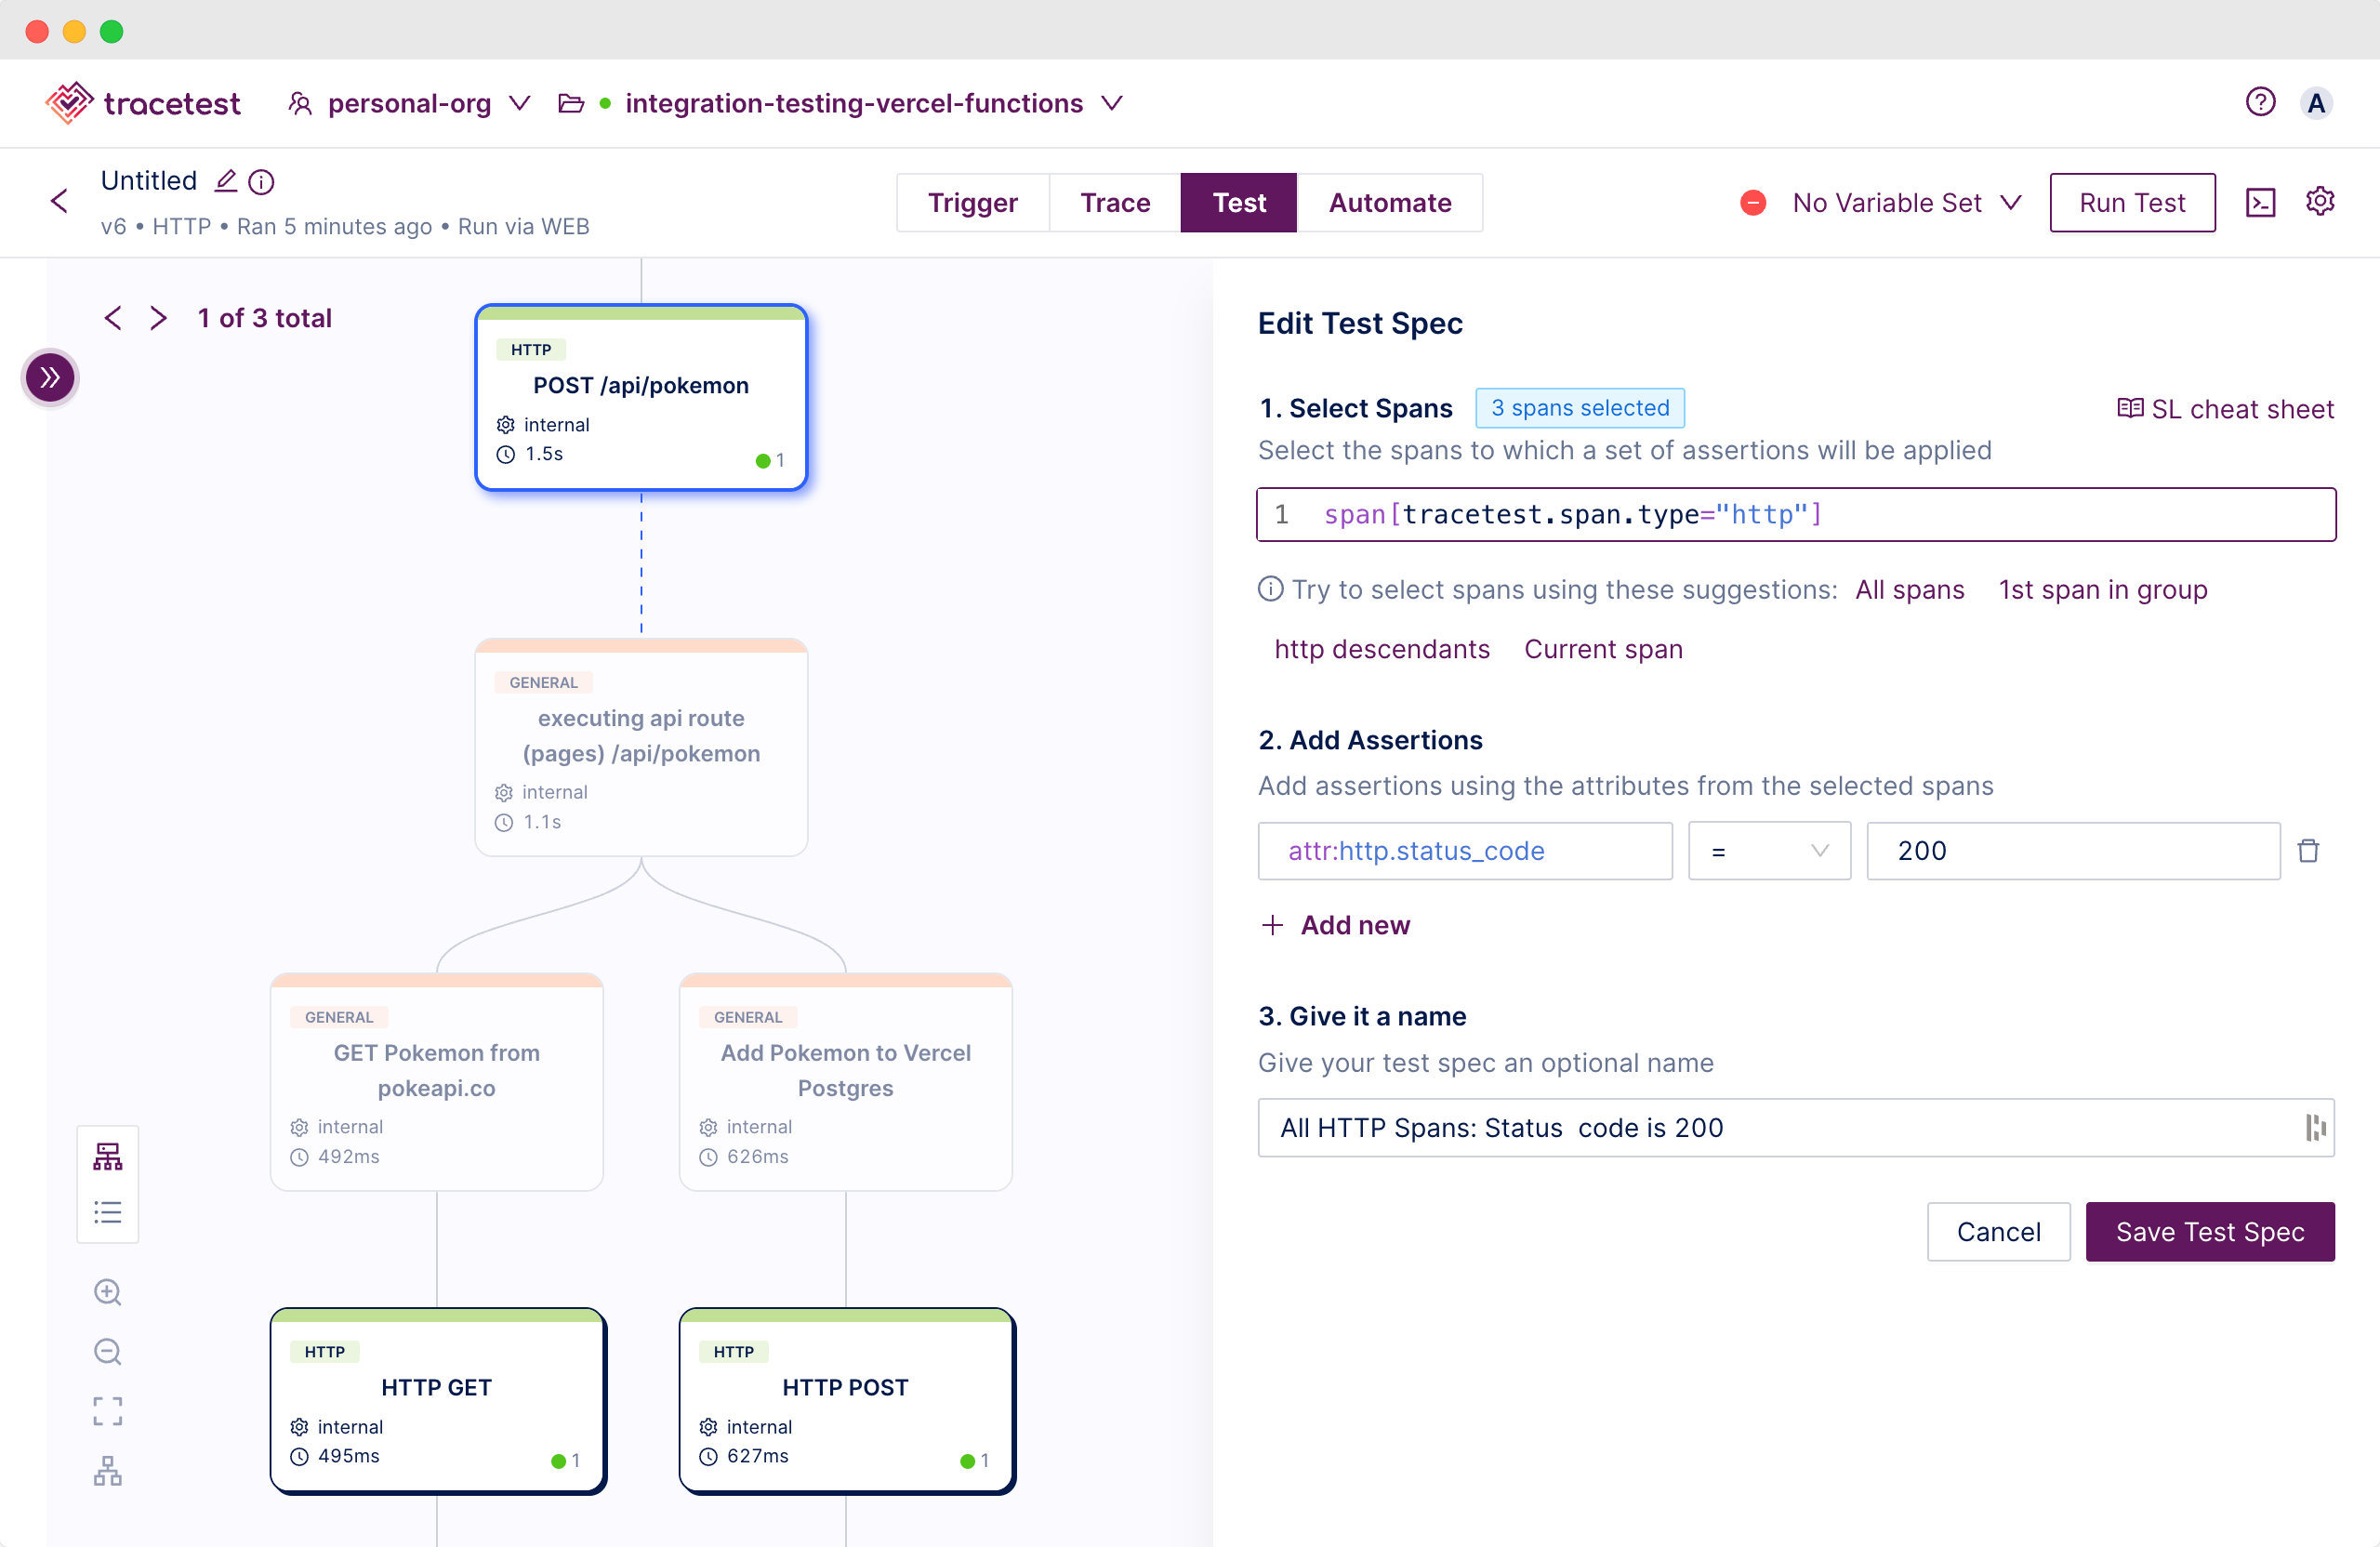
Save the test spec. You now see the test is passing since both the external HTTP requests and database interactions are passing and returning status code `200`.
All this enabled by OpenTelemetry tracing and Tracetest! What’s also awesome is that these tests are stored in your Tracetest Account and you can revisit them and run the same tests again every time you run your dev environment!
This is awesome for your development lifecycle and API testing while developing Vercel functions, but also in pre-merge testing, and integration testing.
Let me explain how to enable integration testing in CI pipelines next!
## Integration Testing Vercel Serverless Functions
Finally, check out the `Automate` tab.
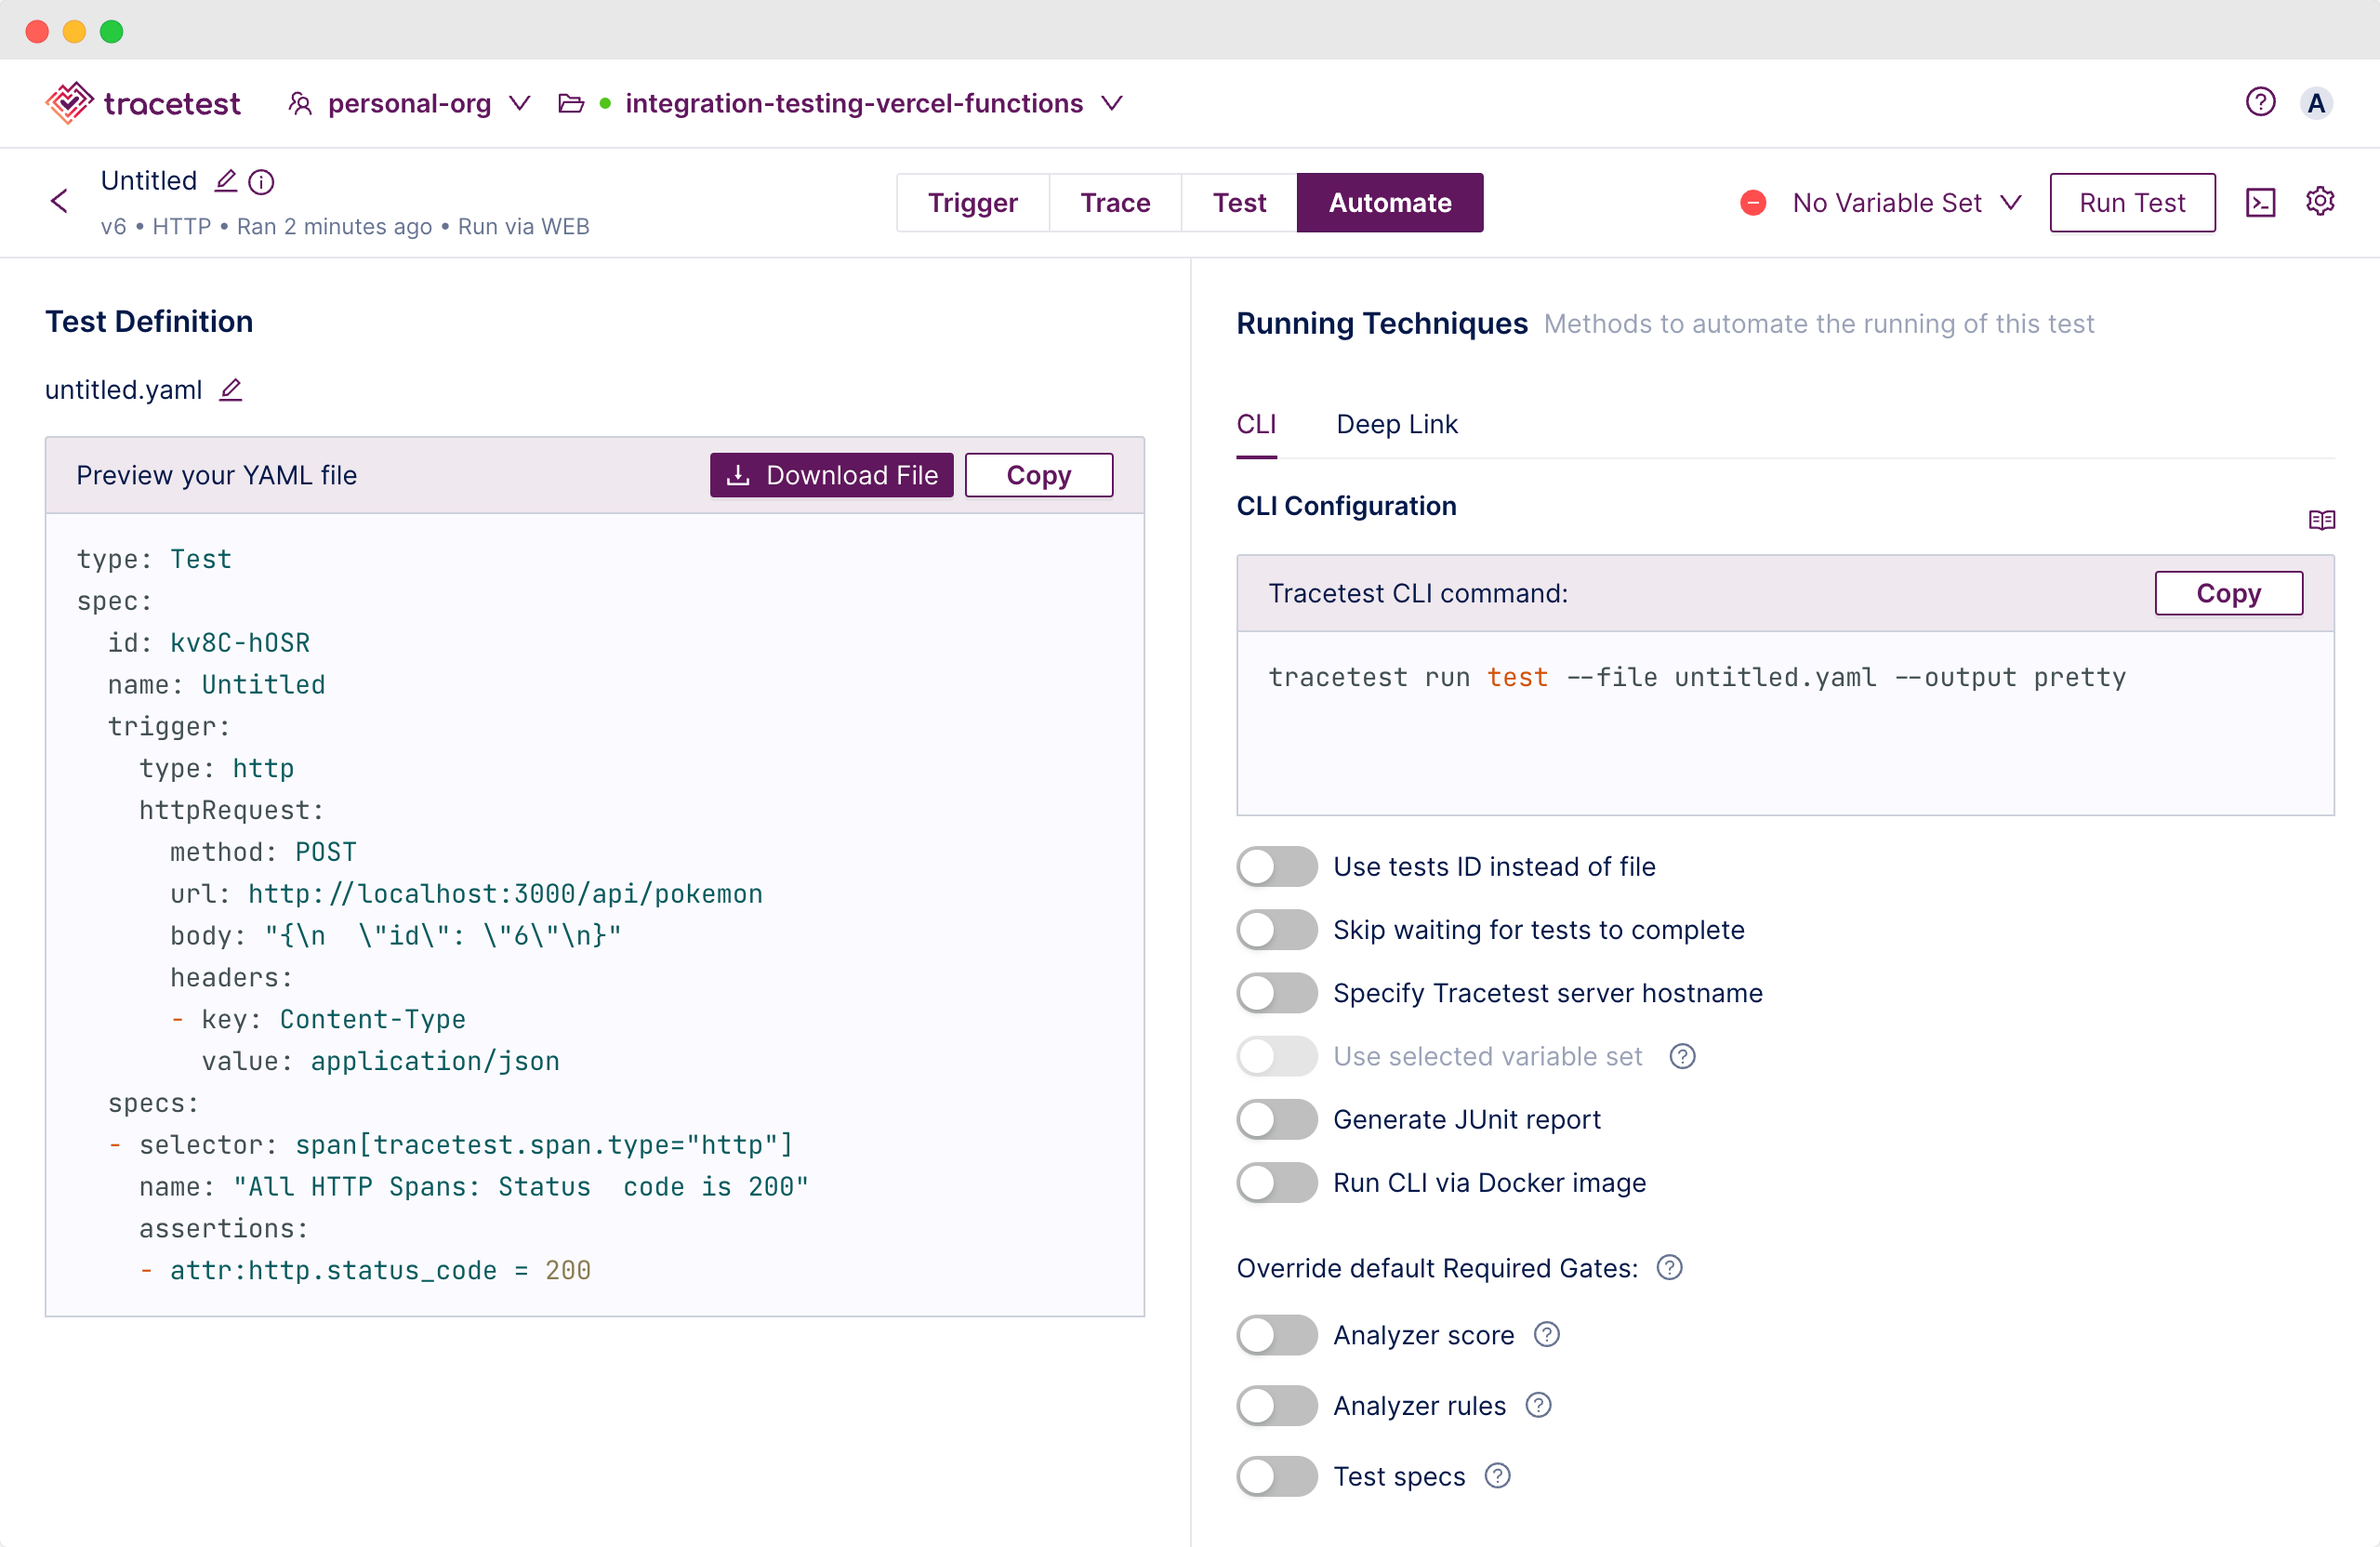
Every test you create can be expressed with YAML. I know you love YAML, quit complaining! 😄
With this test definition you can trigger the same test via the CLI either locally or in any CI pipeline of you choice.
To try it locally, create a directory called `test` in the root directory.
Paste this into a file called `api.pokemon.spec.development.yaml`.
```yaml
# api.pokemon.spec.development.yaml
type: Test
spec:
id: kv8C-hOSR
name: Test API
trigger:
type: http
httpRequest:
method: POST
url: http://localhost:3000/api/pokemon
body: "{\n \"id\": \"6\"\n}"
headers:
- key: Content-Type
value: application/json
specs:
- selector: span[tracetest.span.type="http"]
name: "All HTTP Spans: Status code is 200"
assertions:
- attr:http.status_code = 200
```
Since you already have the Tracetest CLI installed, running it is as simple as one command.
```bash
tracetest run test -f ./test/api.pokemon.spec.development.yaml --required-gates test-specs --output pretty
[Output]
✔ Test API (https://app.tracetest.io/organizations/ttorg_e66318ba6544b856/environments/ttenv_0e807879e2e38d28/test/-gjd4idIR/run/22/test) - trace id: f2250362ff2f70f8f5be7b2fba74e4b2
✔ All HTTP Spans: Status code is 200
```
What’s cool is you can follow the link and open the particular test in Tracetest and view it once it’s saved in the cloud.
Let’s introduce Docker into the mix and set up a proper CI environment.
Start by creating a `.env.docker` file.
```bash
# OTLP HTTP
OTEL_EXPORTER_OTLP_ENDPOINT="http://tracetest-agent:4318"
# Vercel Postgres
POSTGRES_DATABASE="**********"
POSTGRES_HOST="**********"
POSTGRES_PASSWORD="**********"
POSTGRES_PRISMA_URL="**********"
POSTGRES_URL="**********"
POSTGRES_URL_NON_POOLING="**********"
POSTGRES_USER="**********"
```
This will make sure we set up the trace exporter endpoint to send traces to Tracetest Agent.
Then, create a `docker-compose.yaml` in the root directory.
```yaml
version: "3"
services:
next-app:
image: foobar/next-app:v1
build:
context: .
dockerfile: ./Dockerfile
env_file:
- .env.docker
restart: always
ports:
- 3000:3000
networks:
- tracetest
tracetest-agent:
image: kubeshop/tracetest-agent:latest
environment:
- TRACETEST_API_KEY=ttagent_<api_key> # Find the Agent API Key here: https://docs.tracetest.io/configuration/agent
ports:
- 4317:4317
- 4318:4318
networks:
- tracetest
integration-tests:
image: foobar/integration-tests:v1
profiles:
- tests
build:
context: ./
dockerfile: ./test/Dockerfile
volumes:
- ./test/:/app/test/
depends_on:
tracetest-agent:
condition: service_started
networks:
- tracetest
networks:
tracetest:
```
Next, create a `Dockerfile` for the Next.js app.
```docker
FROM node:20-alpine AS base
FROM base AS builder
WORKDIR /app
RUN apk add --no-cache g++ make py3-pip
COPY package.json package-lock.json ./
RUN npm i
COPY app ./app
COPY pages ./pages
COPY public ./public
COPY next.config.js .
COPY tsconfig.json .
COPY instrumentation.ts .
COPY instrumentation.node.ts .
RUN npm run build
# Step 2. Production image, copy all the files and run next
FROM base AS runner
WORKDIR /app
# Don't run production as root
RUN addgroup --system --gid 1001 nodejs
RUN adduser --system --uid 1001 nextjs
USER nextjs
COPY --from=builder /app/public ./public
COPY --from=builder --chown=nextjs:nodejs /app/.next/standalone ./
COPY --from=builder --chown=nextjs:nodejs /app/.next/static ./.next/static
CMD ["node", "server.js"]
```
Don’t forget to set the `next.config.js` to include `output: standalone`.
```jsx
/** @type {import('next').NextConfig} */
const nextConfig = {
// ...
output: 'standalone',
}
module.exports = nextConfig
```
Go back to the `test` directory and create a `Dockerfile` in it. This `Dockerfile` is for a container running the integration tests. It will include an installation of the Tracetest CLI and contain a bash script called `run.bash` to run tests.
```docker
FROM alpine
WORKDIR /app
RUN apk --update add bash jq curl
RUN curl -L https://raw.githubusercontent.com/kubeshop/tracetest/main/install-cli.sh | bash
WORKDIR /app/test/
ENTRYPOINT ["/bin/bash", "/app/test/run.bash"]
```
Next, create the `run.bash`.
```bash
#/bin/bash
# Add a Tracetest token here
# https://docs.tracetest.io/concepts/environment-tokens
tracetest configure -t tttoken_<token>
tracetest run test -f ./api.pokemon.spec.docker.yaml --required-gates test-specs --output pretty
# Add more tests here! :D
```
Finally, create a `api.pokemon.spec.docker.yaml` file in the `test` directory.
```yaml
# api.pokemon.spec.docker.yaml
type: Test
spec:
id: p00W82OIR
name: Test API
trigger:
type: http
httpRequest:
method: GET
url: http://next-app:3000/api/pokemon # Note: Using Docker networking!
body: "{\n \"id\": \"6\"\n}"
headers:
- key: Content-Type
value: application/json
specs:
- selector: span[tracetest.span.type="http"]
name: "All HTTP Spans: Status code is 200"
assertions:
- attr:http.status_code = 200
```
Now, go ahead and give it a run!
```bash
docker compose up -d --build
```
And, trigger the integration tests.
```bash
docker compose run integration-tests
[Ouput]
[+] Creating 1/0
✔ Container integration-testing-vercel-functions-tracetest-agent-1 Running 0.0s
SUCCESS Successfully configured Tracetest CLI
✔ Test API (https://app.tracetest.io/organizations/ttorg_e66318ba6544b856/environments/ttenv_82af376d61da80a0/test/p00W82OIR/run/8/test) - trace id: d64ab3a6f52a98141d26679fff3373b6
✔ All HTTP Spans: Status code is 200
```
Running this particular Docker Compose stack in any CI pipeline of choice is a breeze. The only dependencies you need are Docker and Docker Compose. It’s self-contained and standalone. Easily transferrable and runnable in your pipeline of choice.
## Beyond Integration Testing
In conclusion, today you learned a step-by-step approach to developing, troubleshooting, and testing serverless functions using Vercel and Next.js. You started from a boilerplate Next.js project, created a serverless function, and integrated OpenTelemetry for distributed tracing.
Then you added Tracetest for trace-based testing, in both your development workflow and CI pipelines. With these tools at your disposal you can build, test, and optimize serverless functions efficiently for developing robust serverless applications.
> If you get stuck along the tutorial, feel free to check out the example app in the GitHub repo, [here](https://github.com/kubeshop/tracetest/tree/main/examples/integration-testing-vercel-functions).
Stay tuned for the next 2 parts of this series coming soon:
- **Part 2**: I’ll dive into end-to-end testing by integrating Cypress with Tracetest.
- **Part 3**: You’ll learn how to configure production troubleshooting and testing by using observability tools on the Vercel Marketplace.
Would you like to learn more about Tracetest and what it brings to the table? Visit the Tracetest [docs](https://docs.tracetest.io/getting-started/installation) and try it out by [downloading](https://tracetest.io/download) it today!
Also, please feel free to join our [Slack community](https://dub.sh/tracetest-community), give [Tracetest a star on GitHub](https://github.com/kubeshop/tracetest), or schedule a [time to chat 1:1](https://calendly.com/ken-kubeshop/45min).
.jpg)
.avif)
.avif)