Event-driven Kubernetes testing with Testkube and Tracetest
.jpg)

Learn how to set up both scheduled and event-driven trace-based tests in Kubernetes utilizing an integration between two tools - Tracetest and Testkube.
Table of Contents
Get started with Tracetest!
Try Managed Tracetest Today!
We are pleased to announce that Tracetest now works with [Testkube](https://testkube.io/), the Kubernetes-native testing framework. By using a [Testkube executor to build an integration with Tracetest](https://github.com/kubeshop/testkube-executor-tracetest), you can now run event-driven trace-based tests in your Kubernetes cluster!
> _**Note**: Check out this [hands-on Demo example](https://docs.tracetest.io/tools-and-integrations/testkube) of how Tracetest works with Testkube!_
Configuring CI pipelines for running trace-based tests in Kubernetes is tedious work. Especially if you need to trigger tests based on Kubernetes events. Look no further!
Once you’re done reading, you’ll learn how to set up event-driven, trace-based testing in Kubernetes!
## What is Testkube?
[Testkube](https://testkube.io/) is a Kubernetes-native testing framework, [part of the CNCF landscape](https://github.com/kubeshop/testkube). It integrates test orchestration and execution into Kubernetes and your CI/CD/GitOps pipeline. You can automate the execution of your tests, regardless of the testing framework, by using Testkube's executors or creating your own.
By adopting Kubernetes constructs and GitOps, you can perform K8s-native testing. You can use Kubernetes CRDs to manage and store tests, allowing you to validate your applications by executing tests from inside your cluster.
Use any CI/CD framework for any testing scenario. By decoupling them from your CI/CD, you will spend less time integrating different testing tools.
Analyze all your test results in a centralized place. After running your tests, you can view the results in an intuitive UI, regardless of which testing framework you used.
Debug test failures with ease. With Testkube, it's easy to see all the results, logs, and artifacts of your tests in one place.
In addition, Testkube allows you to easily store and download files generated by your tests from your Kubernetes cluster. All files generated from your tests are saved.
## What is Tracetest?
[Tracetest](https://tracetest.io/features) is a trace-based testing tool for building integration and end-to-end tests in minutes using [OpenTelemetry](https://opentelemetry.io/docs/getting-started/) traces. It’s also [part of the CNCF landscape](https://github.com/kubeshop/tracetest).
Tracetest uses your existing distributed traces to power trace-based testing with assertions against your trace data at every point of the request transaction. You only need to point Tracetest to your existing tracing backend, or send traces to Tracetest directly!
Tracetest makes it possible to:
- Define tests and assertions against every single microservice that a trace goes through.
- Work with your existing distributed tracing solution, allowing you to build tests based on your already instrumented system.
- Define multiple transaction triggers, such as a GET against an API endpoint, a GRPC request, etc.
- Define assertions against both the response and trace data, ensuring both your response and the underlying processes worked correctly, quickly, and without errors.
- Save and run the tests manually or via CI build jobs with the Tracetest CLI.
## Tracetest Now Works with Testkube!
Tracetest now works with Testkube, allowing you to unlock Testkube's capacity with Tracetest, and leverage OpenTelemetry instrumentation in your services to run end-to-end and integration testing. It works thanks to the [Testkube Tracetest Executor](https://github.com/kubeshop/testkube-executor-tracetest) — a test executor to run Tracetest tests with Testkube.
### Why is the Tracetest integration with Testkube important?
By integrating with Testkube you can now add Tracetest to the native CI/CD/GitOps pipeline in your Kubernetes cluster. It allows you to run scheduled test runs on set intervals, as well as asynchronous tests triggered by Kubernetes events. All while following the trace-based testing principle and enabling full in-depth assertions against trace data, not just the response.
Combining the ability to create tests with Tracetest with a Kubernetes-native test runner like Testkube enables you to use the native events from the environment of your Kubernetes cluster as test triggers in your CI/CD/GitOps pipelines!
### Why run trace-based tests?
When running integration tests, you have no way of knowing precisely at which point an HTTP transaction goes wrong in a network of microservices! With tracing enabled, Tracetest can run tests with assertions against existing trace data throughout every service in the entire transaction. You can utilize these tests as part of your CI/CD process to ensure system functionality, and to catch regressions.
## Try Tracetest with Testkube
To run trace-based tests with Tracetest and Testkube, make sure you have these four things installed locally before starting.
1. A running Kubernetes cluster, either locally or in the cloud.
2. [`Kubectl` installed.](https://kubernetes.io/docs/tasks/tools/)
3. [`Testkube CLI` installed.](https://docs.testkube.io/articles/install/cli)
4. [`Helm` installed.](https://helm.sh/docs/intro/install/)
This guide will show you how to install these three things in your Kubernetes cluster.
1. [`Tracetest Agent`.](https://docs.tracetest.io/configuration/agent)
2. [`Testkube Agent`.](https://docs.testkube.io/testkube-pro/articles/installing-agent/)
3. [`OpenTelemetry Instrumented Service (Pokeshop)`](https://docs.tracetest.io/live-examples/pokeshop/overview) : In order to generate traces and spans, the service under test must support the basics for [propagation](https://opentelemetry.io/docs/reference/specification/context/api-propagators/) through HTTP requests, and also store traces and spans into a Tracing Backend (Jaeger, Grafana Tempo, OpenSearch, etc) or use the [OpenTelemetry Collector](https://docs.tracetest.io/configuration/overview#using-tracetest-without-a-trace-data-store). If you are using a Tracing Backend, the Tracetest Agent requires network access to it. In case of using the OpenTelemetry Collector, you need to setup your collector to send trace data to the Tracetest Agent.
### Install Tracetest
Start by creating a Tracetest account. Sign up to [`app.tracetest.io`](https://app.tracetest.io/) or follow the [get started](https://docs.tracetest.io/getting-started/installation) docs. Create an [organization](https://docs.tracetest.io/concepts/organizations) and [environment](https://docs.tracetest.io/concepts/environments) and deploy the [Tracetest Agent](https://docs.tracetest.io/configuration/agent) in your cluster. Finally, create an [environment token](https://docs.tracetest.io/concepts/environment-tokens).
```bash
curl https://raw.githubusercontent.com/kubeshop/tracetest/main/k8s/agent/deploy-agent.sh | bash -s -- default <your_tracetest_agent_api_key>
```
The DNS name of the Tracetest Agent service should be:
```bash
tracetest-agent.default.svc.cluster.local
```
### Install the Pokeshop Demo
First clone the GitHub repo.
```bash
git clone https://github.com/kubeshop/pokeshop.git
cd helm-chart
```
Update the `values.yaml`.
```yaml
env:
- name: COLLECTOR_ENDPOINT
value: http://tracetest-agent.default.svc.cluster.local:4317
```
Update Helm and install the chart.
```bash
helm dependency update
helm install -n demo -f values.yaml --create-namespace demo .
```
This will run a HTTP API with the DNS name:
```yaml
demo-pokemon-api.demo.svc.cluster.local
```
### Create a Test in Tracetest
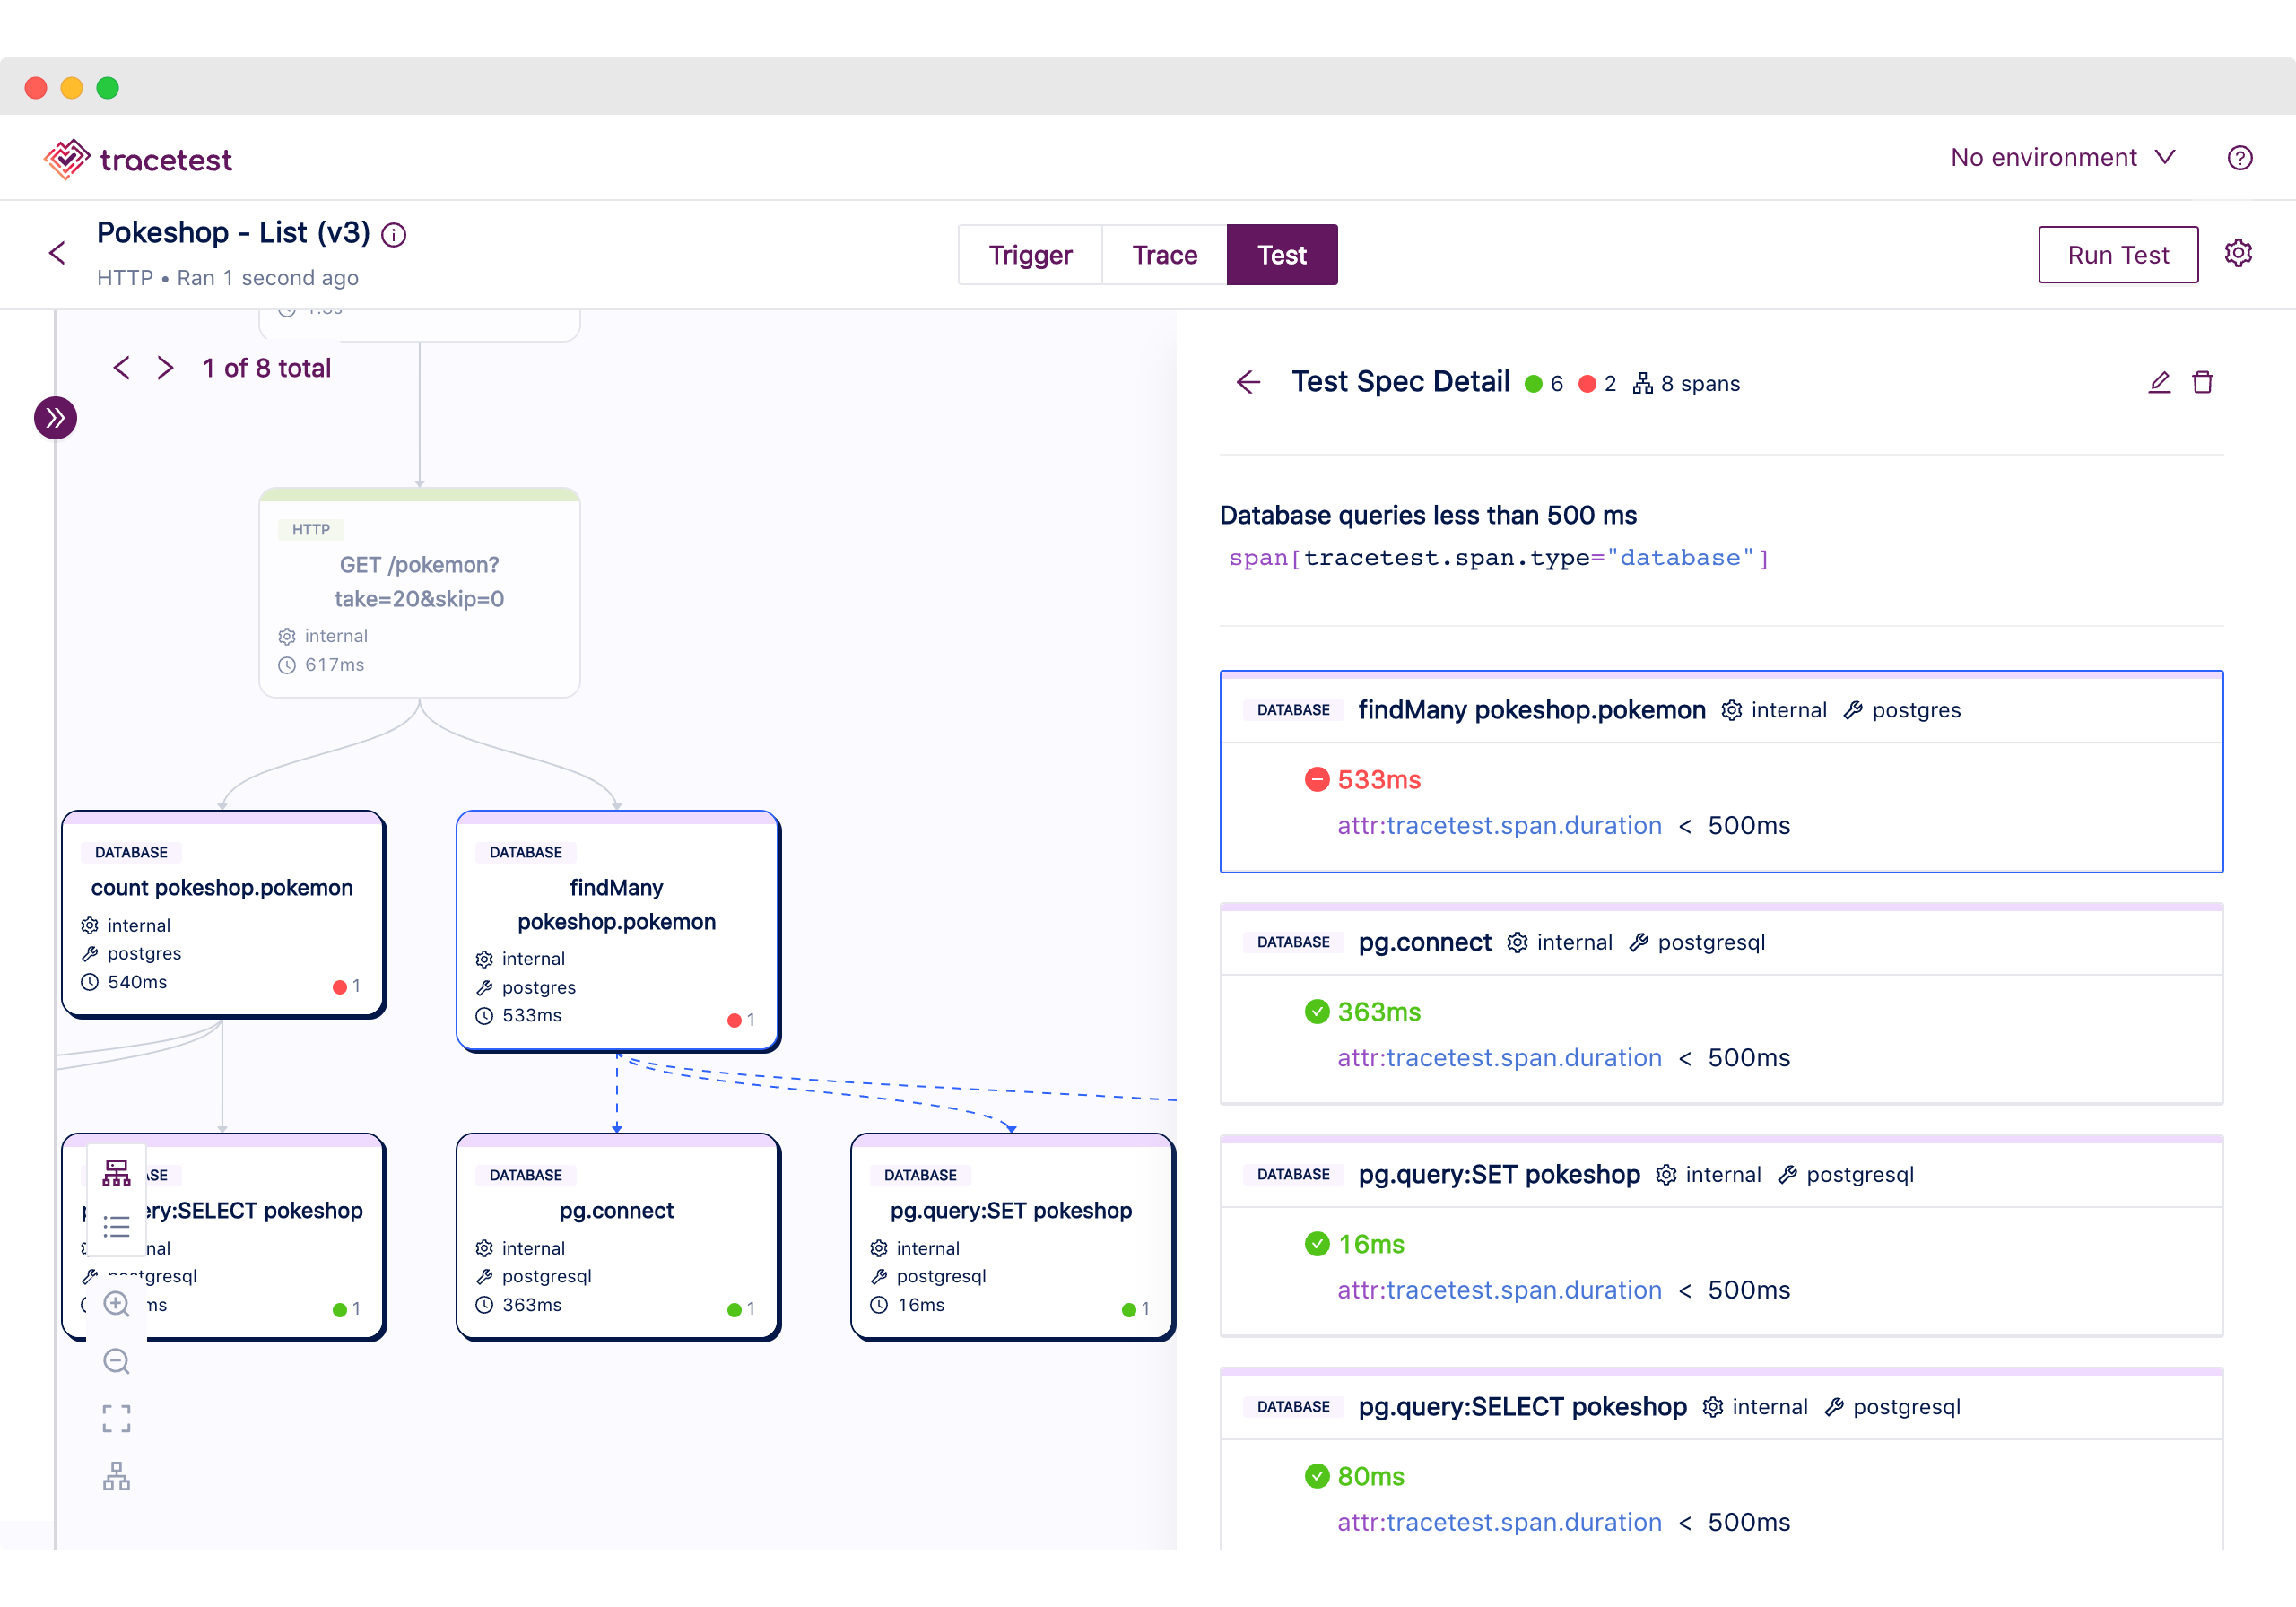
Start by clicking `Create` > `Create New Test` > `HTTP Request` > `Method` is `GET` and `URL` is `http://demo-pokemon-api.demo.svc.cluster.local/pokemon?take=20&skip=0` > `Run`. Name the test `List Pokemon`.

This will trigger the test and display a distributed trace analysis in the `Trace` tab. To add test specs, open the `Test` tab.

Proceed to add a test spec to assert all database queries return within `100 ms`. Click the `Add Test Spec` button.
In the span selector make sure to add this selector:
```css
span[tracetest.span.type="database"]
```
In the assertion field add:
```css
attr:tracetest.span.duration < 100ms
```
Save the test spec and publish the test.

The database spans that are returning in more than `100ms` are labeled in red.

This is an example of a trace-based test that asserts against every single part of an HTTP transaction, including all interactions with the database.
However, Tracetest cannot run this test as part of your CI/CD without integrating it with another tool.
Let's introduce how Testkube makes it possible.
### Install Testkube
Start by creating a Testkube account. Sign up to [`app.testkube.io`](https://app.testkube.io/) or follow the [Getting Started](https://docs.testkube.io/articles/getting-started) docs. Next, create a Testkube environment and deploy the [Testkube Agent](https://docs.testkube.io/testkube-pro/articles/installing-agent) in your cluster.
Explore the Testkube dashboard to see your environment and verify the Testkube Agent is running.

### Connect your Testkube CLI to your Testkube Environment
To use the Testkube CLI with your Testkube account you need to set the CLI Context. For that you need a [Testkube Pro token](https://docs.testkube.io/testkube-pro/articles/organization-management/#api-tokens). Go to the environment settings and click `Manage your API Tokens here` to create a new token.

The token will have this format:
```bash
tkcapi_0042f38a14xxxxxxxxxxxxxxxxxxxx
```
When the token is created, you are ready to change the Testkube CLI context. Back on the settings page you can copy the Testkube CLI context command.

```bash
testkube set context -c cloud -e <testkube-environment-id> -o <testkube-organization-id> -k <testkube-token>
```
For more information see the Testkube [Connecting from the CLI](https://docs.testkube.io/testkube-pro/articles/managing-cli-context) docs.
### Trigger a Trace-based Test in Tracetest with Testkube
Back in your Tracetest account, click the `Automate` tab. Here you can see a YAML definition for the test.

Save this into a file called `test.yaml`.
```yaml
# test.yaml
type: Test
spec:
id: NjN0J5LSg
name: Untitled
trigger:
type: http
httpRequest:
method: GET
url: http://demo-pokemon-api.demo.svc.cluster.local/pokemon?take=20&skip=0
headers:
- key: Content-Type
value: application/json
specs:
- selector: span[tracetest.span.type="database"]
name: "All Database Spans: Processing time is less than 100ms"
assertions:
- attr:tracetest.span.duration < 100ms
```
Execute the following command to create the test executor object in Testkube. Do not forget to provide the path to your Tracetest definition file using the `--file` argument, and also the following variables:
- `TRACETEST_TOKEN`: your [environment token](https://docs.tracetest.io/concepts/environment-tokens).
- `TRACETEST_ENVIRONMENT`: your [environment id](https://docs.tracetest.io/concepts/environments).
- `TRACETEST_ORGANIZATION`: your [organization id](https://docs.tracetest.io/concepts/organizations).
```bash
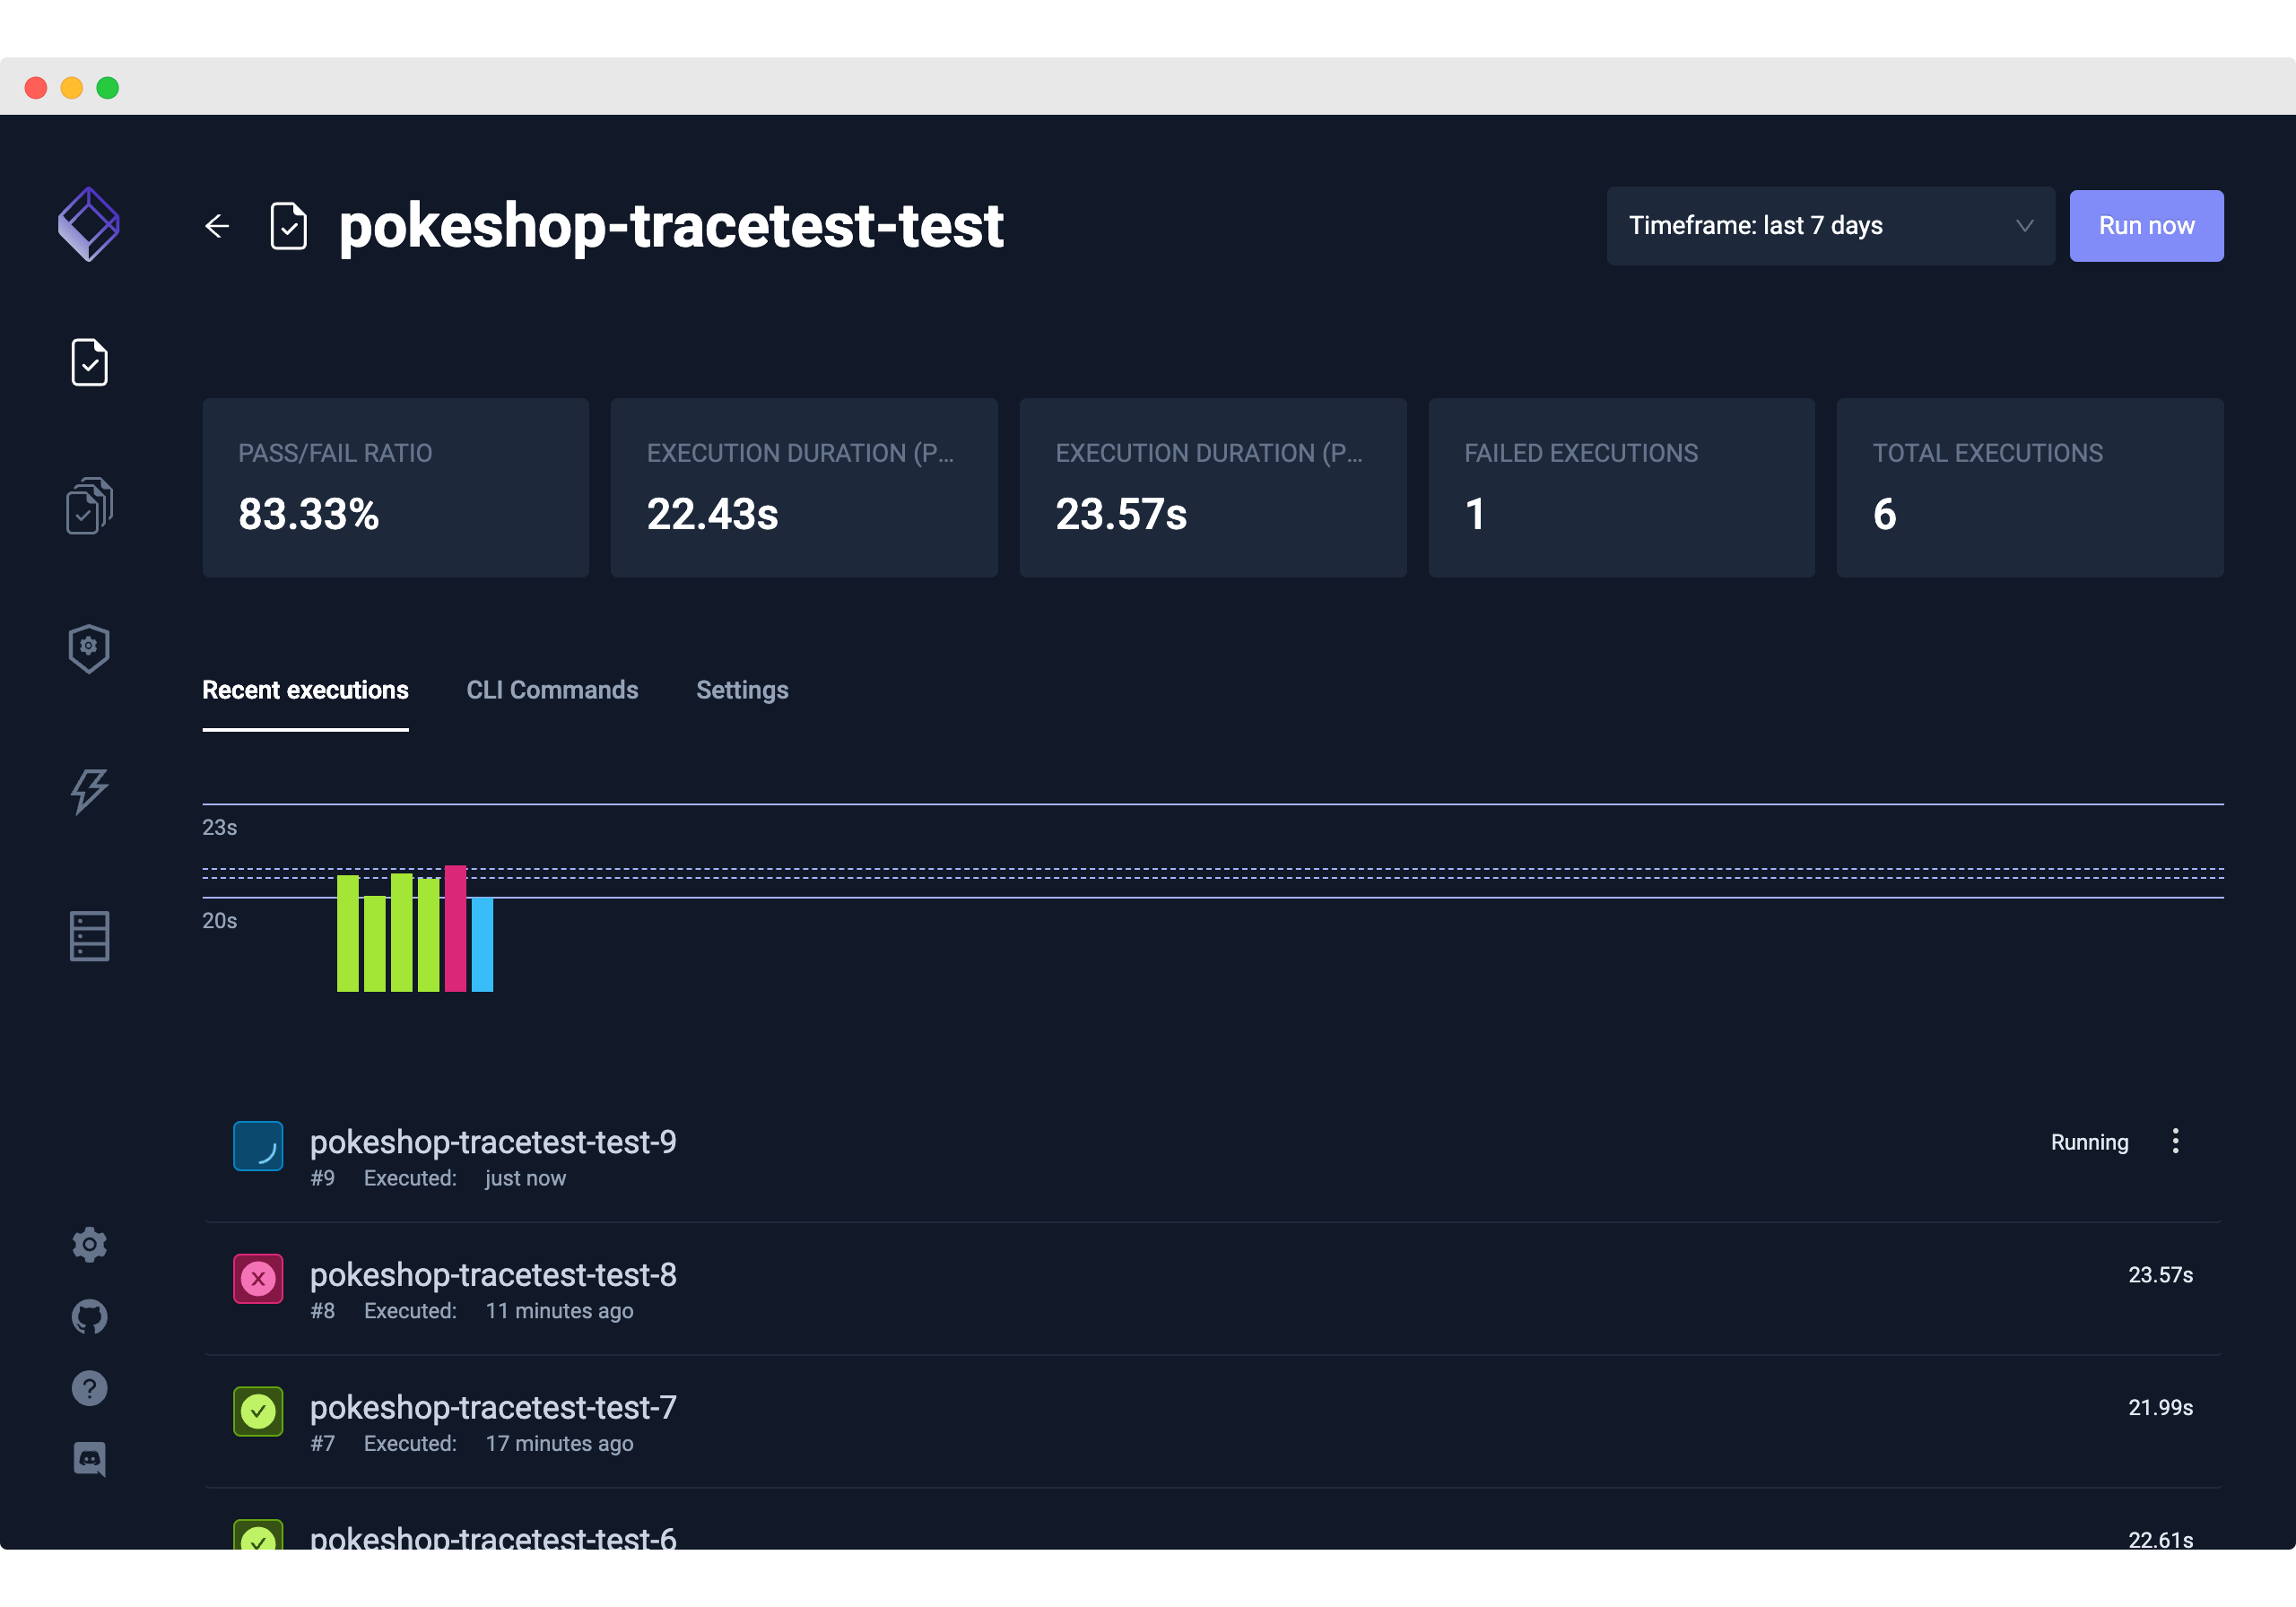
kubectl testkube create test --file your/file/location/test.yaml --type "tracetest/test" --name pokeshop-tracetest-test --variable TRACETEST_TOKEN=<tracetest-token> --variable TRACETEST_ENVIRONMENT=<tracetest-environment-id> --variable TRACETEST_ORGANIZATION=<tracetest-organization-id>
```
The expected output is:
```bash
Test created testkube / pokeshop-tracetest-test 🥇
```
Opening the Testkube Dashboard will show the test is created successfully.

Finally, to run the test, execute the following command, or run the test from the Testkube Dashboard.
```bash
kubectl testkube run test --watch pokeshop-tracetest-test
```
Here's what the Testkube CLI will look like if the test fails.
```bash
[Output]
Type: tracetest/test
Name: pokeshop-tracetest-test
Execution ID: 663b1f7f4872881b2cb6991d
Execution name: pokeshop-tracetest-test-1
Execution number: 1
Status: running
Start time: 2024-05-08 06:45:19.51587322 +0000 UTC
End time: 0001-01-01 00:00:00 +0000 UTC
Duration:
Variables: 3
- TRACETEST_ENVIRONMENT = ***
- TRACETEST_ORGANIZATION = ***
- TRACETEST_TOKEN = ***
Getting logs from test job 663b1f7f4872881b2cb6991d
......................................................................................................
Test execution failed:
⨯ ✘ RunGroup: #GwkxShYIR (https://app.tracetest.io/organizations/ttorg_e66318ba6544b856/environments/ttenv_7150c86f59baa6c6/run/GwkxShYIR)
Summary: 0 passed, 1 failed, 0 pending
✘ Untitled (https://app.tracetest.io/organizations/ttorg_e66318ba6544b856/environments/ttenv_7150c86f59baa6c6/test/NjN0J5LSg/run/3/test) - trace id: 648f7b29f946e696c70e6cfdeb39162c
✘ All Database Spans: Processing time is less than 100ms
✘ #a5adc2c60ff97b45
✘ attr:tracetest.span.duration < 100ms (216ms) (https://app.tracetest.io/organizations/ttorg_e66318ba6544b856/environments/ttenv_7150c86f59baa6c6/test/NjN0J5LSg/run/3/test?selectedAssertion=0&selectedSpan=a5adc2c60ff97b45)
✘ #ce2d085508edc6a3
✘ attr:tracetest.span.duration < 100ms (209ms) (https://app.tracetest.io/organizations/ttorg_e66318ba6544b856/environments/ttenv_7150c86f59baa6c6/test/NjN0J5LSg/run/3/test?selectedAssertion=0&selectedSpan=ce2d085508edc6a3)
✘ Required gates
✘ test-specs
Test URI: /tests/pokeshop-tracetest-test
Test Execution URI: /tests/pokeshop-tracetest-test/executions/663b1f7f4872881b2cb6991d
Watch test execution until complete:
$ kubectl testkube watch execution pokeshop-tracetest-test-1
Use following command to get test execution details:
$ kubectl testkube get execution pokeshop-tracetest-test-1
executions contain failed on errors (error: ✘ RunGroup: #GwkxShYIR (https://app.tracetest.io/organizations/ttorg_e66318ba6544b856/environments/ttenv_7150c86f59baa6c6/run/GwkxShYIR)
Summary: 0 passed, 1 failed, 0 pending
✘ Untitled (https://app.tracetest.io/organizations/ttorg_e66318ba6544b856/environments/ttenv_7150c86f59baa6c6/test/NjN0J5LSg/run/3/test) - trace id: 648f7b29f946e696c70e6cfdeb39162c
✘ All Database Spans: Processing time is less than 100ms
✘ #a5adc2c60ff97b45
✘ attr:tracetest.span.duration < 100ms (216ms) (https://app.tracetest.io/organizations/ttorg_e66318ba6544b856/environments/ttenv_7150c86f59baa6c6/test/NjN0J5LSg/run/3/test?selectedAssertion=0&selectedSpan=a5adc2c60ff97b45)
✘ #ce2d085508edc6a3
✘ attr:tracetest.span.duration < 100ms (209ms) (https://app.tracetest.io/organizations/ttorg_e66318ba6544b856/environments/ttenv_7150c86f59baa6c6/test/NjN0J5LSg/run/3/test?selectedAssertion=0&selectedSpan=ce2d085508edc6a3)
✘ Required gates
✘ test-specs
)
```
And, here's the Testkube Dashboard.

If the test passes, it'll look like this in the terminal.
```bash
[Output]
Type: tracetest/test
Name: pokeshop-tracetest-test
Execution ID: 663b20af4872881b2cb6991e
Execution name: pokeshop-tracetest-test-2
Execution number: 2
Status: running
Start time: 2024-05-08 06:50:23.945150972 +0000 UTC
End time: 0001-01-01 00:00:00 +0000 UTC
Duration:
Variables: 3
- TRACETEST_ENVIRONMENT = ***
- TRACETEST_ORGANIZATION = ***
- TRACETEST_TOKEN = ***
***
✅ Execution succeeded
🌍 Using arguments to run test: [run test --file /data/test-content --output pretty]
🚀 Test run command tracetest run test --file /data/test-content --output pretty
🔬 Executing in directory :
$ tracetest run test --file /data/test-content --output pretty
✔ RunGroup: #pjUsShYSg (https://app.tracetest.io/organizations/ttorg_e66318ba6544b856/environments/ttenv_7150c86f59baa6c6/run/pjUsShYSg)
Summary: 1 passed, 0 failed, 0 pending
✔ Untitled (https://app.tracetest.io/organizations/ttorg_e66318ba6544b856/environments/ttenv_7150c86f59baa6c6/test/NjN0J5LSg/run/4/test) - trace id: f3479fd67f3e579d379bb30b019aea73
✔ All Database Spans: Processing time is less than 500ms
✅ Execution succeeded
test execution finished [663b20af4872881b2cb6991e]
Execution completed ✔ RunGroup: #pjUsShYSg (https://app.tracetest.io/organizations/ttorg_e66318ba6544b856/environments/ttenv_7150c86f59baa6c6/run/pjUsShYSg)
Summary: 1 passed, 0 failed, 0 pending
✔ Untitled (https://app.tracetest.io/organizations/ttorg_e66318ba6544b856/environments/ttenv_7150c86f59baa6c6/test/NjN0J5LSg/run/4/test) - trace id: f3479fd67f3e579d379bb30b019aea73
✔ All Database Spans: Processing time is less than 500ms
Test execution completed with success in 16.298s 🥇
Test URI: /tests/pokeshop-tracetest-test
Test Execution URI: /tests/pokeshop-tracetest-test/executions/663b20af4872881b2cb6991e
Watch test execution until complete:
$ kubectl testkube watch execution pokeshop-tracetest-test-2
Use following command to get test execution details:
$ kubectl testkube get execution pokeshop-tracetest-test-2
```
And, like this in Testkube Dashboard.

## Running Scheduled Trace-based Tests
Integrating with Testkube enables you to add Tracetest to the native CI/CD/GitOps pipeline in your Kubernetes cluster. This allows for scheduled test runs on set intervals, also called [synthetic tests](https://en.wikipedia.org/wiki/Synthetic_monitoring). Now with trace-based testing available, full, in-depth assertions against trace data is available, not just a response.
By using Testkube's [scheduling](https://docs.testkube.io/concepts/scheduling), you can trigger the same test you defined above every minute. It works by providing a CRON schedule. You’ll add an additional `--schedule="*/1 * * * *"` flag.
```bash
kubectl testkube create test --file your/file/location/test.yaml --type "tracetest/test" --name pokeshop-tracetest-scheduled-test --schedule="*/1 * * * *" --variable TRACETEST_TOKEN=<tracetest-token> --variable TRACETEST_ENVIRONMENT=<tracetest-environment-id> --variable TRACETEST_ORGANIZATION=<tracetest-organization-id>
```
The expected output is:
```bash
[Output]
Test created testkube / pokeshop-tracetest-scheduled-test 🥇
```
In your Testkube Dashboard, you'll see this test run continuously and get triggered every minute.

## Running Event-driven Trace-based Tests
Event-based testing in Kubernetes is a critical aspect of ensuring the reliability and performance of microservices in Kubernetes. This testing approach involves observing events that are emitted by various components and services in the system to trigger tests against the system’s components under various conditions.
The main benefit of event-based testing is that it provides a more comprehensive testing approach than traditional unit, integration, and functional testing. With event-based testing, testers can simulate real-world scenarios and test the system's response to different types of input, load, and failure, while also verifying the system's ability to recover from such events.
To effectively perform event-based testing in Kubernetes, you’ll use Testkube as an event monitoring and management system that can capture and analyze the events generated by the system.
This sample will trigger a test when a `deployment` is scaled.
You’ve configured the Tracetest assertions to make sure all database queries finish within `100ms`. Now, define a trigger that will run the trace-based test every time the deployment scales to ensure each replica satisfies the defined assertions.
Define a Test Trigger for the Deployment resource to run the trace-based test when a `deployment-scale-update` event occurs:
```yaml
# testkube-trigger.yaml
apiVersion: tests.testkube.io/v1
kind: TestTrigger
metadata:
name: deployment-scale-update-trigger
namespace: testkube
spec:
resource: deployment
resourceSelector:
labelSelector:
matchLabels:
app.kubernetes.io/instance: demo
event: deployment-scale-update
action: run
execution: test
testSelector:
name: pokeshop-tracetest-test
namespace: testkube
```
Save the file, name it `testkube-trigger.yaml` and apply it.
```bash
kubectl apply -f ./testkube-trigger.yaml
```
This will configure a trigger to run the test every time the demo app deployment is scaled. Try it yourself by running:
```bash
kubectl scale deployment demo-pokemon-api --replicas=4 -n demo
```

Moving back to the Testkube Dashboard you’ll see the test was triggered by the event.

## Running Tests in a Test Suite
Running singular, isolated, event-driven tests has its own important use cases and values. But, in the wild, you’ll more often rely on chaining multiple tests together into a test suite.
Both Testkube and Tracetest support such logical constructs. Both tools call them [test suites](https://docs.tracetest.io/concepts/test-suites).
### Tracetest Test Suites
Running end-to-end tests is not simple. It requires configuration before the actual test can be run, such as creating a new user or removing all items from a cart. Therefore, it's important to be able to execute multiple steps as part of your transaction. Tracetest introduces the concept of **Test Suites** to achieve this goal.
A test suite is a group of steps executed in a defined order, where each step is a test that can access information exported by previous tests.
The main benefit of using test suites is the ability to chain tests together and use values obtained in one test as input for a subsequent test.
When a test is executed within a test suite, if it generates any outputs, the test outputs will be injected into the test suite context environment. After the outputs are injected, all subsequent tests to be run within the transaction will be able to reference those values with `env:VARIABLE_NAME`.
> _**Note**: Outputs generated by steps don't modify the selected environment. It only modifies the test suite run context object._
Tracetest allows tests to declare `outputs`. An output is a value that is extracted from a trace by providing a [selector](https://docs.tracetest.io/concepts/transactions/selectors) to choose which spans to use to get the information from, and an [expression](https://docs.tracetest.io/concepts/transactions/expressions) to get the value from the selected spans.
### Run a Tracetest Test Suite
Start by adding a new test called `Add Pokemon` by clicking `Create` > `Create New Test` > `HTTP Request` > `Next` > Method is `POST` and `URL` is `http://demo-pokemon-api.demo.svc.cluster.local/pokemon` > `Run`.
Populate the request body with this JSON.
```json
{
"name": "meowth",
"type":"normal",
"imageUrl":"https://assets.pokemon.com/assets/cms2/img/pokedex/full/052.png",
"isFeatured": true
}
```
Navigate to `Test` > `Outputs` and click `Add Test Output`. Select the `create pokeshop.pokemon` database span.
```css
span[tracetest.span.type="database" name="create pokeshop.pokemon" db.system="postgres" db.name="pokeshop" db.user="ashketchum" db.operation="create" db.sql.table="pokemon"]
```
The attribute to export the Pokemon’s `id` as a value is:
```bash
attr:db.result | json_path 'id'
```
Finally give it a name:
```bash
add_pokemon_db_result_id
```

Save the test output and publish the variables. Here’s what the YAML definition of this test looks like:
```yaml
type: Test
spec:
id: 2tN6VJLIR
name: Untitled
trigger:
type: http
httpRequest:
method: POST
url: http://demo-pokemon-api.demo.svc.cluster.local/pokemon
body: "{\n \"name\": \"meowth\",\n \"type\":\"normal\",\n \"imageUrl\":\"https://assets.pokemon.com/assets/cms2/img/pokedex/full/052.png\",\n \"isFeatured\": true\n}"
headers:
- key: Content-Type
value: application/json
outputs:
- name: add_pokemon_db_result_id
selector: span[tracetest.span.type="database" name="create pokeshop.pokemon" db.system="postgres" db.name="pokeshop" db.user="ashketchum" db.operation="create" db.sql.table="pokemon"]
value: attr:db.result | json_path 'id'
```
Now you can edit the `List Pokemon` test to use this variable in an assertion.
Select the HTTP span.
```bash
span[tracetest.span.type="http" name="GET /pokemon?take=20&skip=0" http.method="GET"]
```
Set this assertion.
```bash
attr:http.response.body contains '${env:add_pokemon_db_result_id}'
```
Finally, give the assertion a name.

Save the test spec and click publish.
Now you can add a test suite and see how it works together. Click `Test Suites` > `Create` > Give it a name > `Next`.
Once created, add the `Add` and `List` tests to the list. Click `Create & Run`.

You’ll see the defined variables on the right, below the execution steps. The `List` test is passing as it is correctly asserting that the result of the `List` request contains the exported variable from the `Add` test.

On the `Automate` tab, copy the test suite definition file and save it as a file named `test-suite.yaml`.
```yaml
# test-suite.yaml
type: TestSuite
spec:
id: 68Vjr1LIR
name: Add+List Pokemon
description: ""
steps:
- 2tN6VJLIR
- NjN0J5LSg
```
Now you can create a test in Testkube to trigger the test suite.
```bash
kubectl testkube create test --file your/file/location/test-suite.yaml --type "tracetest/test" --name pokeshop-tracetest-test-suite --variable TRACETEST_TOKEN=<tracetest-token> --variable TRACETEST_ENVIRONMENT=<tracetest-environment-id> --variable TRACETEST_ORGANIZATION=<tracetest-organization-id>
```
The output should be:
```bash
[Output]
Test created testkube / pokeshop-tracetest-test-suite 🥇
```
Trigger the test suite in the same way as you did the test.
```bash
kubectl testkube run test --watch pokeshop-tracetest-test-suite
```
And, here’s the output:
```bash
[Output]
Type: tracetest/test
Name: pokeshop-tracetest-test-suite
Execution ID: 663d0153f643603e99fcbcf0
Execution name: pokeshop-tracetest-test-suite-1
Execution number: 1
Status: running
Start time: 2024-05-09 17:01:08.178692594 +0000 UTC
End time: 0001-01-01 00:00:00 +0000 UTC
Duration:
Variables: 3
- TRACETEST_TOKEN = ***
- TRACETEST_ENVIRONMENT = ***
- TRACETEST_ORGANIZATION = ***
[...]
✅ Execution succeeded
test execution finished [663d0153f643603e99fcbcf0]
Execution completed ✔ RunGroup: #okQmCJLIR (https://app.tracetest.io/organizations/ttorg_e66318ba6544b856/environments/ttenv_7150c86f59baa6c6/run/okQmCJLIR)
Summary: 3 passed, 0 failed, 0 pending
✔ Add+List Pokemon (https://app.tracetest.io/organizations/ttorg_e66318ba6544b856/environments/ttenv_7150c86f59baa6c6/testsuite/68Vjr1LIR/run/2)
✔ Add Pokemon (https://app.tracetest.io/organizations/ttorg_e66318ba6544b856/environments/ttenv_7150c86f59baa6c6/test/2tN6VJLIR/run/8/test) - trace id: 00a1c1a27e3e53c0d188ec272ba584ae
✔ List Pokemon (https://app.tracetest.io/organizations/ttorg_e66318ba6544b856/environments/ttenv_7150c86f59baa6c6/test/NjN0J5LSg/run/165/test) - trace id: a44e7f28bda4e7c42a3e614a159d4635
✔ All Database Spans: Processing time is less than 500ms
✔ Validate the id from the ADD is present in the LIST.
Test execution completed with success in 22.517s 🥇
Test URI: /tests/pokeshop-tracetest-test-suite
Test Execution URI: /tests/pokeshop-tracetest-test-suite/executions/663d0153f643603e99fcbcf0
Watch test execution until complete:
$ kubectl testkube watch execution pokeshop-tracetest-test-suite-1
Use following command to get test execution details:
$ kubectl testkube get execution pokeshop-tracetest-test-suite-1
```

### Run a Testkube Test Suite
[Test suites](https://docs.testkube.io/concepts/test-suites/testsuites-creating) in Testkube are a way to orchestrate different test steps and entirely different testing frameworks to run in a suite. Your front-end team uses Cypress for browser tests, while the back-end team uses Tracetest. You may also have Postman collections testing various parts of your apps.
With test suites, you can orchestrate different test steps and combine them to run in a sequence. Even if each team runs its tests on its own, they can ultimately be combined and triggered from one location by a test suite.
## Learn More About Kubernetes Testing
Combined, Testkube and Tracetest provide a comprehensive testing solution for Kubernetes applications. By utilizing Testkube triggers, you can automatically initiate trace-based tests with Tracetest, ensuring that your services are adhering to defined SLAs.
Tracetest provides detailed distributed trace data, allowing you to gain insight into the behavior of your application at a granular level, and ultimately create assertions against this data to write bullet-proof tests.
Would you like to learn more about Tracetest and what it brings to the table? Check the [docs](https://docs.tracetest.io/examples-tutorials/recipes/running-tracetest-with-lightstep/) and try it out today by [signing up for free](https://app.tracetest.io/)!
To explore more options Testkube gives you, check out the documentation on [test triggers](https://docs.testkube.io/concepts/triggers). They enable you to trigger tests based on Kubernetes events. Want to learn more about Testkube? [Read more here](https://testkube.io/get-started).
Also, please feel free to join our [Discord community](https://discord.com/channels/884464549347074049/963470167327772703), give [Tracetest a star on GitHub](https://github.com/kubeshop/tracetest), or schedule a [time to chat 1:1](http://calendly.com/ken-kubeshop/otel-user-interview-w-tracetest).
Related Content
.jpg)
.jpg)
.jpg)
Stay in the Loop

Join the Tracetest Community in one of these channels:


— a first of its kind open source accelerator focused on the cloud native ecosystem


