
Crafting Observable Cloudflare Workers with OpenTelemetry
.avif)

Simplify troubleshooting in your Cloudflare Workers with OpenTelemetry and Tracetest! Get end-to-end visibility in your Serverless architecture by using the power of distributed tracing!
Table of Contents
Serverless architectural patterns struggle with visibility. They’re difficult to troubleshoot in production and complex to test across development and staging environments including integration tests.
Today you’ll learn how to gain insight into your development lifecycle and test critical flows while building production-ready [Cloudflare Workers](https://workers.cloudflare.com/) that interact with a [D1 database](https://www.cloudflare.com/developer-platform/d1/).
This includes adding:
1. [**Distributed tracing with OpenTelemetry**](https://opentelemetry.io/) for troubleshooting.
2. [**Trace-based testing with Tracetest**](https://tracetest.io/features) for integration testing and testing staging/production deployments.
Why? So you can:
- **Test what you usually can’t!** Apply assertions against the Cloudflare Worker runtime, external API calls, and a serverless database.
- **Troubleshoot failed tests, with traces.** Use OpenTelemetry-based distributed traces.
- **Stop the blame game.** With a view of the entire flow, from upstream API to database, quickly determine the cause of the failure.
- **Gain better observability!** As tracing data from instrumentation is used to build trace-based tests, developers will want to add more insightful and meaningful instrumentation.
Once you’re done with the tutorial, you’ll have configured **testing Cloudflare Workers in live staging and production deployments**.
> *If you’re eager to start, [clone the example from GitHub](https://github.com/kubeshop/tracetest/tree/main/examples/testing-cloudflare-workers) and get a [Tracetest Agent public URL](https://docs.tracetest.io/concepts/cloud-agent) and [Token](https://docs.tracetest.io/concepts/environment-tokens) after signing up at [`app.tracetest.io`](https://app.tracetest.io). Sign up for a Cloudflare account on* [`dash.cloudflare.com/`](https://dash.cloudflare.com/) *. Update the values in `wrangler.toml`, deploy your Cloudflare Worker, and run tests against deployed code! [Read the quick start instructions, here](https://docs.tracetest.io/examples-tutorials/recipes/testing-cloudflare-workers-with-opentelemetry-tracetest).*
```bash
git clone https://github.com/kubeshop/tracetest.git
cd tracetest/examples/testing-cloudflare-workers
# Install modules and npx if you haven't already
npm i npx -g
npm i
# Sign in to Cloudflare
npx wrangler login
# Set the <TRACETEST_URL> in wrangler.toml
npx wrangler d1 create testing-cloudflare-workers
# Set the <YOUR_DATABASE_ID> from the command above in wrangler.toml
npx wrangler d1 execute testing-cloudflare-workers --file=./schema.sql
# Deploy Cloudflare Worker
npm run deploy
# Run tests!
tracetest run test -f ./test/test-api.prod.yaml
```
## What are Cloudflare Workers?
[Cloudflare Workers](https://workers.cloudflare.com/) are Cloudflare’s answer to AWS Lambda. They let you deploy serverless code instantly across the globe and are blazing fast. You write code and deploy it to cloud environments without the need for traditional infrastructure.
## Install Cloudflare Dev Tools and Create the Boilerplate
There are three prerequisites to get started. You might’ve figured already but let me outline them below:
1. Sign up for a Cloudflare account.
2. Install `npm` .
3. Install Node.js.
You create a new Worker project with the [`create-cloudflare-cli`](https://www.npmjs.com/package/create-cloudflare) also called C3. It’s a command-line tool designed to help you setup and deploy Workers to Cloudflare.
Open a terminal window and run C3 to create your Worker project.
```bash
npm create cloudflare@latest
```
This will prompt you to install C3, and lead you through setup. Let’s set up a basic worker.
1. Name your new Worker directory `pokemon-api` because I’ll demo how to fetch Pokemon from an external API.
2. Select `"Hello World" script` as the type of application you want to create.
3. Answer `yes` to using TypeScript.
You will be asked if you would like to deploy the project to Cloudflare. Go ahead and select `yes`.
You will be asked to authenticate, if not logged in already, and your project will be deployed to the Cloudflare global network.
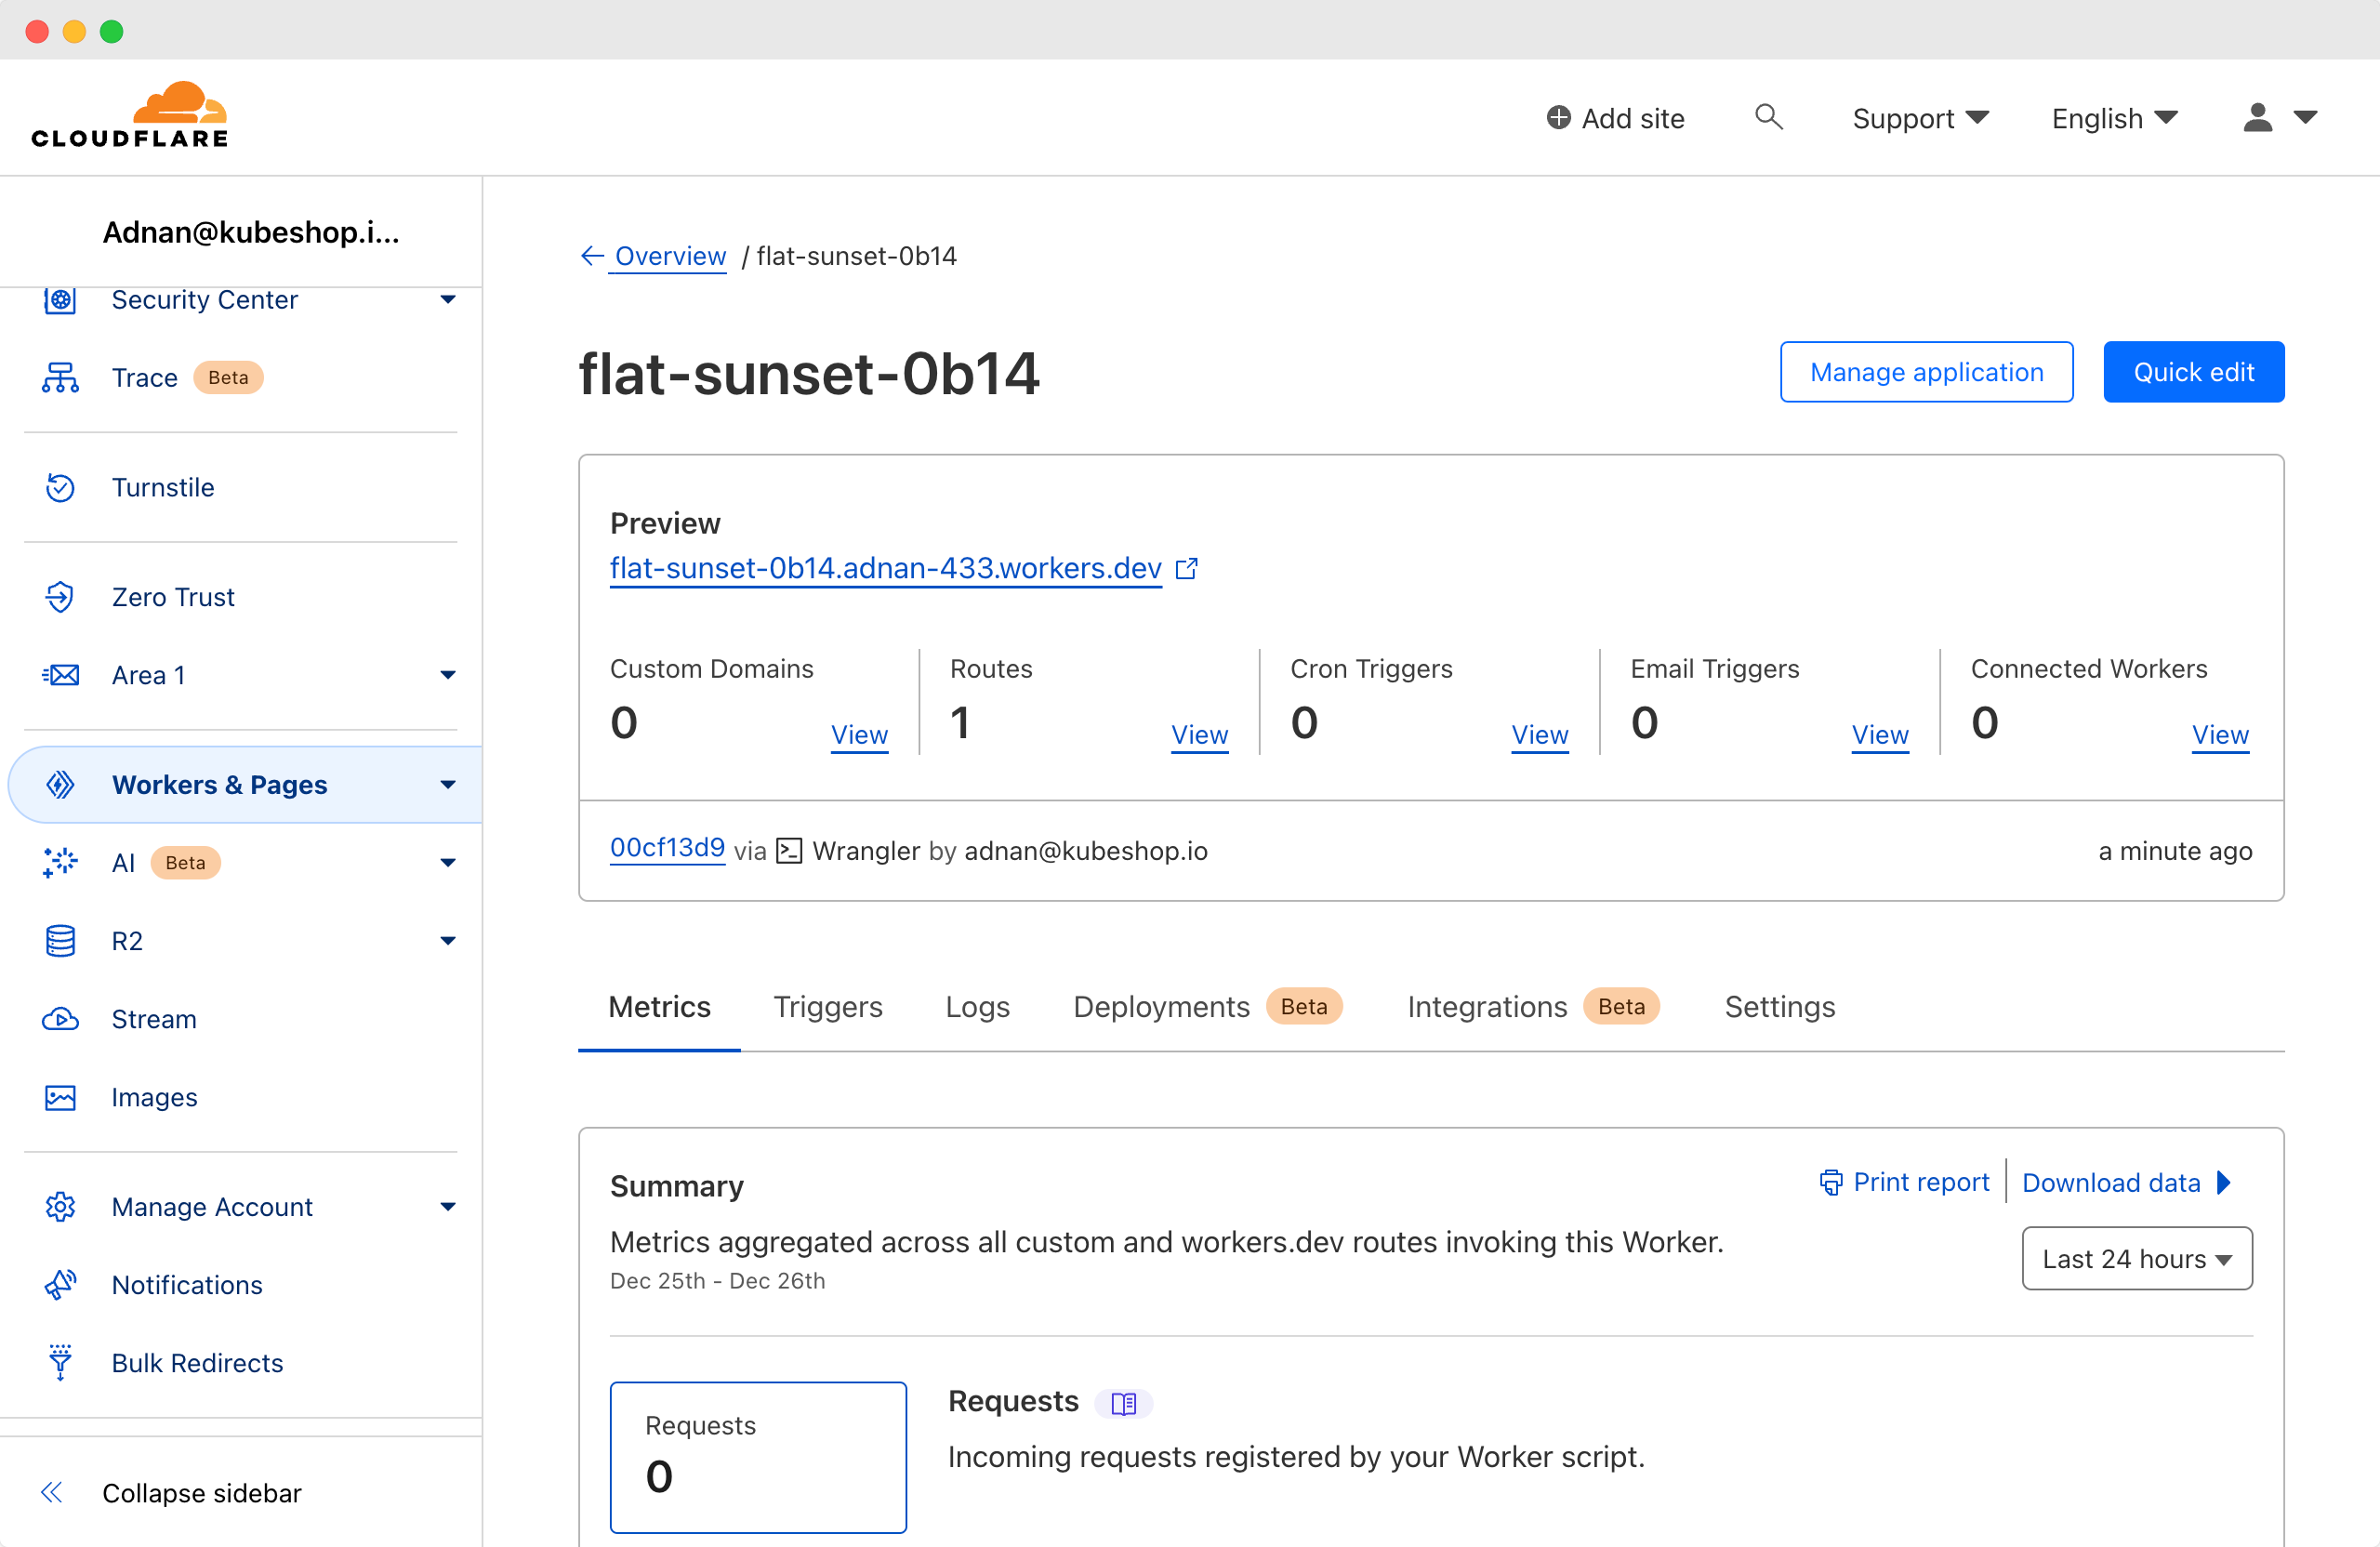
Open your Cloudflare Dashboard and see that indeed you have deployed the `Hello World` Worker.
In your project directory, C3 has generated the following:
1. `wrangler.toml`: Your [Wrangler](https://developers.cloudflare.com/workers/wrangler/configuration/#sample-wranglertoml-configuration) configuration file. The Workers command-line interface, [Wrangler](https://developers.cloudflare.com/workers/wrangler/install-and-update/), allows you to [create](https://developers.cloudflare.com/workers/wrangler/commands/#init), [test](https://developers.cloudflare.com/workers/wrangler/commands/#dev), and [deploy](https://developers.cloudflare.com/workers/wrangler/commands/#deploy) your Workers projects. C3 will install Wrangler in projects by default.
2. `index.js` (in `/src`): A minimal `'Hello World!'` Worker written in [ES module](https://developers.cloudflare.com/workers/reference/migrate-to-module-workers/) syntax.
3. `package.json`: A minimal Node dependencies configuration file.
4. `package-lock.json`: Refer to [`npm` documentation on `package-lock.json`](https://docs.npmjs.com/cli/v9/configuring-npm/package-lock-json) .
5. `node_modules`: Refer to [`npm` documentation `node_modules`](https://docs.npmjs.com/cli/v7/configuring-npm/folders#node-modules) .
## Create a Cloudflare D1 Database
The [Cloudflare D1 Database](https://www.cloudflare.com/developer-platform/d1/) is a serverless SQL database built on SQLite. It offers a native serverless architecture, a SQL-based dialect, and built-in JSON parsing and querying functions. With D1, you can easily deploy and maintain a database of any size, using a familiar query language and benefiting from features like point-in-time recovery and cost-effective pricing.
Start by creating a D1 database.
```bash
npx wrangler d1 create testing-cloudflare-workers
[Output]
✅ Successfully created DB 'testing-cloudflare-workers' in region EEUR
Created your database using D1's new storage backend. The new storage backend is not yet recommended for production workloads, but backs up your data via point-in-time
restore.
[[d1_databases]]
binding = "DB" # i.e. available in your Worker on env.DB
database_name = "testing-cloudflare-workers"
database_id = "<your_database_id>"
```
Add the `d1_databases` block to your `wrangler.toml` file.
```sql
# D1
[[d1_databases]]
binding = "DB" # i.e. available in your Worker on env.DB
database_name = "testing-cloudflare-workers"
database_id = "<your_database_id>"
```
Create a schema that defines a Pokemon table. Call it `schema.sql` and put it in the root directory.
```sql
DROP TABLE IF EXISTS Pokemon;
CREATE TABLE IF NOT EXISTS Pokemon (
id INTEGER PRIMARY KEY,
name TEXT,
createdAt TIMESTAMP WITH TIME ZONE DEFAULT CURRENT_TIMESTAMP
);
```
Configure D1 locally and in your Cloudflare account.
```bash
# Local
npx wrangler d1 execute testing-cloudflare-workers --local --file=./schema.sql
# Deployed
npx wrangler d1 execute testing-cloudflare-workers --file=./schema.sql
```
Finally use the `DB` binding to query the database.
```javascript
export interface Env {
// If you set another name in wrangler.toml as the value for 'binding',
// replace "DB" with the variable name you defined.
DB: D1Database;
}
// ...
```
You’re ready to start building!
## Use Wrangler CLI to Develop Workers
The Workers command-line interface, [Wrangler](https://developers.cloudflare.com/workers/wrangler/install-and-update/), allows you to [create](https://developers.cloudflare.com/workers/wrangler/commands/#init), [test](https://developers.cloudflare.com/workers/wrangler/commands/#dev), and [deploy](https://developers.cloudflare.com/workers/wrangler/commands/#deploy) your Workers projects. C3 will install Wrangler in projects by default.
After you have created your first Worker, run the [`wrangler dev`](https://developers.cloudflare.com/workers/wrangler/commands/#dev) command in the project directory to start a local server for developing your Worker. This will allow you to test your Worker locally during development.
```bash
npx wrangler dev
[output]
⛅️ wrangler 3.22.1
-------------------
✔ Would you like to help improve Wrangler by sending usage metrics to Cloudflare? … no
Your choice has been saved in the following file: ../../../../Library/Preferences/.wrangler/metrics.json.
You can override the user level setting for a project in `wrangler.toml`:
- to disable sending metrics for a project: `send_metrics = false`
- to enable sending metrics for a project: `send_metrics = true`
⎔ Starting local server...
[wrangler:inf] Ready on http://localhost:8787
[wrangler:inf] GET / 200 OK (5ms)
[wrangler:inf] GET /favicon.ico 200 OK (1ms)
...
```
If you have not used Wrangler before, it will try to open your web browser to authenticate with your Cloudflare account. If you have issues with this step or you do not have access to a browser interface, refer to the [`wrangler login`](https://developers.cloudflare.com/workers/wrangler/commands/#login) documentation for more information.
You will now be able to go to [`http://localhost:8787`](http://localhost:8787/) to see your Worker running. Any changes you make to your code will trigger a rebuild, and reloading the page will show you the up-to-date output of your Worker.
## Cloudflare Worker Boilerplate Code
The `src/index.ts` file contains the Worker code. This file will be triggered when hitting the `/` endpoint of your Worker.
Think of it as a tiny Node.js server. You can do all kinds of cool things here. Create routers, listen for different HTTP methods like `POST` etc, fetch external APIs, store data in databases, and even trigger other Workers!
Open up the `src/index.ts` . You’ll see boilerplate code.
```javascript
/**
* Welcome to Cloudflare Workers! This is your first worker.
*
* - Run `npm run dev` in your terminal to start a development server
* - Open a browser tab at http://localhost:8787/ to see your worker in action
* - Run `npm run deploy` to publish your worker
*
* Learn more at https://developers.cloudflare.com/workers/
*/
export interface Env {
// Example binding to KV. Learn more at https://developers.cloudflare.com/workers/runtime-apis/kv/
// MY_KV_NAMESPACE: KVNamespace;
//
// Example binding to Durable Object. Learn more at https://developers.cloudflare.com/workers/runtime-apis/durable-objects/
// MY_DURABLE_OBJECT: DurableObjectNamespace;
//
// Example binding to R2. Learn more at https://developers.cloudflare.com/workers/runtime-apis/r2/
// MY_BUCKET: R2Bucket;
//
// Example binding to a Service. Learn more at https://developers.cloudflare.com/workers/runtime-apis/service-bindings/
// MY_SERVICE: Fetcher;
//
// Example binding to a Queue. Learn more at https://developers.cloudflare.com/queues/javascript-apis/
// MY_QUEUE: Queue;
}
export default {
async fetch(request: Request, env: Env, ctx: ExecutionContext): Promise<Response> {
return new Response('Hello World!');
},
};
```
Let’s edit it to instead create a Pokemon directory.
## Create the Cloudflare Worker Code
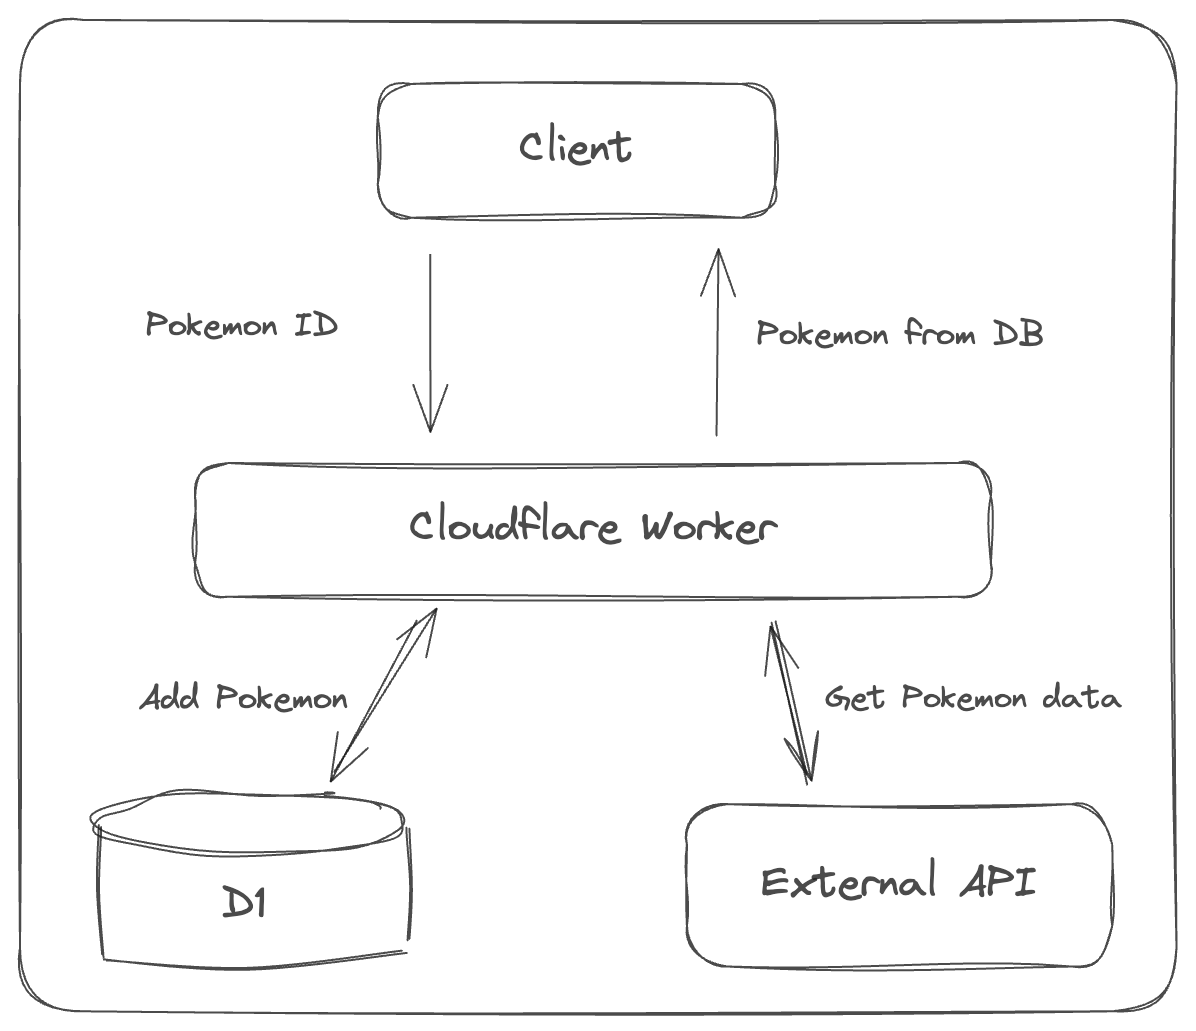
You’ll create an import flow. Send the ID of a Pokemon to the Cloudflare Worker, it handles getting the Pokemon info from an external API and stores it in the D1 database.
The Cloudflare Worker you’ll create will be accessible at the URL `http://localhost:8787/`.
To return JSON data, you’ll use the `return Response.json(...)` method. Async/Await flows are enabled by default as well!
Here’s an example of a POST request with a GET request to an external API from within the Cloudflare Worker and then inserting the data into D1. It’s a common point-of-failure that is hard to troubleshoot and test.
You’ll configure the Worker to listen for a POST request on path `/api/pokemon`. And, add an optional query parameter called `id`.
```javascript
export interface Env {
DB: D1Database
}
export async function addPokemon(pokemon: any, env: Env) {
return await env.DB.prepare(
"INSERT INTO Pokemon (name) VALUES (?) RETURNING *"
).bind(pokemon.name).all()
}
export async function getPokemon(pokemon: any, env: Env) {
return await env.DB.prepare(
"SELECT * FROM Pokemon WHERE id = ?"
).bind(pokemon.id).all()
}
async function formatPokeApiResponse(response: any) {
const { headers } = response
const contentType = headers.get("content-type") || ""
if (contentType.includes("application/json")) {
const data = await response.json()
const { name, id } = data
return { name, id }
}
return response.text()
}
const handler = {
async fetch(request: Request, env: Env, ctx: ExecutionContext): Promise<Response> {
try {
const { pathname, searchParams } = new URL(request.url)
// Import a Pokemon
if (pathname === "/api/pokemon" && request.method === "POST") {
const queryId = searchParams.get('id')
const requestUrl = `https://pokeapi.co/api/v2/pokemon/${queryId || '6'}`
const response = await fetch(requestUrl)
const resPokemon = await formatPokeApiResponse(response)
const addedPokemon = await addPokemon(resPokemon, env)
return Response.json(addedPokemon)
}
return new Response("Hello Worker!")
} catch (err) {
return new Response(String(err))
}
},
}
export default handler
```
Go ahead and run the Worker.
```bash
npx wrangler dev
```
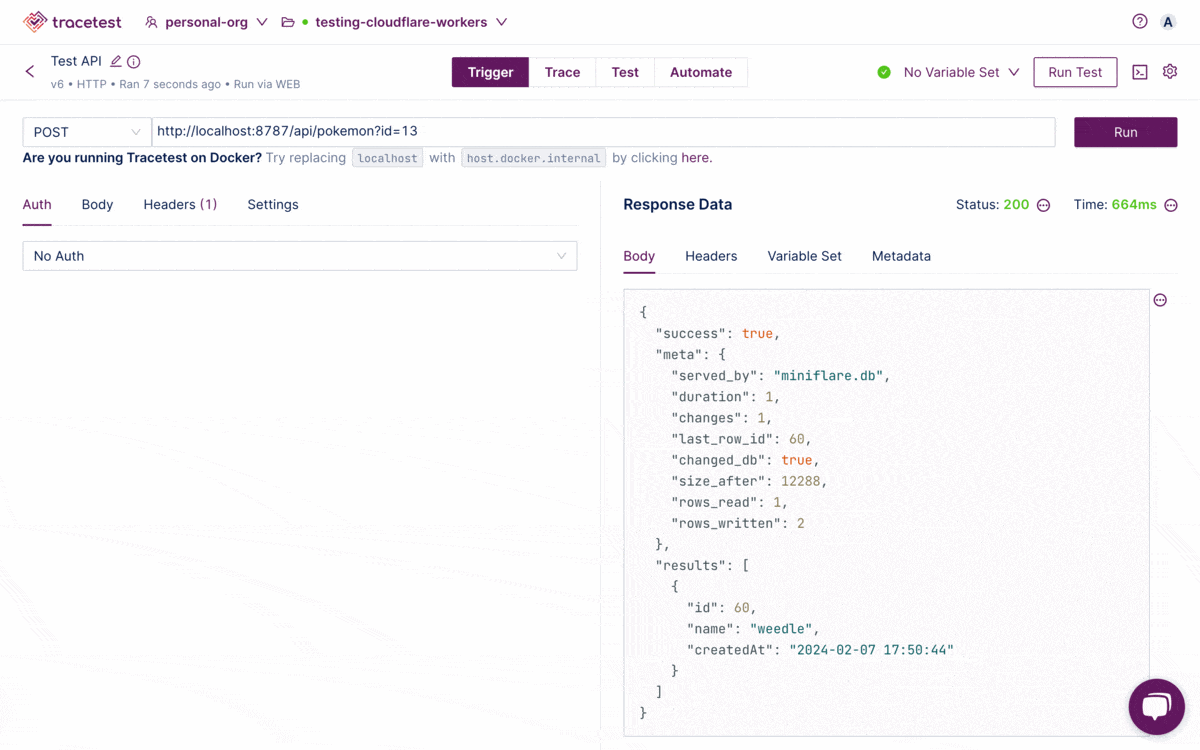
Send a `POST` request to `http://localhost:8787/api/pokemon` to see the response from your Cloudflare Worker.
```json
curl -X POST "http://localhost:8787/api/pokemon?id=1"
{"success":true,"meta":{"served_by":"v3-prod","duration":0.4586,"changes":1,"last_row_id":2,"changed_db":true,"size_after":16384,"rows_read":1,"rows_written":2},"results":[{"id":2,"name":"bulbasaur","createdAt":"2024-02-06 17:54:52"}]}
```
To validate that the Pokemon has been added, you can also run this command to query the database.
```bash
npx wrangler d1 execute testing-cloudflare-workers --local --command="SELECT * FROM Pokemon"
```
Redeploy the Worker via Wrangler.
```bash
npx wrangler deploy
```
Preview your Worker at `<YOUR_WORKER>.<YOUR_SUBDOMAIN>.workers.dev`.
## Configure Troubleshooting with OpenTelemetry and Distributed Tracing
OpenTelemetry libraries for Node.js are stable and include auto-instrumentation.
Luckily for you and me, [Erwin van der Koogh](https://github.com/evanderkoogh) wrote an awesome package for wrapping the OpenTelemetry libraries in Cloudflare Workers. It’s called [`otel-cf-workers`](https://github.com/evanderkoogh/otel-cf-workers) and it is beautiful! 🤩 — Let’s be awesome to each other and give him as many ⭐ as possible on GitHub!
To be able to use the OpenTelemetry library at all you have to add the Node.js compatibility flag in your `wrangler.toml` file.
```toml
compatibility_flags = [ "nodejs_compat" ]
```
Now, install the node modules.
```bash
npm i \
@opentelemetry/api \
@microlabs/otel-cf-workers
```
You need the `@opentelemetry/api` module to create custom spans, while the `@microlabs/otel-cf-workers` module is the OpenTelemetry wrapper.
Next up, add OpenTelemetry to your code.
```jsx
import { trace, SpanStatusCode } from '@opentelemetry/api'
import { instrument, ResolveConfigFn } from '@microlabs/otel-cf-workers'
const tracer = trace.getTracer('pokemon-api')
export interface Env {
DB: D1Database
TRACETEST_URL: string
}
export async function addPokemon(pokemon: any, env: Env) {
return await env.DB.prepare(
"INSERT INTO Pokemon (name) VALUES (?) RETURNING *"
).bind(pokemon.name).all()
}
export async function getPokemon(pokemon: any, env: Env) {
return await env.DB.prepare(
"SELECT * FROM Pokemon WHERE id = ?;"
).bind(pokemon.id).all();
}
async function formatPokeApiResponse(response: any) {
const { headers } = response
const contentType = headers.get("content-type") || ""
if (contentType.includes("application/json")) {
const data = await response.json()
const { name, id } = data
// Add manual instrumentation
const span = trace.getActiveSpan()
if(span) {
span.setStatus({ code: SpanStatusCode.OK, message: String("Pokemon fetched successfully!") })
span.setAttribute('pokemon.name', name)
span.setAttribute('pokemon.id', id)
}
return { name, id }
}
return response.text()
}
const handler = {
async fetch(request: Request, env: Env, ctx: ExecutionContext): Promise<Response> {
try {
const { pathname, searchParams } = new URL(request.url)
// Import a Pokemon
if (pathname === "/api/pokemon" && request.method === "POST") {
const queryId = searchParams.get('id')
const requestUrl = `https://pokeapi.co/api/v2/pokemon/${queryId || '6'}`
const response = await fetch(requestUrl)
const resPokemon = await formatPokeApiResponse(response)
// Add manual instrumentation
return tracer.startActiveSpan('D1: Add Pokemon', async (span) => {
const addedPokemon = await addPokemon(resPokemon, env)
span.setStatus({ code: SpanStatusCode.OK, message: String("Pokemon added successfully!") })
span.setAttribute('pokemon.name', String(addedPokemon?.results[0].name))
span.end()
return Response.json(addedPokemon)
})
}
return new Response("Hello Worker!")
} catch (err) {
return new Response(String(err))
}
},
}
const config: ResolveConfigFn = (env: Env, _trigger) => {
return {
exporter: {
url: env.TRACETEST_URL,
headers: { },
},
service: { name: 'pokemon-api' },
}
}
export default instrument(handler, config)
```
Let me explain what’s happening here:
- You’re importing the `@opentelemetry/api` and `@microlabs/otel-cf-workers` modules to enable OpenTelemetry tracing.
- The `@microlabs/otel-cf-workers` module contains the `instrument` and `ResolveConfigFn` functions. You’ll use them to wrap the Cloudflare Worker and automatically generate traces.
- The `const tracer = trace.getTracer('pokemon-api')` will instantiate a tracer object for you to create new spans in your code. You’ll do this to create a trace for the D1 insert operation. As you can see in the `handler` I’ve now wrapped the `addPokemon` function with a `tracer.startActiveSpan('D1: Add Pokemon'...)` trace span.
- The `formatPokeApiResponse` function now contains manual instrumentation to add span attributes for the external API request. This is to validate the external Pokemon API works as expected.
- The `url: env.TRACETEST_URL` in the `ResolveConfigFn` function sets the Tracetest Agent URL where you send traces to. I’ll walk you through creating tests further down where you’ll also add environment variables.
By configuring your Cloudflare Workers with the following settings, you can enable production observability and emit distributed traces. But what if you could also incorporate testing?
## The Magic of Trace-based Testing for Serverless Architectures
Testing serverless architectures has long been a challenge due to limited visibility. However, observability through distributed traces is now providing a solution to this problem.
Trace-based testing takes uses existing OpenTelemetry traces as test specifications. This allows you to validate the behavior and performance of your distributed services and serverless functions.
[Tracetest](https://tracetest.io/features) is a trace-based testing tool for building integration tests in minutes using [OpenTelemetry](https://opentelemetry.io/docs/getting-started/) traces. You can build test specs against trace data at every point of a request transaction.
To get started with Tracetest:
1. You’ll need to [download the CLI](https://docs.tracetest.io/getting-started/installation#install-the-tracetest-cli) for your operating system.
2. And, [sign up for an account](https://app.tracetest.io/). Go ahead and do that now.
The CLI is bundled with Tracetest Agent that triggers your application and collects responses and traces for new tests. [Learn more in the docs here.](https://docs.tracetest.io/concepts/agent)
Let me walk you through creating tests across your staging and production deployments.
## Testing Cloudflare Workers in Staging and Production
Since I want to keep environments separate I’ll use the [environments feature in Wrangler](https://developers.cloudflare.com/workers/wrangler/environments/).
Create a new environment in Tracetest. Select to run the Tracetest Agent in the cloud.

OpenTelemetry will be selected as the default tracing backend. You’ll find the OTLP endpoint to send traces to.
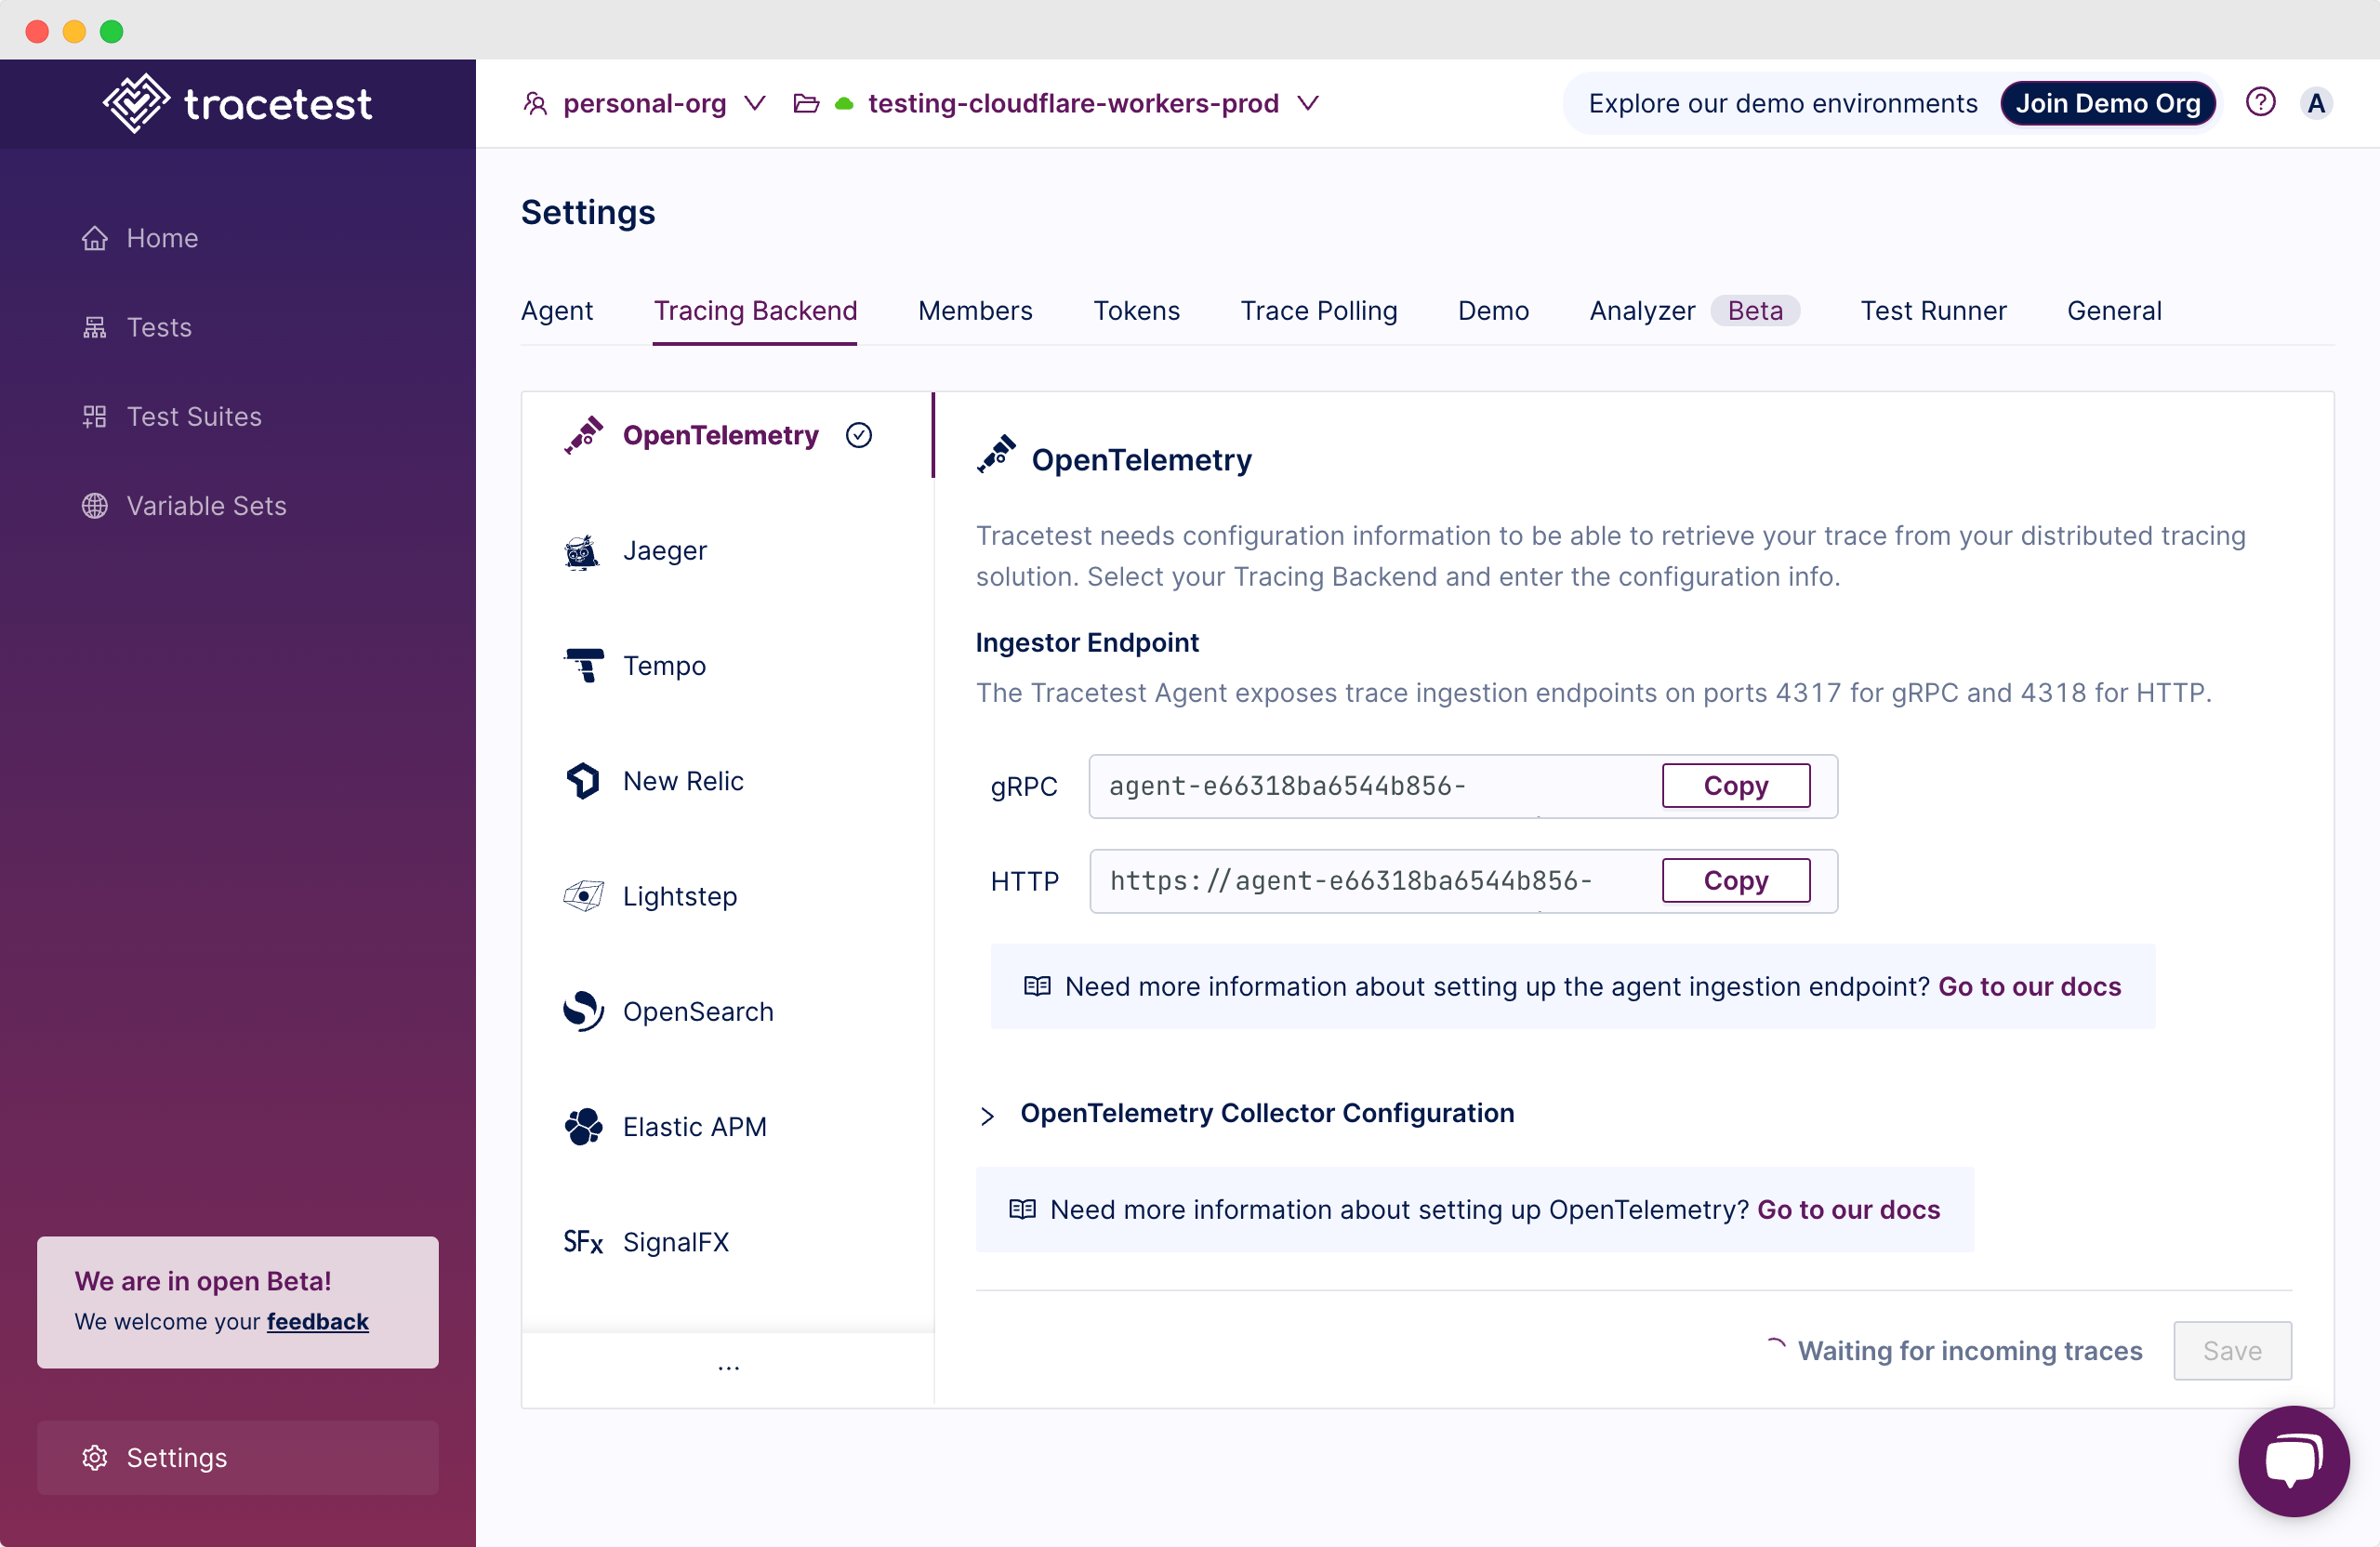
Copy the HTTP URL and paste it in the `wrangler.toml` using a new section called `[env.prod]` . Make sure to append `v1/traces` to the end of the Tracetest URL. Make sure to use the `database_id` that you generated at the beginning of the tutorial.
```toml
# Production
[env.prod]
name = "pokemon-api"
main = "src/index.ts"
compatibility_date = "2023-12-18"
compatibility_flags = [ "nodejs_compat" ]
workers_dev = true
d1_databases = [
{ binding = "DB", database_name = "testing-cloudflare-workers", database_id = "<YOUR_DATABASE_ID>" },
]
[env.prod.vars]
TRACETEST_URL = "https://<YOUR_TRACETEST_AGENT_URL>.tracetest.io:443/v1/traces"
```
The `TRACETEST_URL` here is where the Tracetest Agent is running. Currently, in the cloud in your Tracetest account. To reference it in your Cloudflare Worker you define it in the `interface Env` and again set it in the `exporter` section.
```jsx
// [...]
export interface Env {
TRACETEST_URL: string
// [...]
}
// [...]
const config: ResolveConfigFn = (env: Env, _trigger) => {
return {
exporter: {
url: env.TRACETEST_URL,
headers: { },
},
// [...]
}
}
```
Deploy the Cloudflare Worker to the `prod` environment.
```bash
npx wrangler deploy --env prod
[Output]
⛅️ wrangler 3.27.0
-------------------
Your worker has access to the following bindings:
- D1 Databases:
- DB: testing-cloudflare-workers (<YOUR_DATABASE_ID>)
- Vars:
- TRACETEST_URL: "https://agent-(redacted)..."
Total Upload: 169.02 KiB / gzip: 38.56 KiB
Uploaded pokemon-api (3.79 sec)
Published pokemon-api (1.72 sec)
https://pokemon-api.<YOUR_ACCOUNT>.workers.dev
Current Deployment ID: 6e5333b9-29de-4a83-84c5-dc582218bdba
```
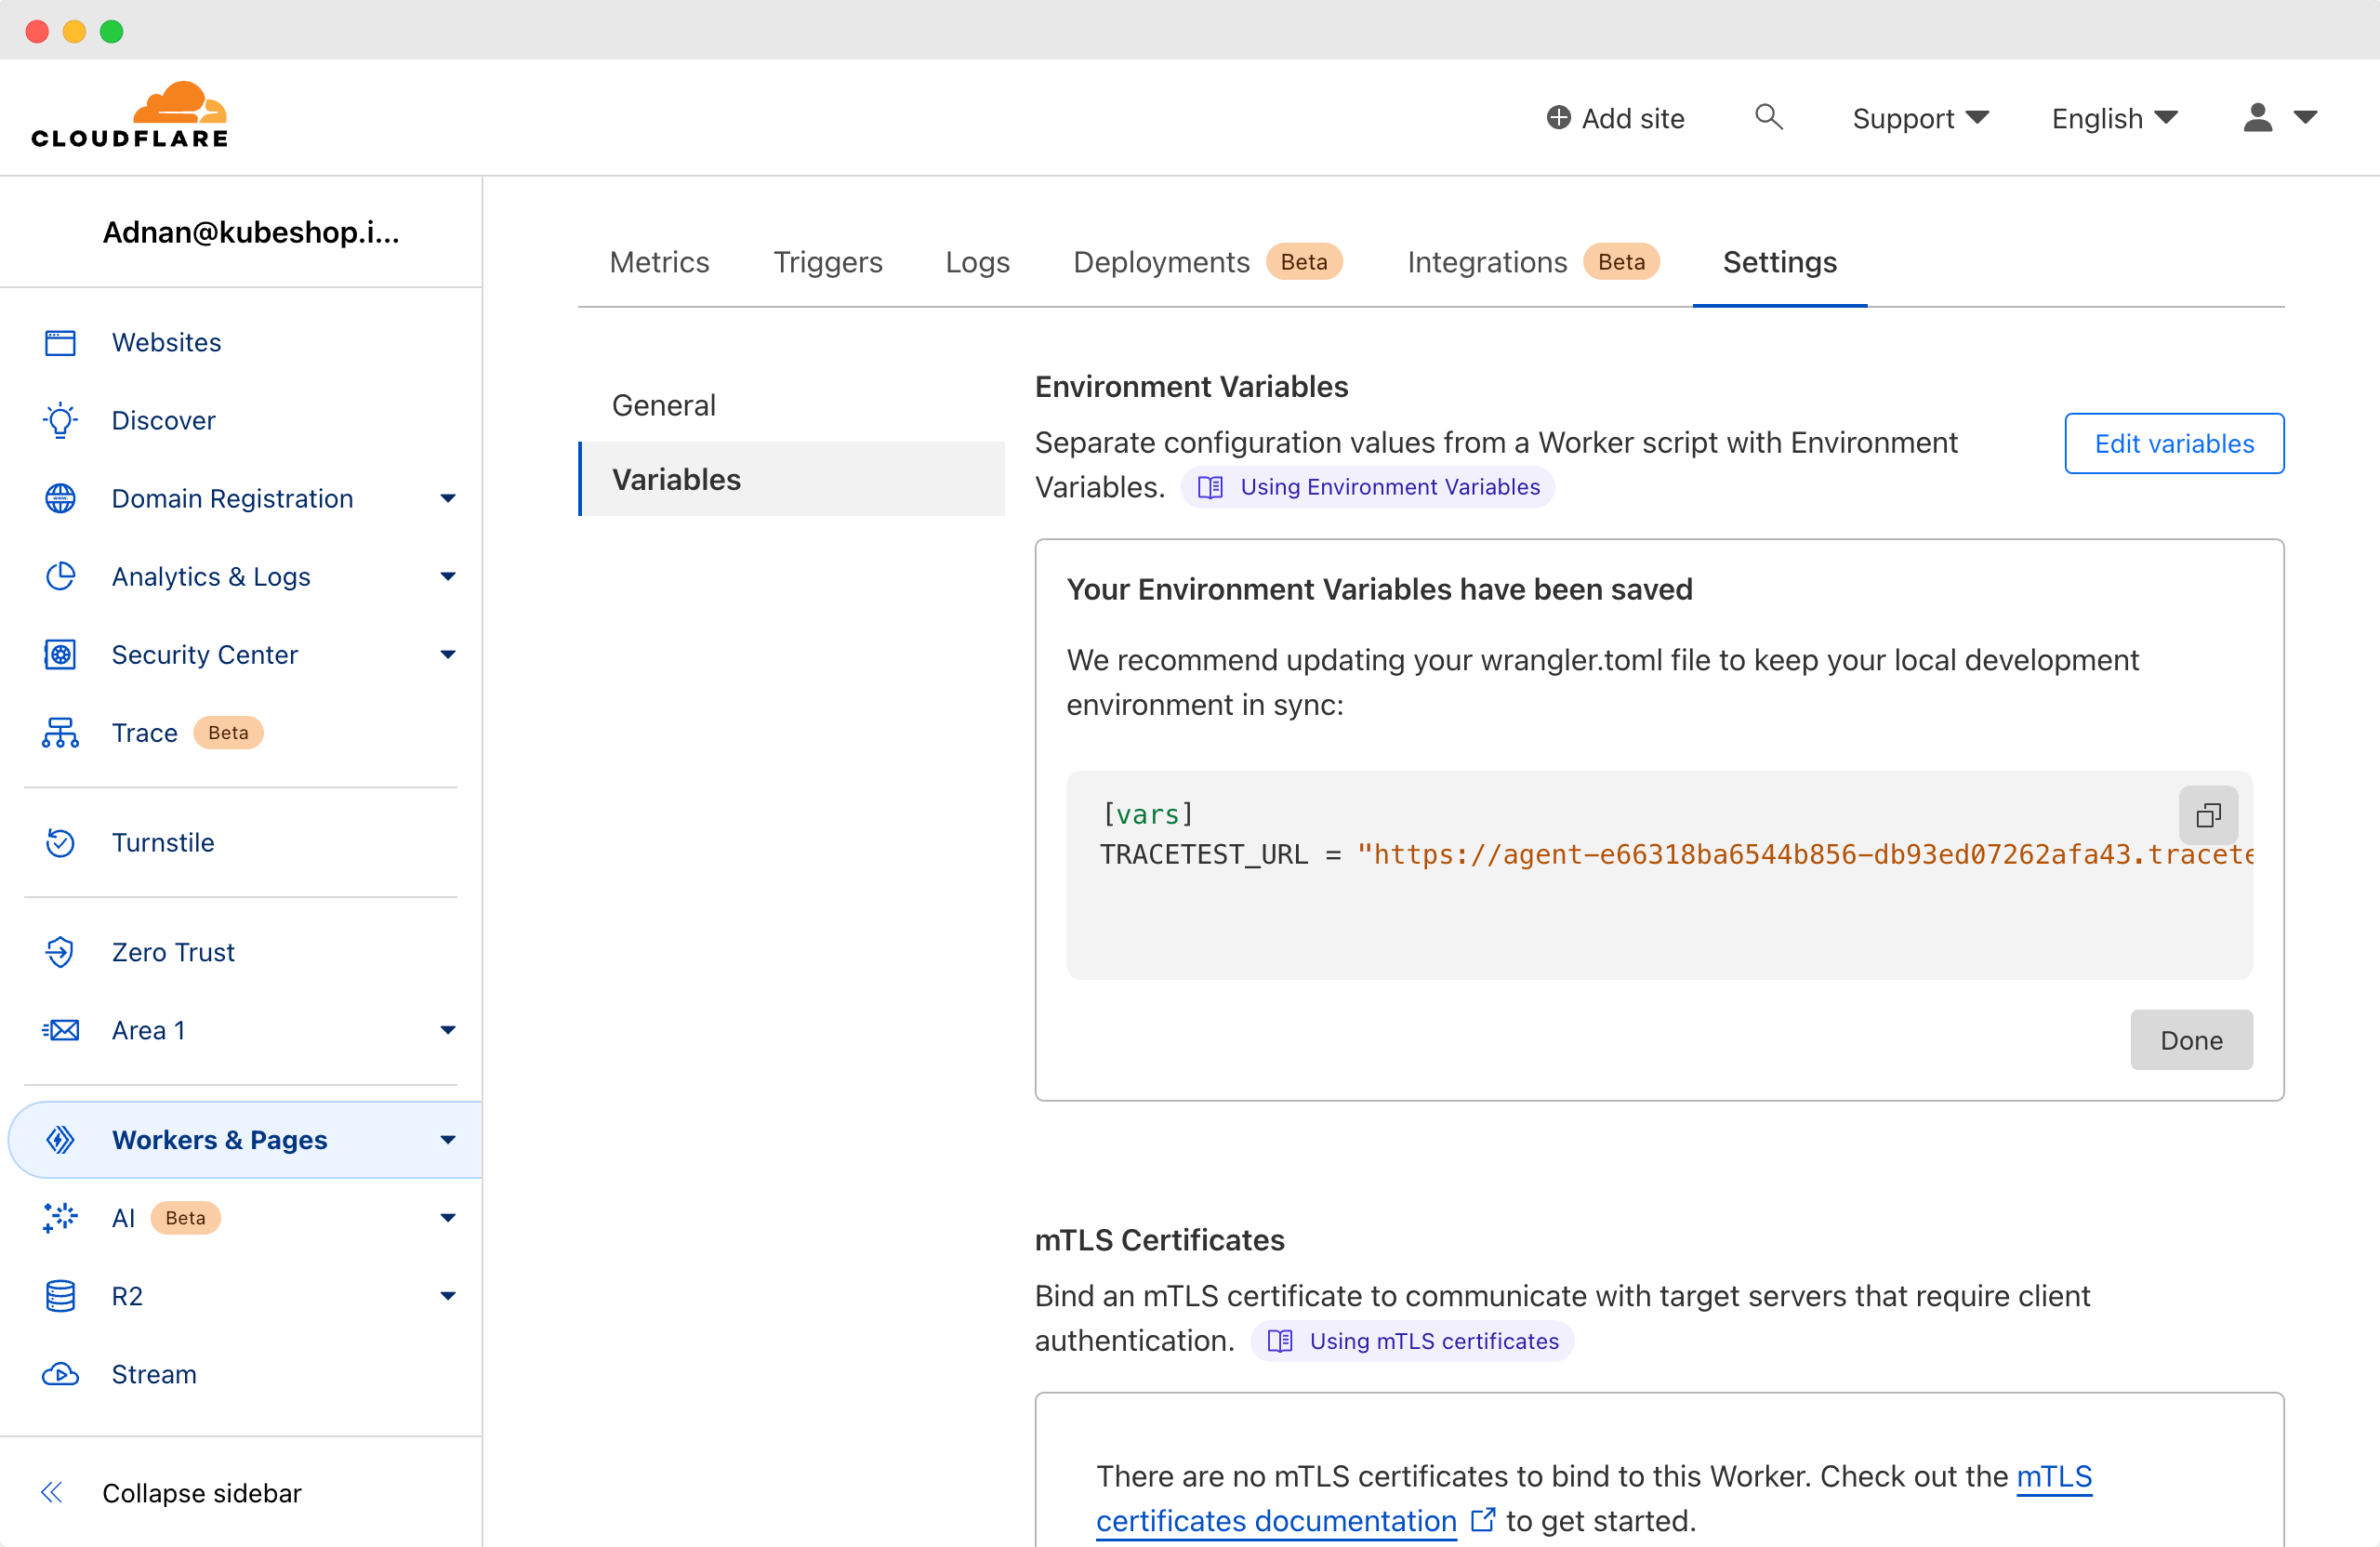
Make sure you see the `TRACETEST_URL` environment variable in your Cloudflare account.
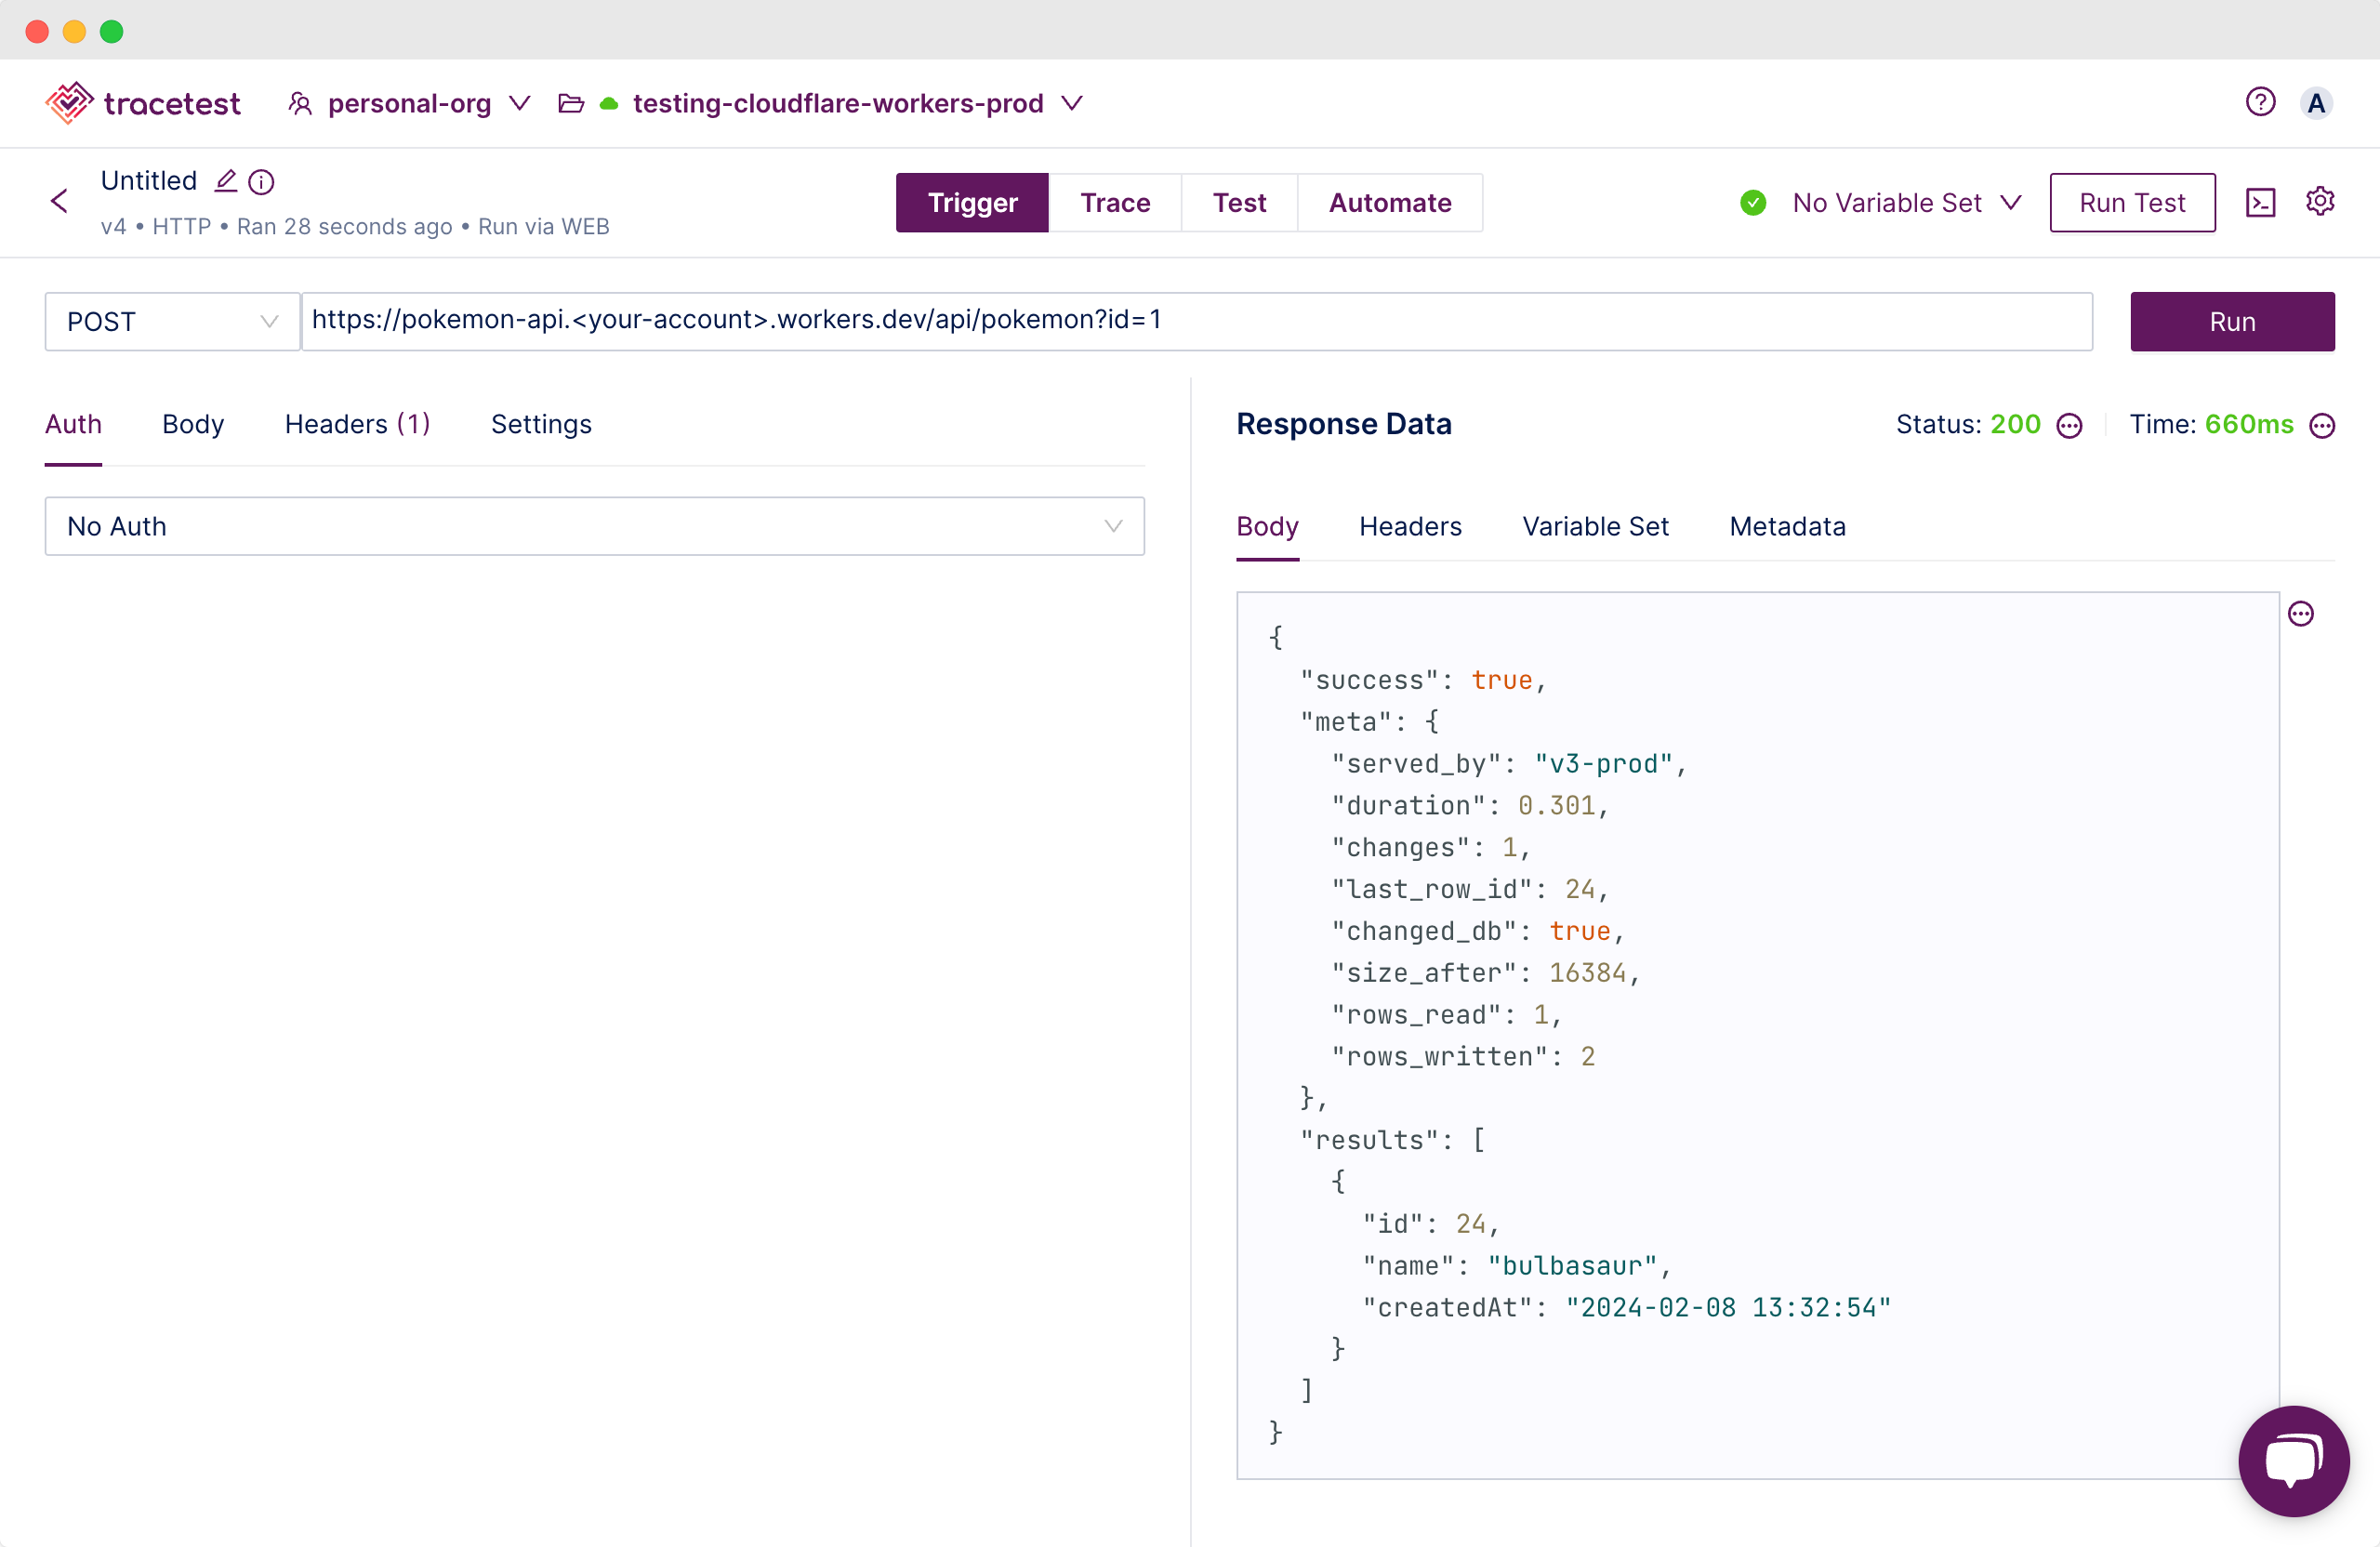
Move back to Tracetest and use the Cloudflare Worker production URL to trigger a test.
Switch to the `Trace` tab to see the full preview of the distributed trace.
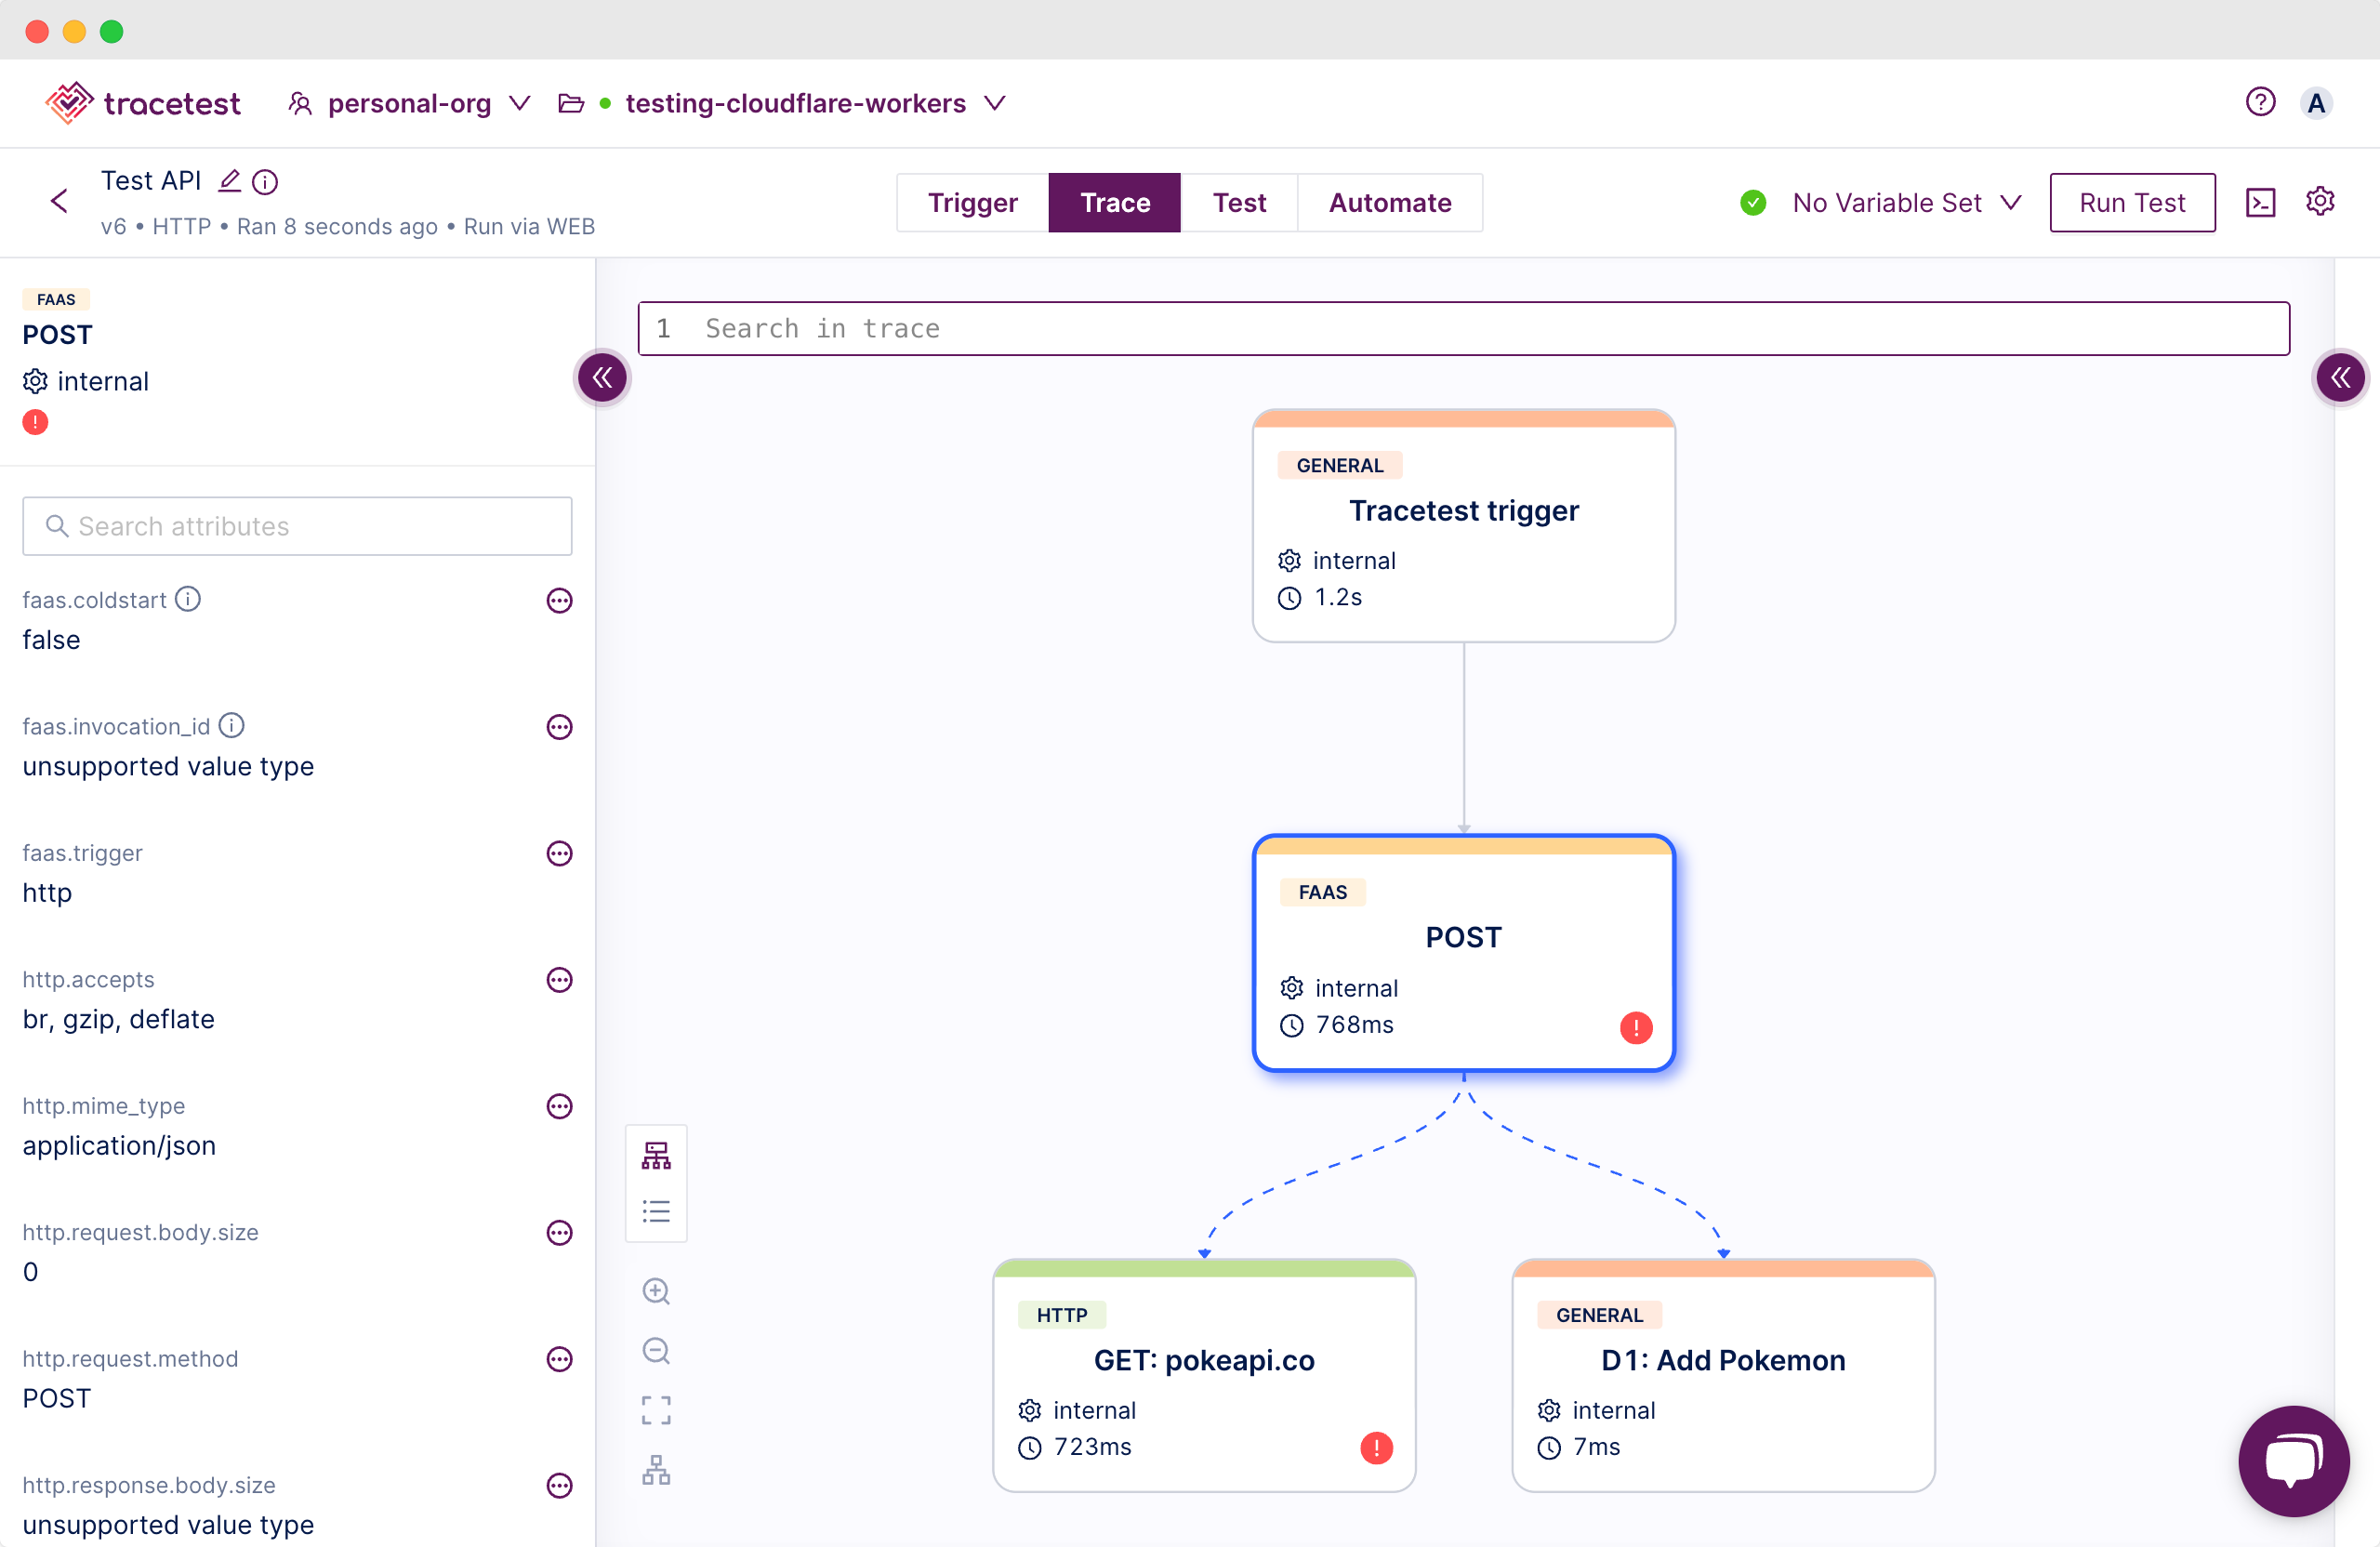
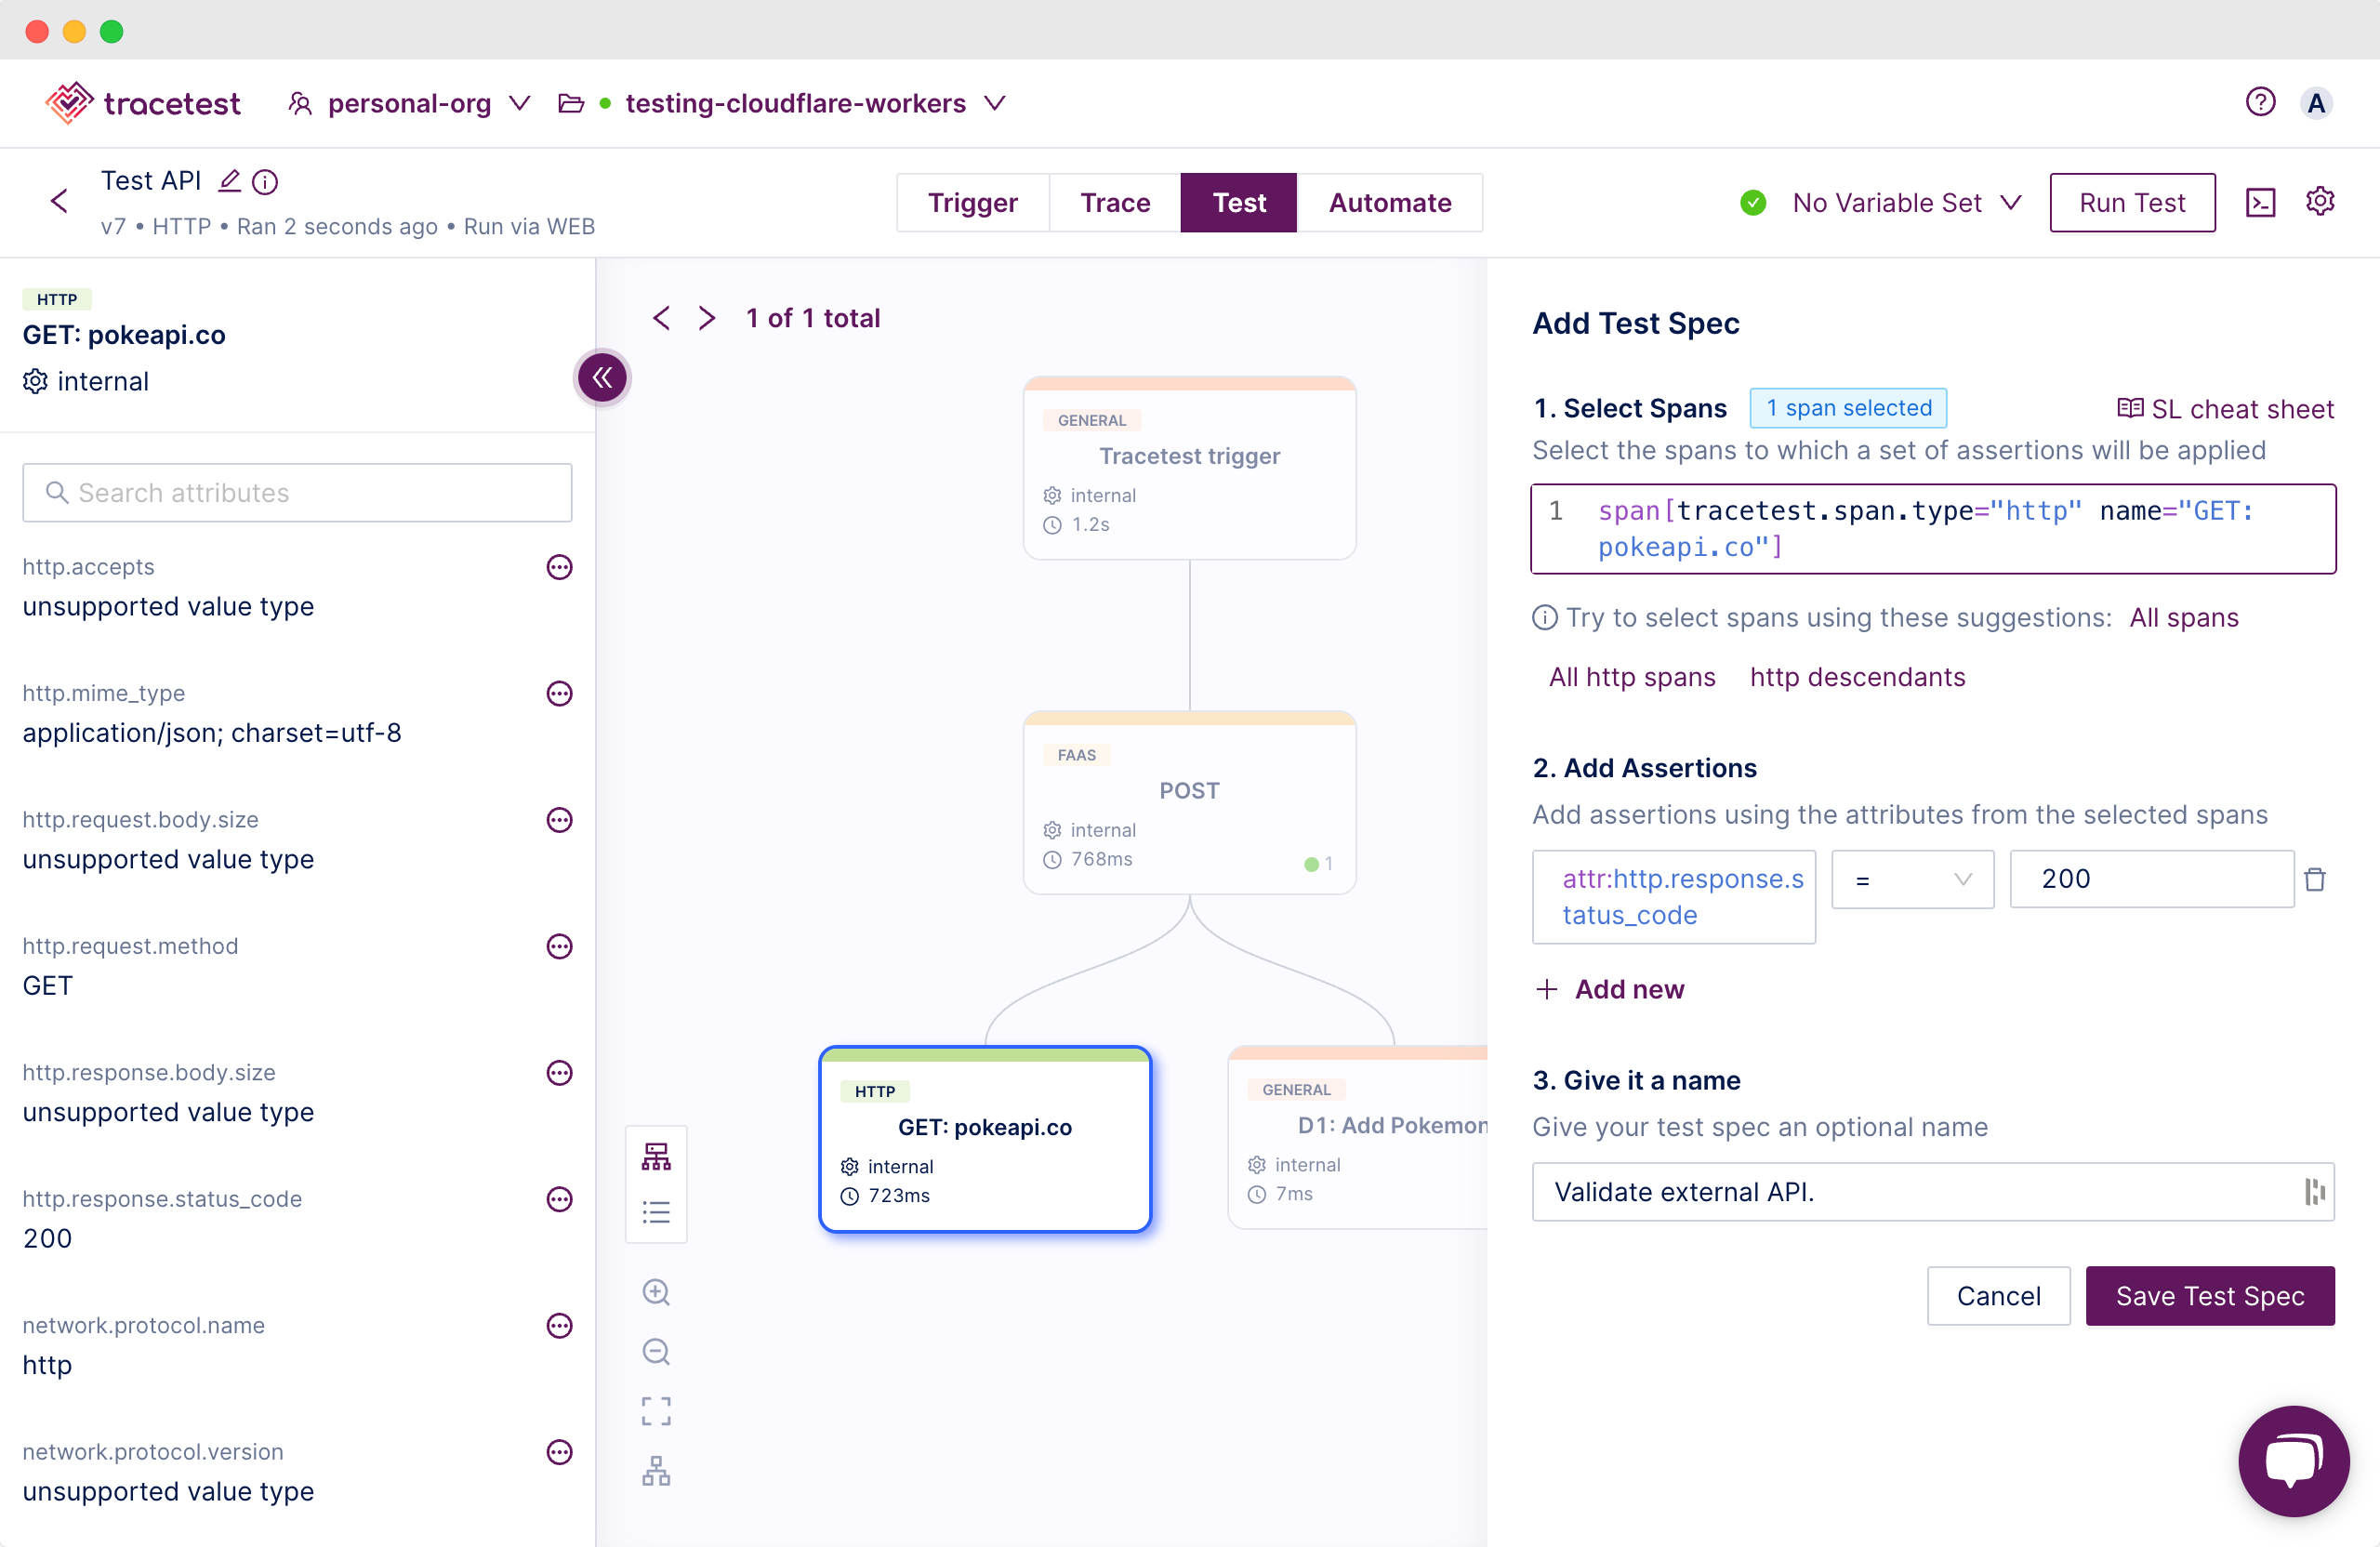
From here you can add test specs to validate that the external HTTP request does not fail and that the D1 database import worked as expected. You can also check for cold starts!
Click the `Test` tab and add some test specs. First create a test spec to validate the function invocation was not a cold start.
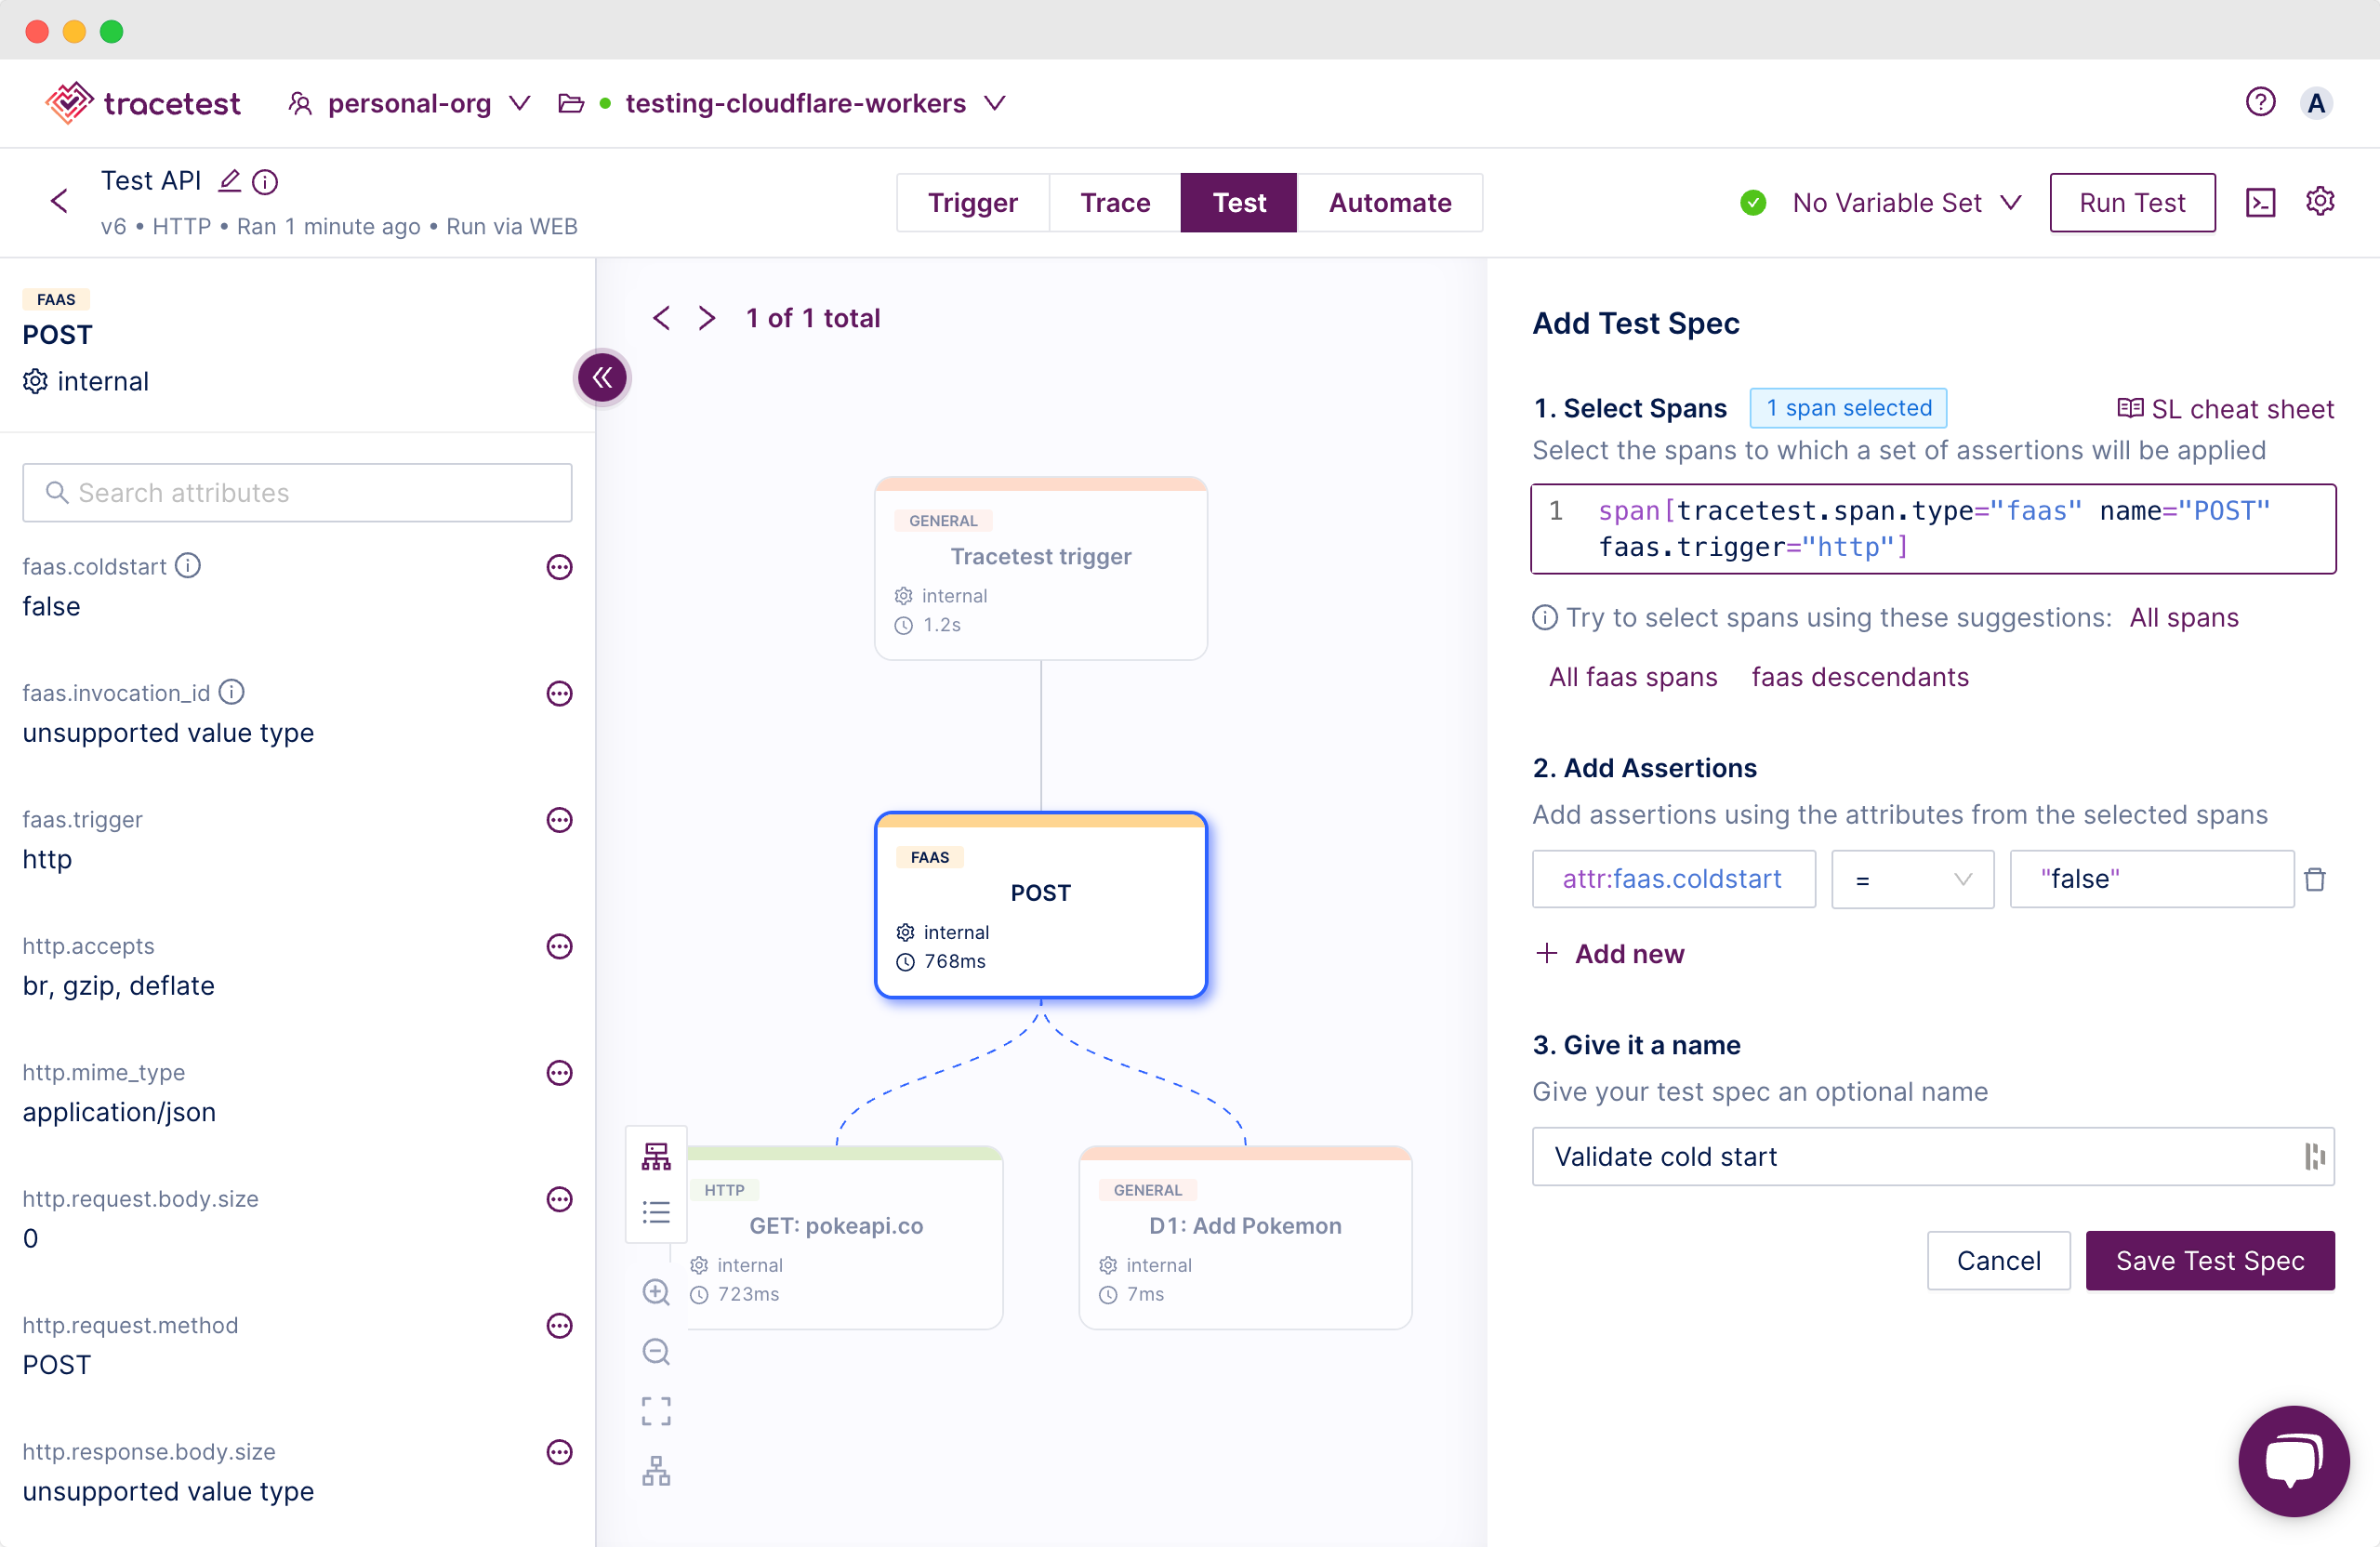
Then make sure the external API request always returns status 200.
Finally, validate that the Pokemon that was added to the D1 database matched what the external API fetched.
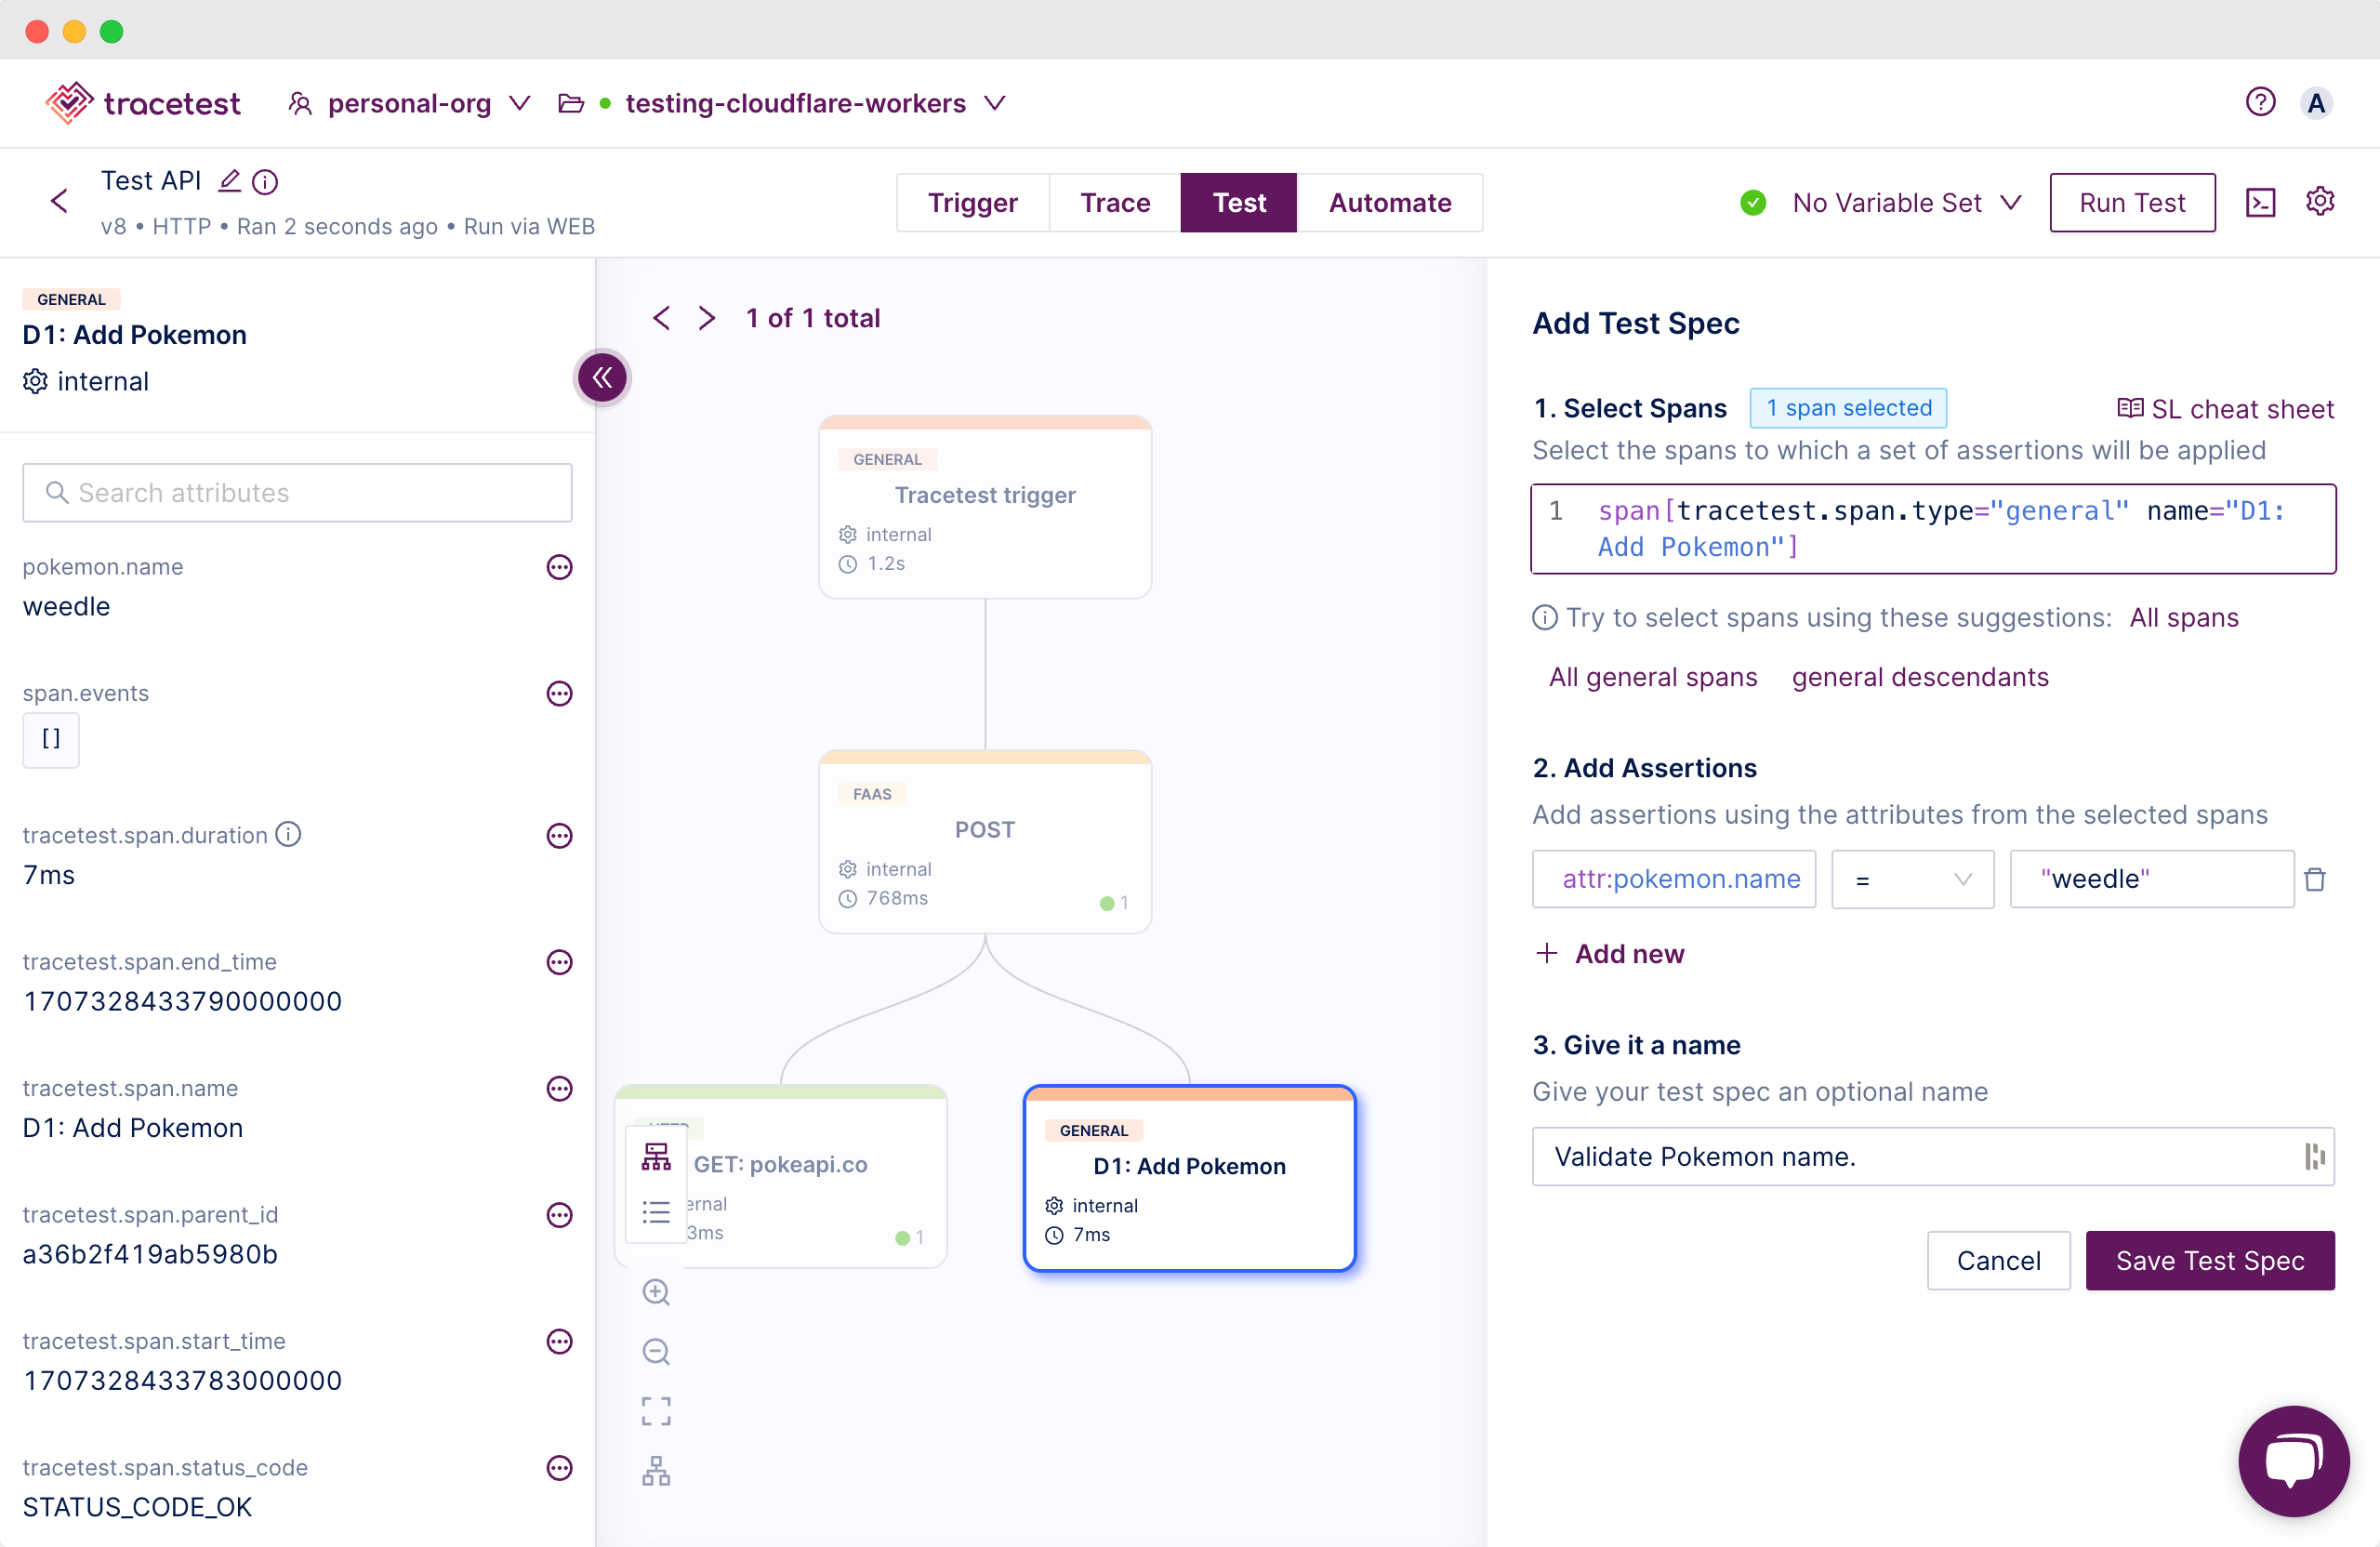
Save the test specs.
You now see all test specs passing since the external HTTP request is valid, the invocation was not a cold start, and the Pokemon name matches what you were expecting!
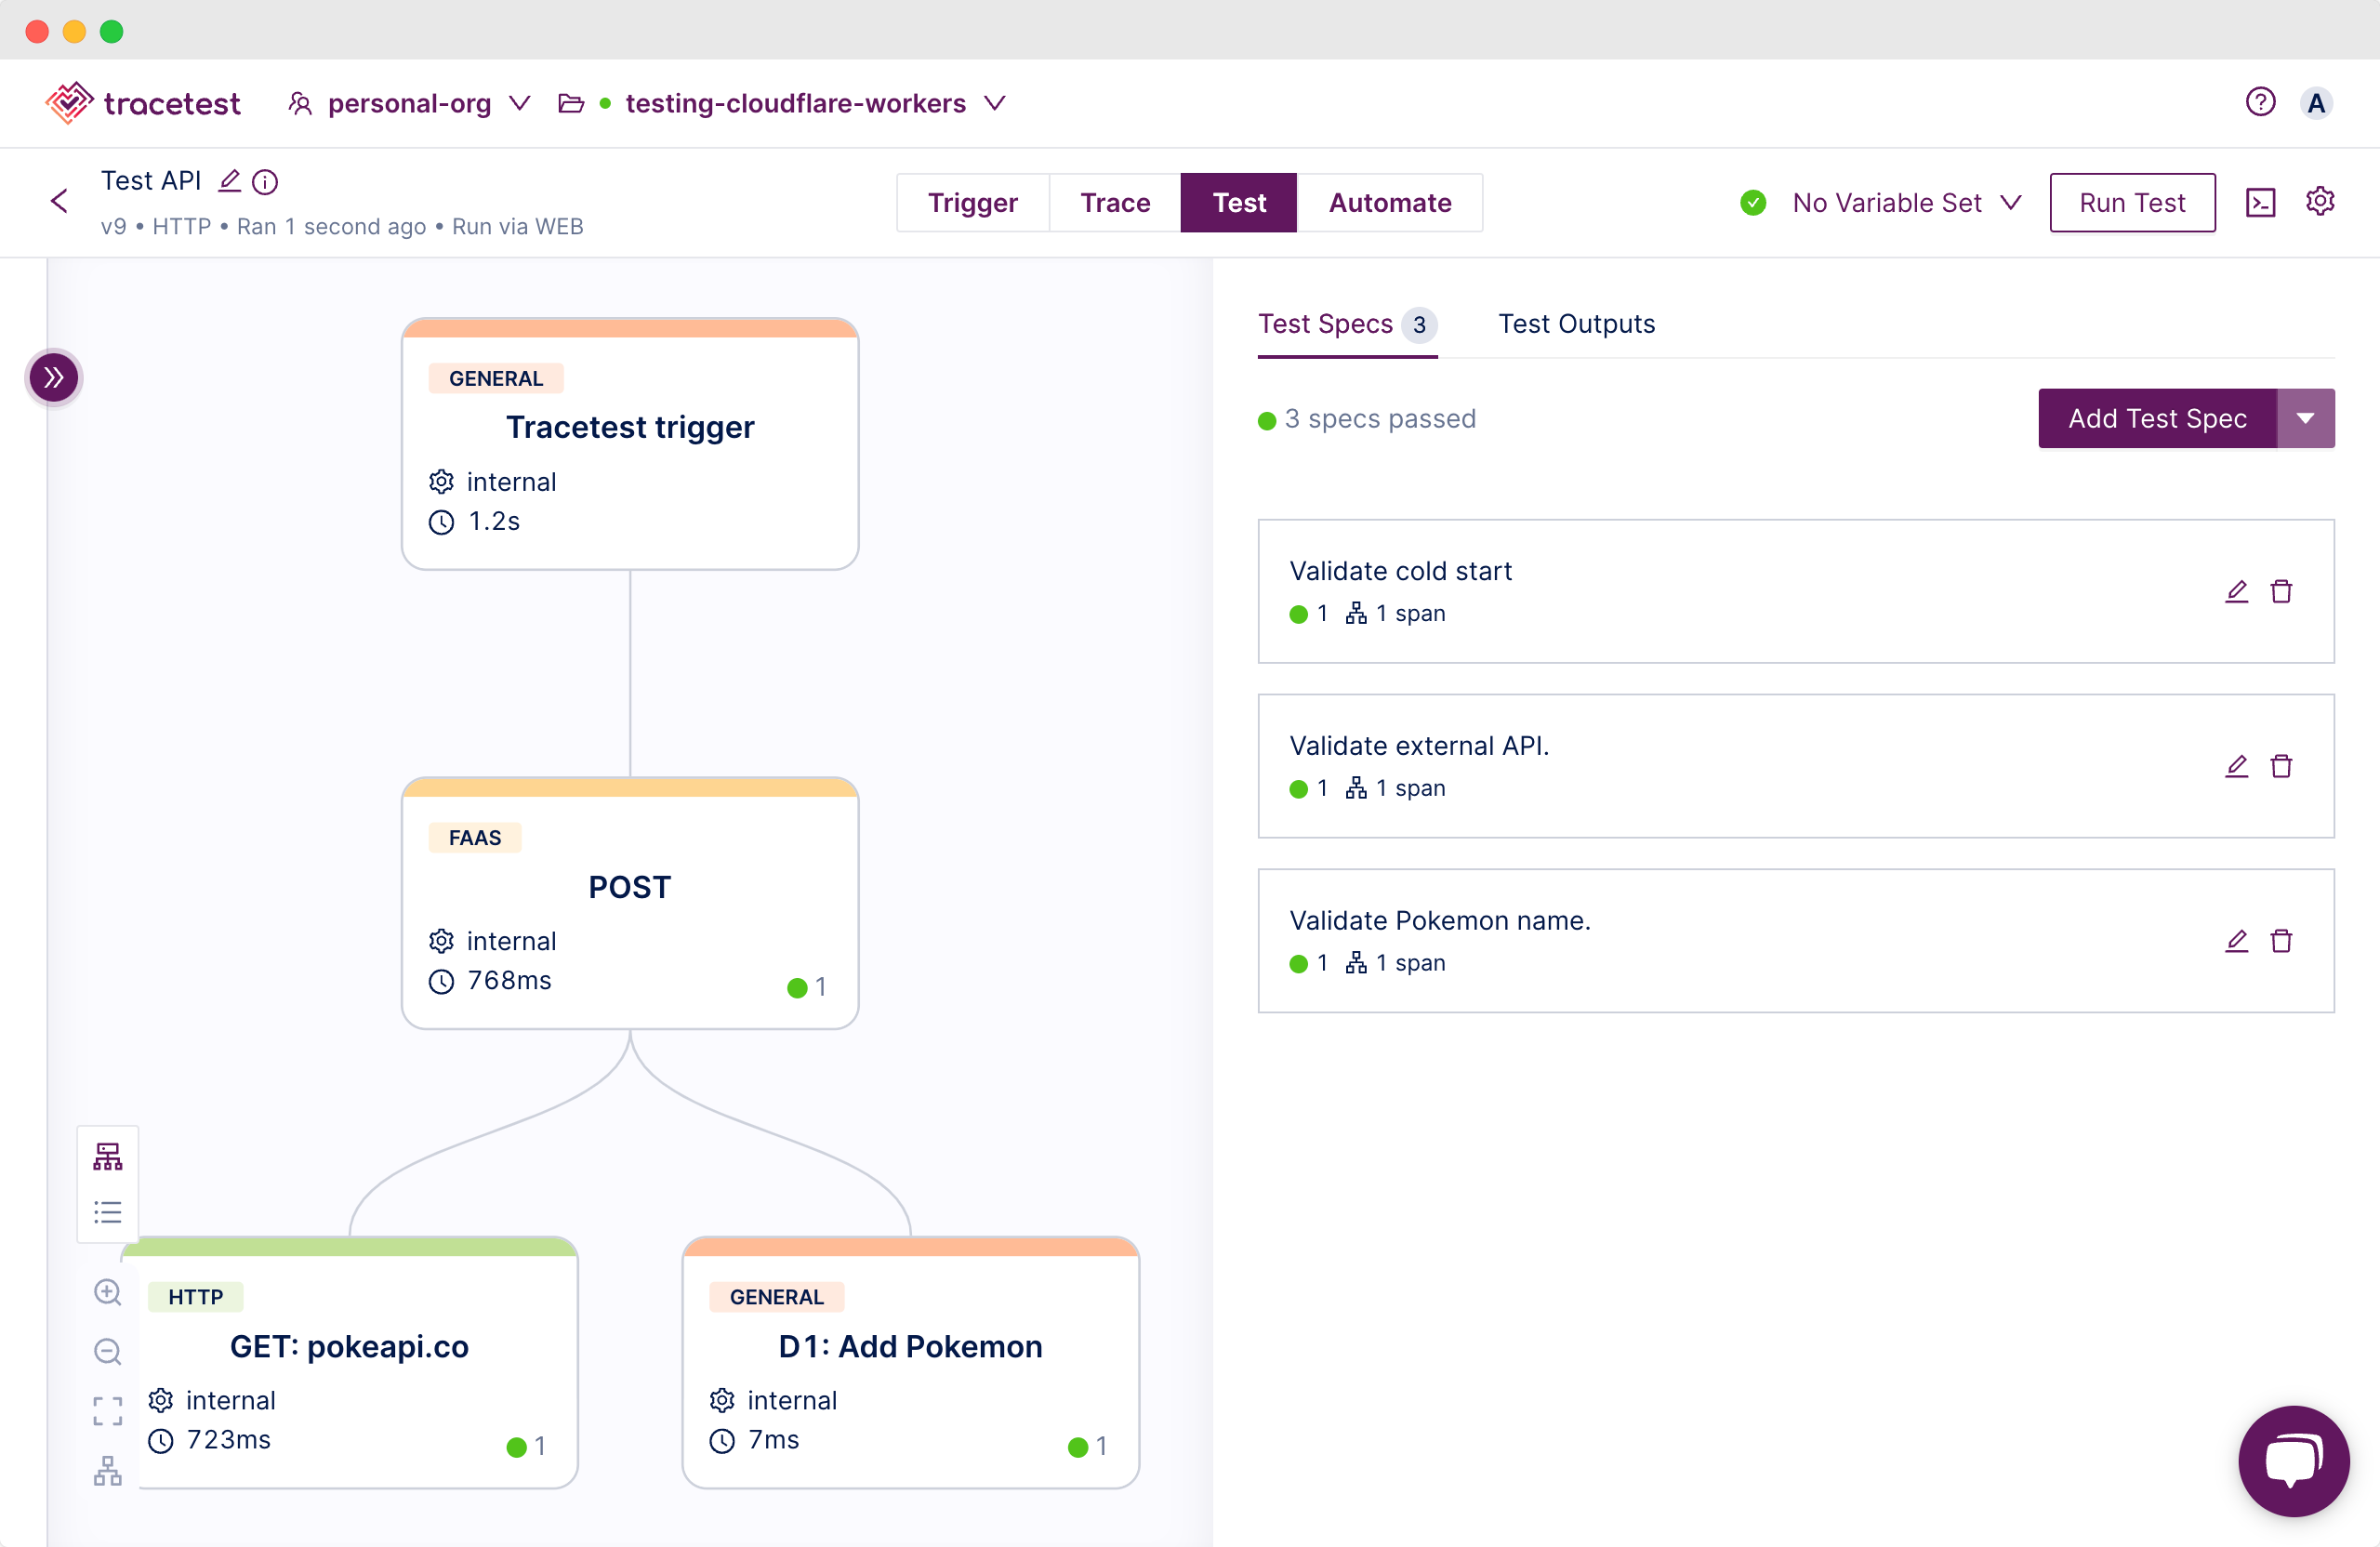
All this enabled by OpenTelemetry tracing and Tracetest! What’s also awesome is that these tests are stored in your Tracetest account and you can revisit them and run the same tests again every time you run your development environment!
This is awesome for testing deployments while developing Cloudflare Workers, but also in [pre-merge testing](https://docs.tracetest.io/examples-tutorials/recipes/testing-cloudflare-workers-with-opentelemetry-tracetest#testing-the-cloudflare-worker-locally) and [integration testing](https://docs.tracetest.io/examples-tutorials/recipes/testing-cloudflare-workers-with-opentelemetry-tracetest#integration-testing-the-cloudflare-worker).
Let me explain how to enable automation next. Check out the `Automate` tab.
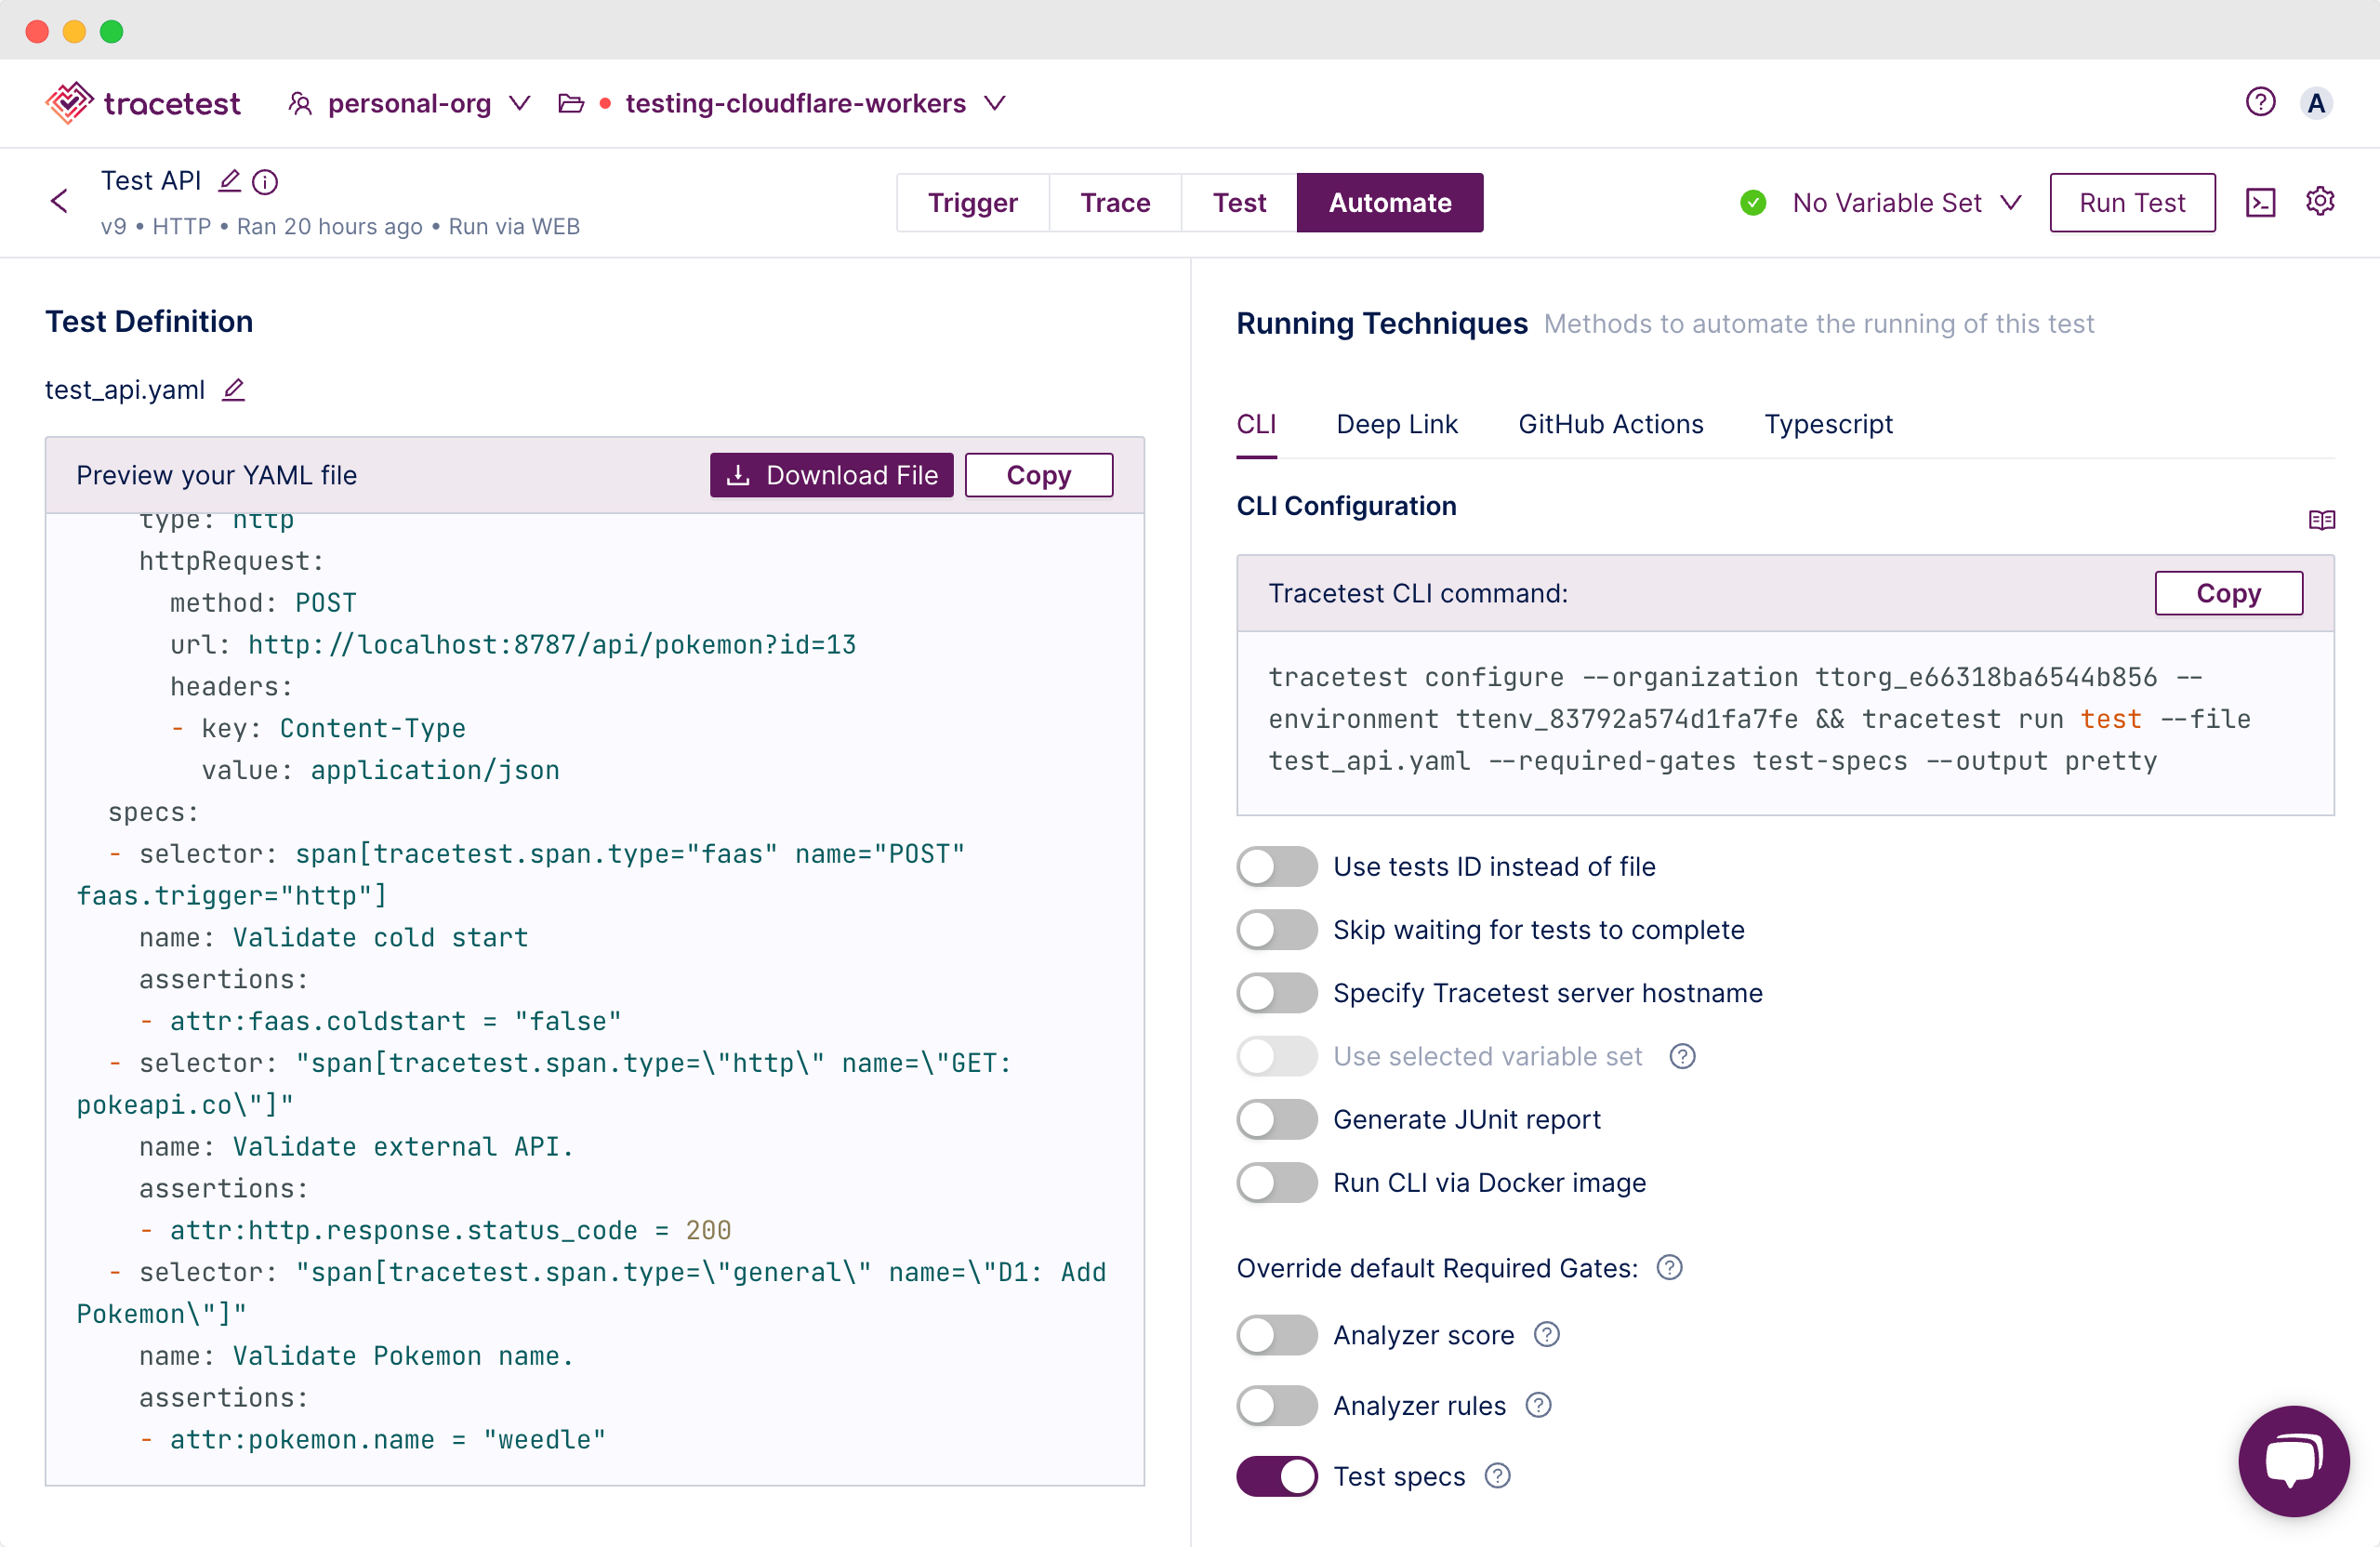
Every test you create can be expressed with YAML. I know you love YAML, quit complaining! 😄
With this test definition you can trigger the same test via the CLI either locally or in any CI pipeline of you choice.
To try it locally, create a directory called `test` in the root directory.
Paste this into a file called `test-api.prod.yaml`.
```yaml
type: Test
spec:
id: WMGTfM2Sg
name: Test API Prod
trigger:
type: http
httpRequest:
method: POST
url: https://pokemon-api.<YOUR_URL>.workers.dev/api/pokemon?id=13
headers:
- key: Content-Type
value: application/json
specs:
- selector: span[tracetest.span.type="faas" name="POST" faas.trigger="http"]
name: Validate cold start
assertions:
- attr:faas.coldstart = "false"
- selector: "span[tracetest.span.type=\"http\" name=\"GET: pokeapi.co\"]"
name: Validate external API.
assertions:
- attr:http.response.status_code = 200
- selector: "span[tracetest.span.type=\"general\" name=\"D1: Add Pokemon\"]"
name: Validate Pokemon name.
assertions:
- attr:pokemon.name = "weedle"
```
Since you already have the Tracetest CLI installed, running it is as simple as one command. You can copy the command for your environment in the Automate tab in Tracetest.
```bash
tracetest configure --organization <YOUR_ORG> --environment <YOUR_ENV> && \
tracetest run test --file ./test/test-api.prod.yaml --required-gates test-specs --output pretty
[Output]
SUCCESS Successfully configured Tracetest CLI
✘ Test API Prod (https://app.tracetest.io/organizations/<YOUR_ORG>/environments/<YOUR_ENV>/test/WMGTfM2Sg/run/1/test) - trace id: 59775e06cd96ee0a3973fa924fcf587a
✘ Validate cold start
✘ #2cff773d8ea49f9c
✘ attr:faas.coldstart = "false" (true) (https://app.tracetest.io/organizations/<YOUR_ORG>/environments/<YOUR_ENV>/test/WMGTfM2Sg/run/1/test?selectedAssertion=0&selectedSpan=2cff773d8ea49f9c)
✔ Validate external API.
✔ #d01b92c183b45433
✔ attr:http.response.status_code = 200 (200)
✔ Validate Pokemon name.
✔ #12443dd73de11a68
✔ attr:pokemon.name = "weedle" (weedle)
✘ Required gates
✘ test-specs
```
What’s cool is you can follow the link and open the particular test in Tracetest and view it once it’s saved in the cloud. [Here’s a guide on using this pattern for integration testing](https://docs.tracetest.io/examples-tutorials/recipes/testing-cloudflare-workers-with-opentelemetry-tracetest#integration-testing-the-cloudflare-worker) Cloudflare Workers in the docs.
## Beyond Deployment Testing
In conclusion, today you learned how to craft production-ready Cloudflare Workers. You now know how to develop, troubleshoot, and test Cloudflare Workers in staging and production. You started from a boilerplate, built an import flow, integrated OpenTelemetry for distributed tracing, and used trace-based testing for integration and deployment testing.
Want more? Jump over to the docs to learn about:
- [Testing Cloudflare Workers in your local development environment.](https://docs.tracetest.io/examples-tutorials/recipes/testing-cloudflare-workers-with-opentelemetry-tracetest#testing-the-cloudflare-worker-locally)
- [Integration testing Cloudflare Workers for CI pipelines.](https://docs.tracetest.io/examples-tutorials/recipes/testing-cloudflare-workers-with-opentelemetry-tracetest#integration-testing-the-cloudflare-worker)
If you get stuck along the tutorial, feel free to check out the [example app in the GitHub repo, here](https://github.com/kubeshop/tracetest/examples/testing-cloudflare-workers).
Stay tuned for the next part of this series coming soon:
- **Part 2**: Learn how to configure production troubleshooting and testing in Cloudflare Workers by using observability tools like Grafana and Jaeger.
Would you like to learn more about Tracetest and what it brings to the table? Visit the Tracetest [docs](https://docs.tracetest.io/getting-started/installation) and try it out by [downloading](https://tracetest.io/download) it today!
Also, please feel free to join our [Slack community](https://dub.sh/tracetest-community), give [Tracetest a star on GitHub](https://github.com/kubeshop/tracetest), or schedule a [time to chat 1:1](https://calendly.com/ken-kubeshop/45min).
.jpg)
.avif)
.avif)