Running Trace-Based Tests on the OpenTelemetry Demo App with Nomad


Shows how to install Tracetest and the OTel Demo App on Nomad running locally using HashiQube & how to create and run a simple test with Tracetest.
Table of Contents
Get started with Tracetest!
Try Managed Tracetest Today!
The concept of Trace-based testing (TBT) was first presented by my awesome colleague, [Ted Young](https://twitter.com/tedsuo), at [KubeCon North America 2018](https://www.youtube.com/watch?v=NU-fTr-udZg). The idea behind it was simple, yet elegant: if you’re already creating distributed [Traces](https://opentelemetry.io/docs/concepts/signals/traces/) in your application code, why not use this same Trace data to create test assertions to validate your end-to-end system flow?
Back in 2018, Trace-based testing was just an idea. Fast-forward to today: TBT is now a reality, thanks to Trace standardization à la [OpenTelemetry](https://opentelemetry.io/) (OTel) and Trace-based testing tools like [Tracetest](https://tracetest.io/), [Helios](https://gethelios.dev/), and [Malabi](https://github.com/aspecto-io/malabi).
I first heard about TBT in the summer of 2022, when I was writing a piece on how [Observability is useful for QAs](https://lightstep.com/blog/observability-mythbusters-not-only-for-sre). After writing the piece, I wanted to get my hands dirty and try this Trace-based testing thing for myself. The tool that I chose for my initial TBT explorations was Tracetest, which is open-source.
## Tracetest Overview
Tracetest came out in May 2022, and I first got my hands on Tracetest [back in June 2022](https://github.com/lightstep/tracetest-nomad/tree/main/jobspec), so it was still pretty fresh! At the time, it integrated only with Jaeger. More specifically, it used the Jaeger API to pull OTel Traces from Jaeger to register them into Tracetest. You then used the UI to create trace-based tests.
Tracetest has come a long way since those early days! It now has:
- A CLI
- A quickstart installer so that you can get a full-fledged example up and running on an existing Kubernetes cluster (Very slick and easy to get going, I might add!)
- [Integrations](https://tracetest.io/integrations) with a number of Observability back-ends and other tools, including [Lightstep](https://app.lightstep.com/).
- A declarative approach to defining Trace-based tests via YAML
I got to play around with these newer features last December, after a months-long hiatus, and it was really cool to see the evolution of the product. If you follow [my work](https://linktr.ee/adriana_villela), you’ll know that I play in both the Kubernetes and Nomad worlds. Today, I’ll be taking you on a quick little guided tour of Tracetest, using Traces from the [OpenTelemetry Demo App](https://github.com/open-telemetry/opentelemetry-demo) to give you a feel for how it works. The whole setup will be running on HashiCorp Nomad.
## Tutorial
In this tutorial, I will show you how to install Tracetest (v0.9.1) and the OTel Demo App (v1.1.0) on Nomad running locally using [HashiQube](https://github.com/servian/hashiqube). I will then show you how to create and run a simple test with Tracetest, using a couple of Traces from the OTel Demo App.
Although the versions of both Tracetest and the OTel Demo App used in this tutorial are slightly older than what’s out there, you should still get a decent idea of how everything works. The OTel Demo App is configured to send Traces and Metrics to Lightstep via the [OTel Collector](https://opentelemetry.io/docs/collector/). The Collector is also configured to send Traces to Tracetest. This configuration is based on guidance from the [official Tracetest docs](https://docs.tracetest.io/configuration/connecting-to-data-stores/lightstep/). You can see the full Collector configuration used in this example [here](https://github.com/avillela/nomad-conversions/blob/ed7b383ab743e279e4b658d3b6bdf036be3dc46f/tracetest/jobspec/otel-collector.nomad#L93-L163).
Please note that there are no official Nomad jobspecs for either Tracetest or the OTel Demo App, so I went ahead and did the conversions myself from Kubernetes manifests to Nomad jobspecs. You can check out the jobspecs in [this repo](https://github.com/avillela/nomad-conversions). If you’re curious as to how I went about the Kubernetes-to-Nomad conversion, you can [check out my blog post on this topic](https://medium.com/dev-genius/how-to-convert-kubernetes-manifests-into-nomad-jobspecs-7a58d2fa07a0). I also have a blog post dedicated to running the OTel Demo App on Nomad. If this tickles your fancy, you can check it out [here](https://medium.com/@adri-v/running-the-opentelemetry-demo-app-on-hashicorp-nomad-a3e21e35369d).
### Assumptions
Before we move on, I am assuming that you have a basic understanding of:
- Nomad. If not, mosey on over to my [Nomad intro post](https://adri-v.medium.com/just-in-time-nomad-80f57cd403ca). [This blog post](https://danielabaron.me/blog/nomad-tips-and-tricks/) by [Daniela Baron](https://danielabaron.me/) is also great.
- Observability (o11y) and [OpenTelemetry](https://opentelemetry.io/) (OTel). If not, mosey on over to my [Observability & OTel post](https://storiesfromtheherd.com/unpacking-observability-the-observability-stack-93d4733e2a72).
### Pre-Requisites
In order to run the example in this tutorial, you’ll need the following:
- [Vagrant](https://vagrantup.com/) (version 2.3.1 at the time of this writing) - to provision HashiQube
- [Docker](https://docker.com/) (version 20.10.21 at the time of this writing) - we’ll be running HashiQube on Docker, using the [Vagrant Docker Provider](https://developer.hashicorp.com/vagrant/docs/providers/docker).
You’ll also need to make sure that your Docker Desktop resource settings are set to the following:
- CPUs: 3
- Memory: 9.5GB
- Swap: 3GB
### Tutorial Repos
Below are the repos that we’ll be using for today’s tutorial:
- [My modified HashiQube Repo](https://github.com/avillela/hashiqube) (fork of [servian/hashiqube](https://github.com/servian/hashiqube)). If you’re curious, you can see what modifications I’ve made [here](https://github.com/avillela/hashiqube#about).
- My [Nomad Conversions](https://github.com/avillela/nomad-conversions) repo
### Part 1: Provision Nomad, Consul, and Vault using HashiQube
In this section, we’ll be provisioning a local Hashi environment (including Nomad, Consul, and Vault) instance using [HashiQube](https://github.com/avillela/hashiqube). Then, we’ll install [Tracetest](https://tracetest.io/) and the [OTel Demo App](https://github.com/open-telemetry/opentelemetry-demo) on [Nomad](https://nomadproject.io/). Feel free to skip this section if you already have a working Hashi environment with Nomad, Consul, and Vault.
### 1 - Update /etc/hosts
We use the [Traefik](https://traefik.io/) load-balancer to expose our services, which we access as subdomains of `localhost`. In order ensure that we can access our Traefik-exposed services (and also the Traefik dashboard itself, you’ll need to add the following entries to `/etc/hosts` on your host machine:
```
127.0.0.1 traefik.localhost
127.0.0.1 otel-demo.localhost
127.0.0.1 tracetest.localhost
```
For more on Traefik load-balancing on Nomad, check out [this post](https://medium.com/dev-genius/running-hashiqube-using-the-vagrant-docker-provider-3e551c0eca97).
### 2 - Provision a Local Hashi Environment with HashiQube
Start HashiQube by following the detailed instructions [here](https://github.com/avillela/hashiqube#quickstart).
You can now access the apps below:
- Vault: [http://localhost:8200](http://localhost:8200/)
- Nomad: [http://localhost:4646](http://localhost:4646/)
- Consul: [http://localhost:8500](http://localhost:8500/)
- Traefik: [http://traefik.localhost](http://traefik.localhost/)
### Part 2: Deploying Tracetest and the OTel Demo App on Nomad
We’re ready to deploy the OTel Demo App and Tracetest on Nomad!
### 1 - Add Lightstep Access Token to Vault
As I mentioned earlier, we’ll be sending our Traces to both Lightstep and Tracetest. In order to send Traces to Lightstep, you’ll need to:
1. Get a [Lightstep Access Token](https://docs.lightstep.com/docs/create-and-manage-access-tokens#create-an-access-token). (Make sure that you [sign up](https://app.lightstep.com/signup) for a [Lightstep](https://app.lightstep.com/) account first, if you don’t already have one.)
2. Configure Vault by following the instructions [here](https://github.com/avillela/hashiqube#vault-setup).
3. Add your Lightstep Access Token to Vault by running the command:
```bash
vault kv put kv/otel/o11y/lightstep ls_token="<LS_TOKEN>"
```
Where `<LS_TOKEN>` is your [Lightstep Access Token](https://docs.lightstep.com/docs/create-and-manage-access-tokens#create-an-access-token).
### 2 - Deploy the OTel Demo App and Tracetest
First, let’s clone the repo, and go to our working directory:
```bash
git clone https://github.com/avillela/nomad-conversions.git
cd nomad-conversions
```
Next, let’s deploy the services:
```bash
# Enable memory over-subscription
nomad operator scheduler set-config -memory-oversubscription true
# Tracetest deploy
nomad job run -detach tracetest/jobspec/traefik.nomad
nomad job run -detach tracetest/jobspec/postgres.nomad
nomad job run -detach tracetest/jobspec/tracetest.nomad
nomad job run -detach tracetest/jobspec/otel-collector.nomad
nomad job run -detach tracetest/jobspec/go-server.nomad
# OTel Demo App deploy
nomad job run -detach otel-demo-app/jobspec/redis.nomad
nomad job run -detach otel-demo-app/jobspec/ffspostgres.nomad
nomad job run -detach otel-demo-app/jobspec/adservice.nomad
nomad job run -detach otel-demo-app/jobspec/cartservice.nomad
nomad job run -detach otel-demo-app/jobspec/currencyservice.nomad
nomad job run -detach otel-demo-app/jobspec/emailservice.nomad
nomad job run -detach otel-demo-app/jobspec/featureflagservice.nomad
nomad job run -detach otel-demo-app/jobspec/paymentservice.nomad
nomad job run -detach otel-demo-app/jobspec/productcatalogservice.nomad
nomad job run -detach otel-demo-app/jobspec/quoteservice.nomad
nomad job run -detach otel-demo-app/jobspec/shippingservice.nomad
nomad job run -detach otel-demo-app/jobspec/checkoutservice.nomad
nomad job run -detach otel-demo-app/jobspec/recommendationservice.nomad
nomad job run -detach otel-demo-app/jobspec/frontend.nomad
nomad job run -detach otel-demo-app/jobspec/loadgenerator.nomad
nomad job run -detach otel-demo-app/jobspec/frontendproxy.nomad
nomad job run -detach otel-demo-app/jobspec/grafana.nomad
nomad job run -detach otel-demo-app/jobspec/jaeger.nomad
nomad job run -detach otel-demo-app/jobspec/prometheus.nomad
```
> ***NOTE:*** We’ve enabled memory [oversubscription](https://developer.hashicorp.com/nomad/docs/commands/operator/scheduler/set-config#memory-oversubscription) in Nomad. This is a one-time setting.
Since we’re running the jobs in [detached mode](https://developer.hashicorp.com/nomad/docs/commands/job/run#detach), Nomad won’t wait to start the next job until the current one has deployed successfully. This means that your output will look something like this:
```bash
Job registration successful
Evaluation ID: d3eaa396-954e-241f-148d-6720c35f34bf
Job registration successful
Evaluation ID: 6bba875d-f415-36b7-bfeb-2ca4b9982acb
Job registration successful
Evaluation ID: 16dc8ef8-5e26-68f4-89b6-3d96b348775b
Job registration successful
Evaluation ID: 34de0532-a3b5-8691-bf18-51c0cc030573
Job registration successful
Evaluation ID: 7310e6a2-9945-710b-1505-c01bd58ccd35
...
```
Friendly reminder that the `Evaluation ID` values will be different on your machine.
### 3 - See it in Nomad
As things are deploying, you can mosey on over to the Nomad UI at [http://localhost:4646](http://localhost:4646/) to see how things are coming along:
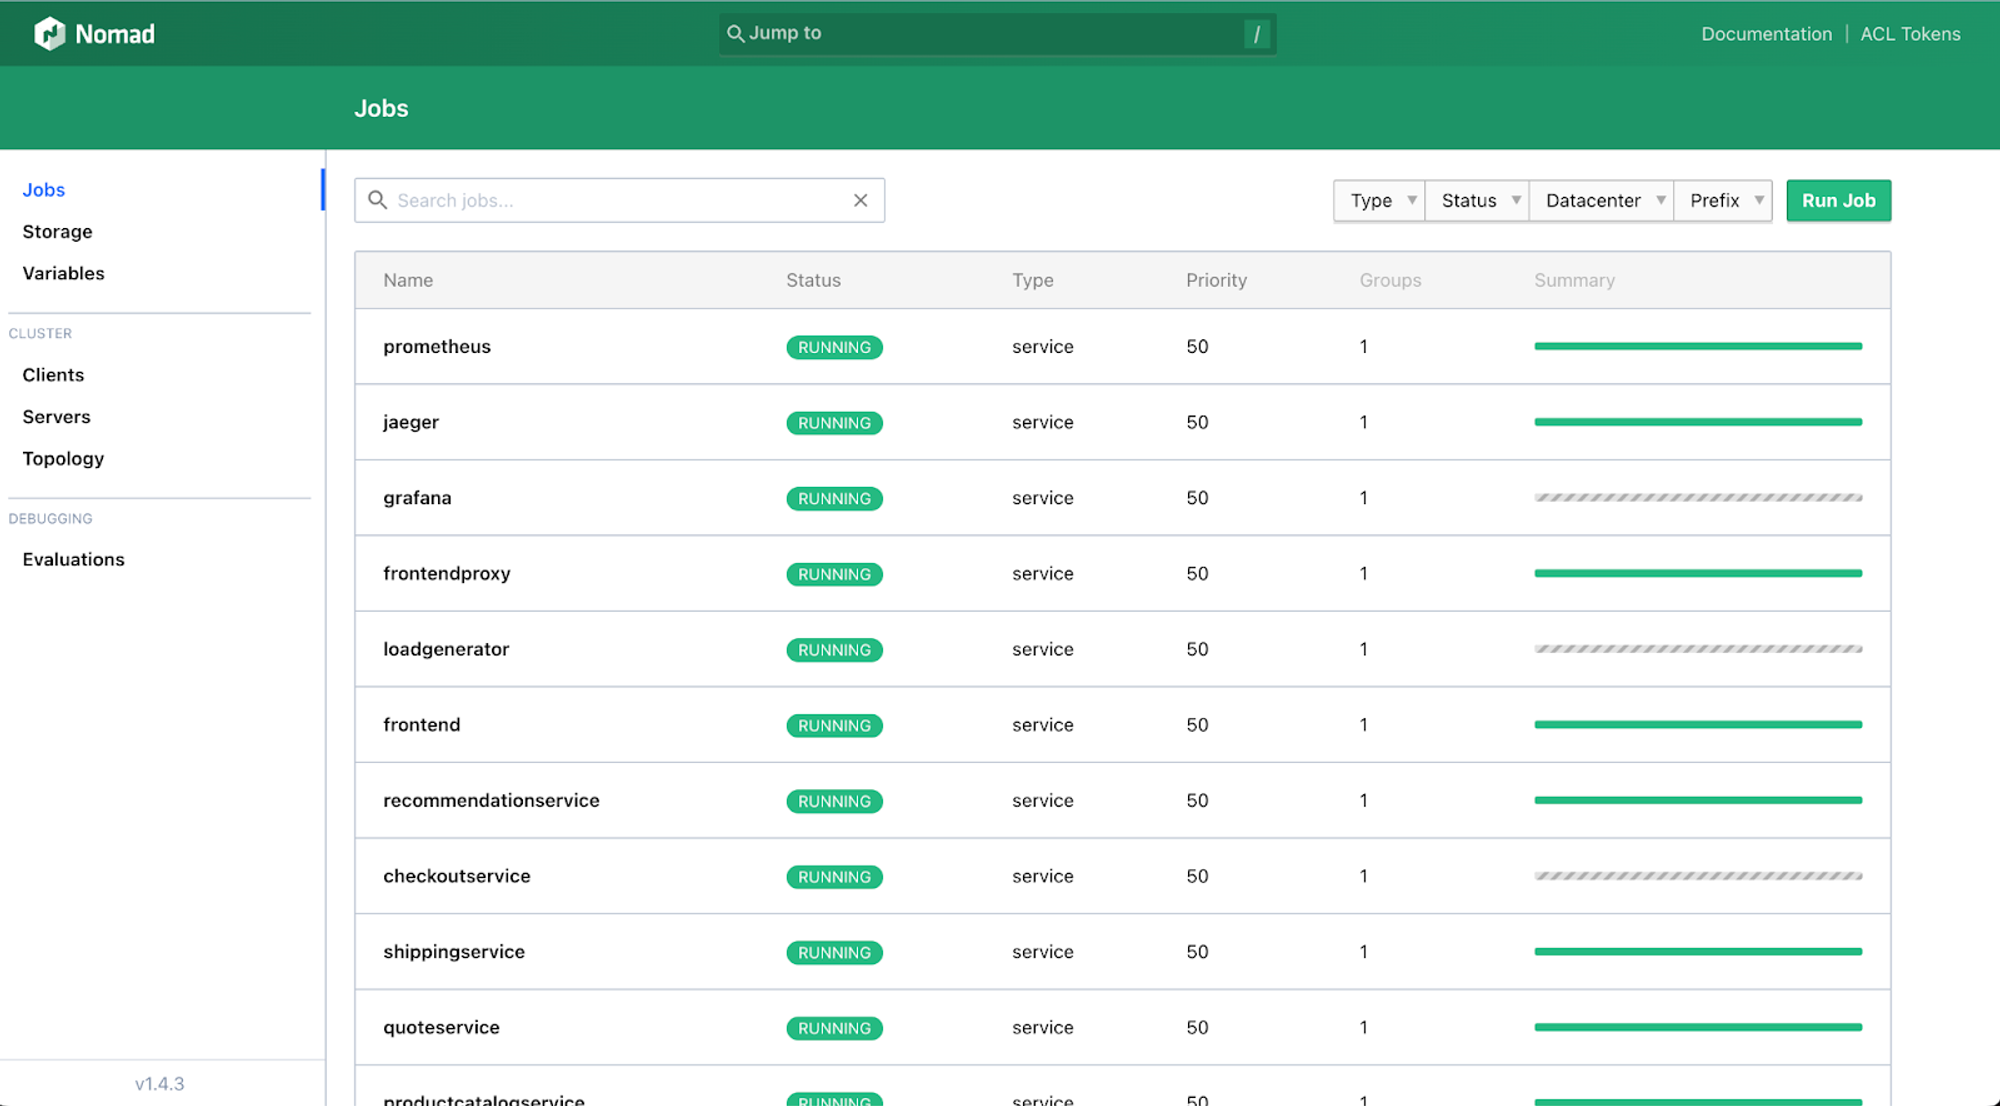
It will take some time for all of the services to come up (sometimes up to 30 minutes), depending on network speed (especially since Nomad needs to download the images and initialize the services) and system resources, so be patient! Since some services depend on other services in order to run, you may see services in limbo or some going up and down for a while, per the above screen capture. DON’T PANIC! IT WILL ALL BE OKAY!!
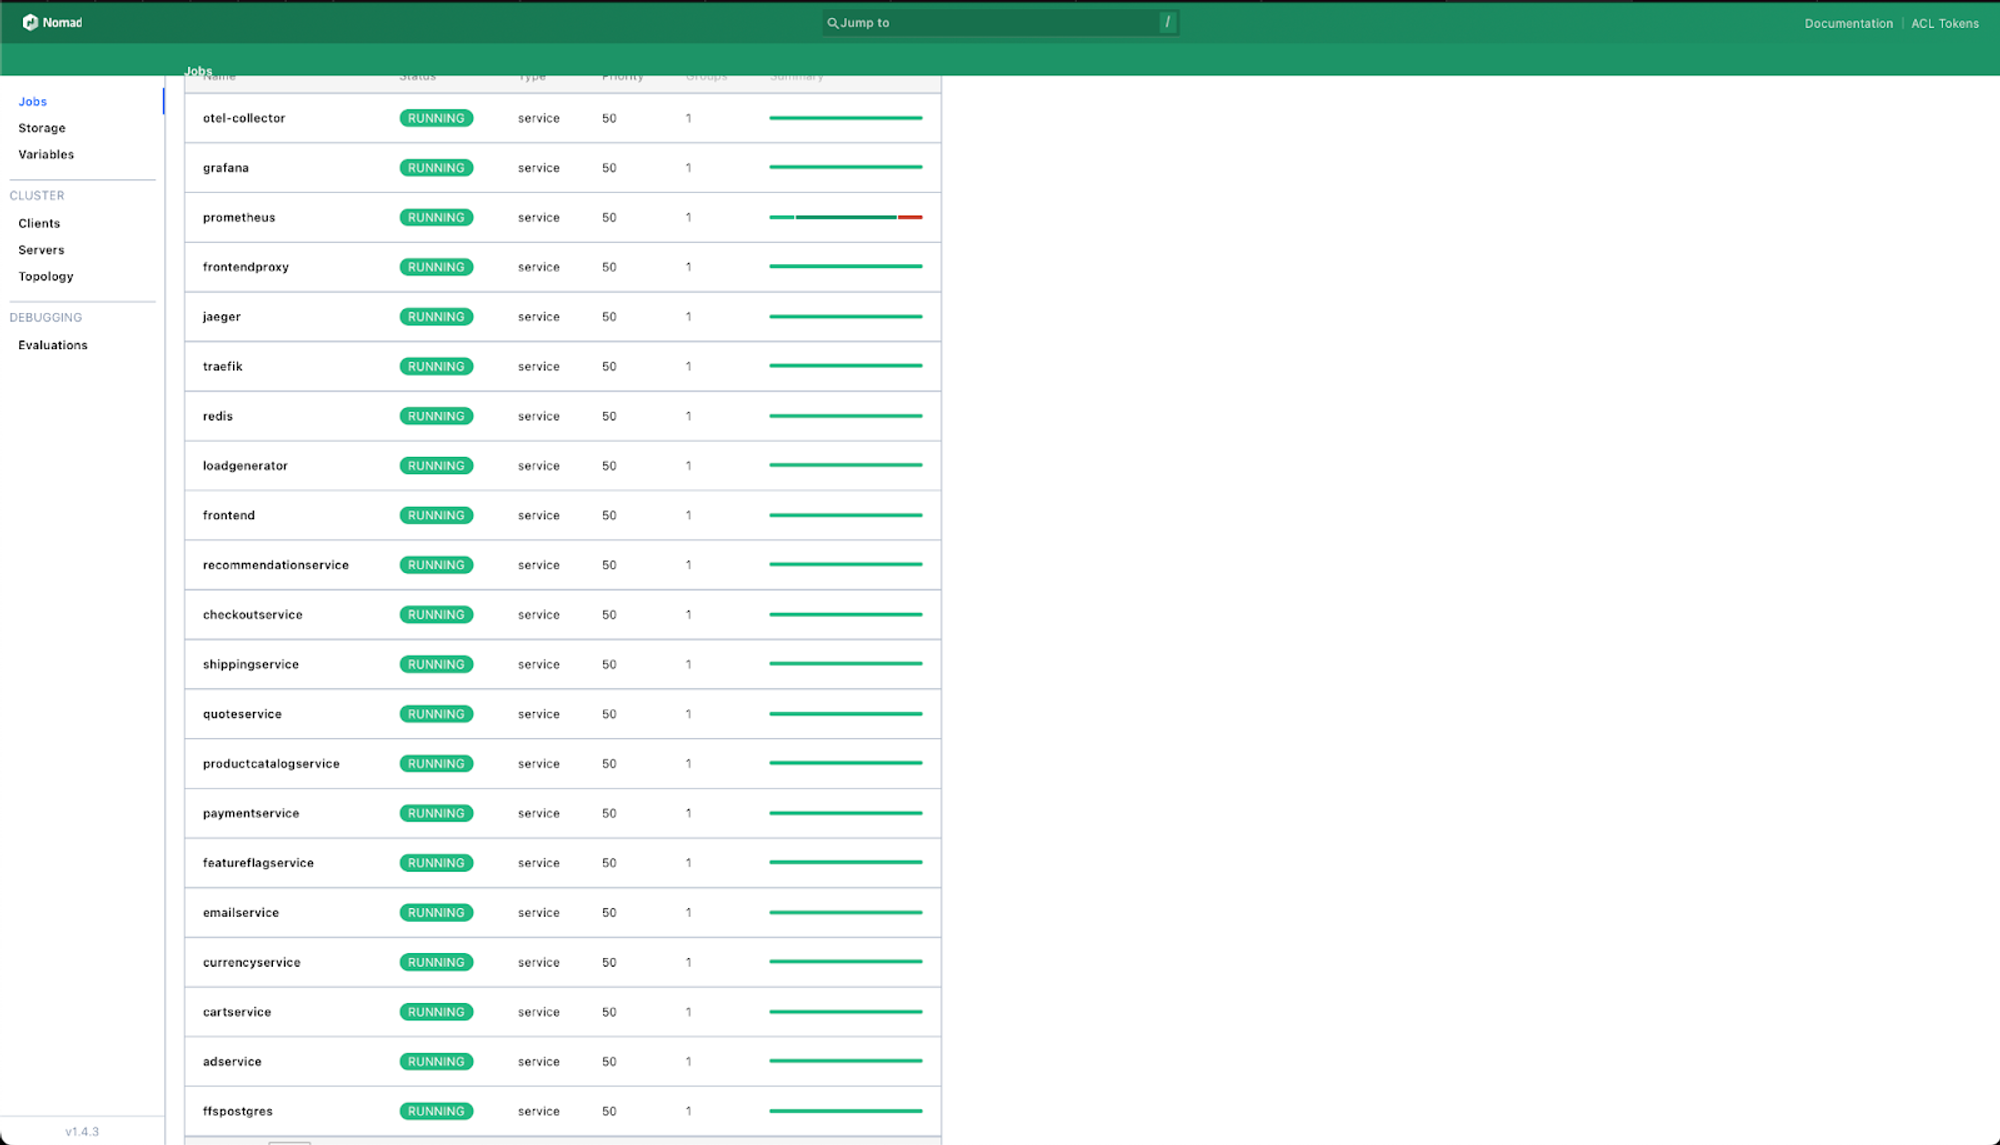
Once all of the jobs are up and running, you’ll see everything look green, like this:
You can also head on over to Consul at [http://localhost:8500](http://localhost:8500/) to see the health of the services:
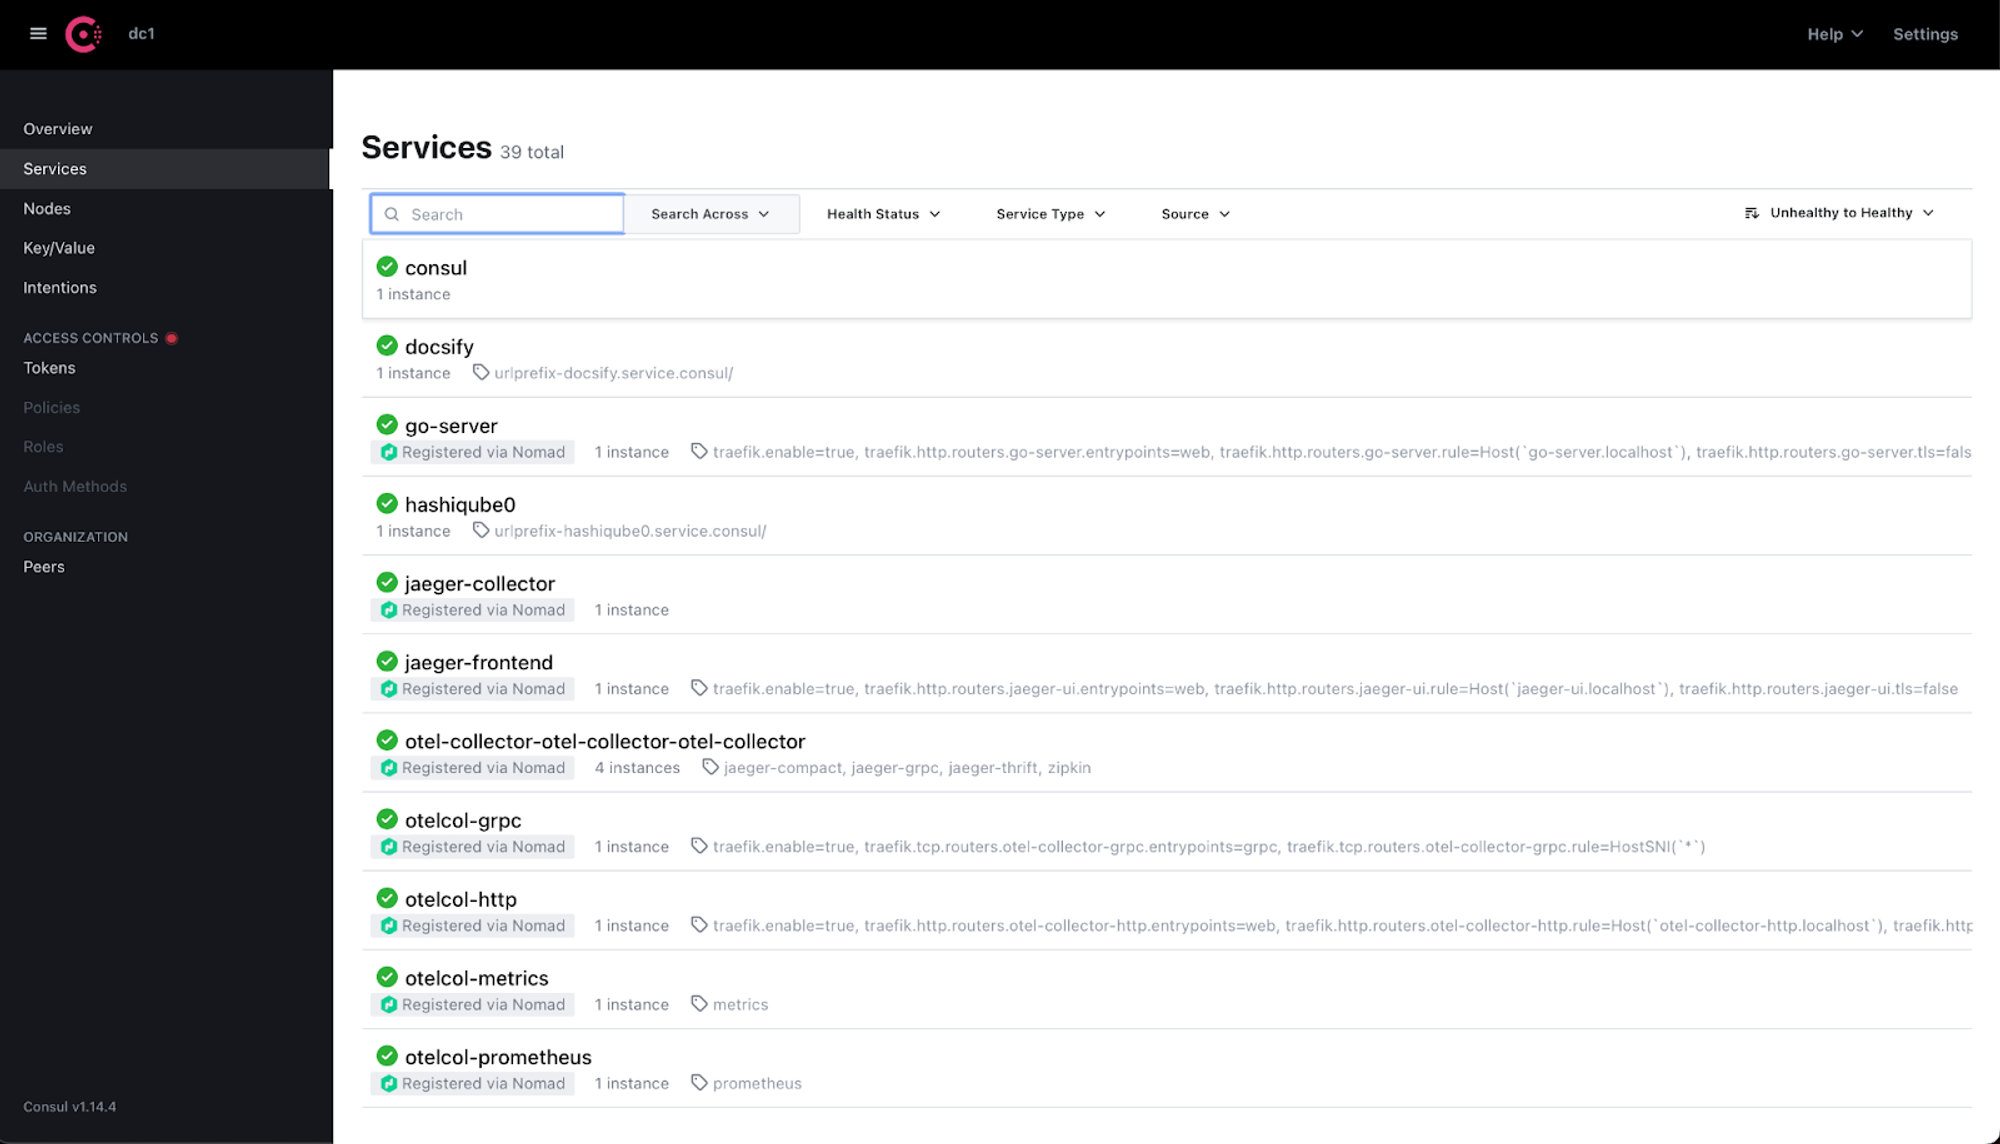
By default, unhealthy services show up at the top, with a red “x” next to them. Since we don’t see any nasty red “x”s in the above screen shot, we know that our services are lookin’ good!
### 4 - Access the OTel Demo App
To make sure that the OTel Demo App is up and running, you can access it at: [http://otel-demo.localhost](http://otel-demo.localhost/).

### 5 - Access Tracetest
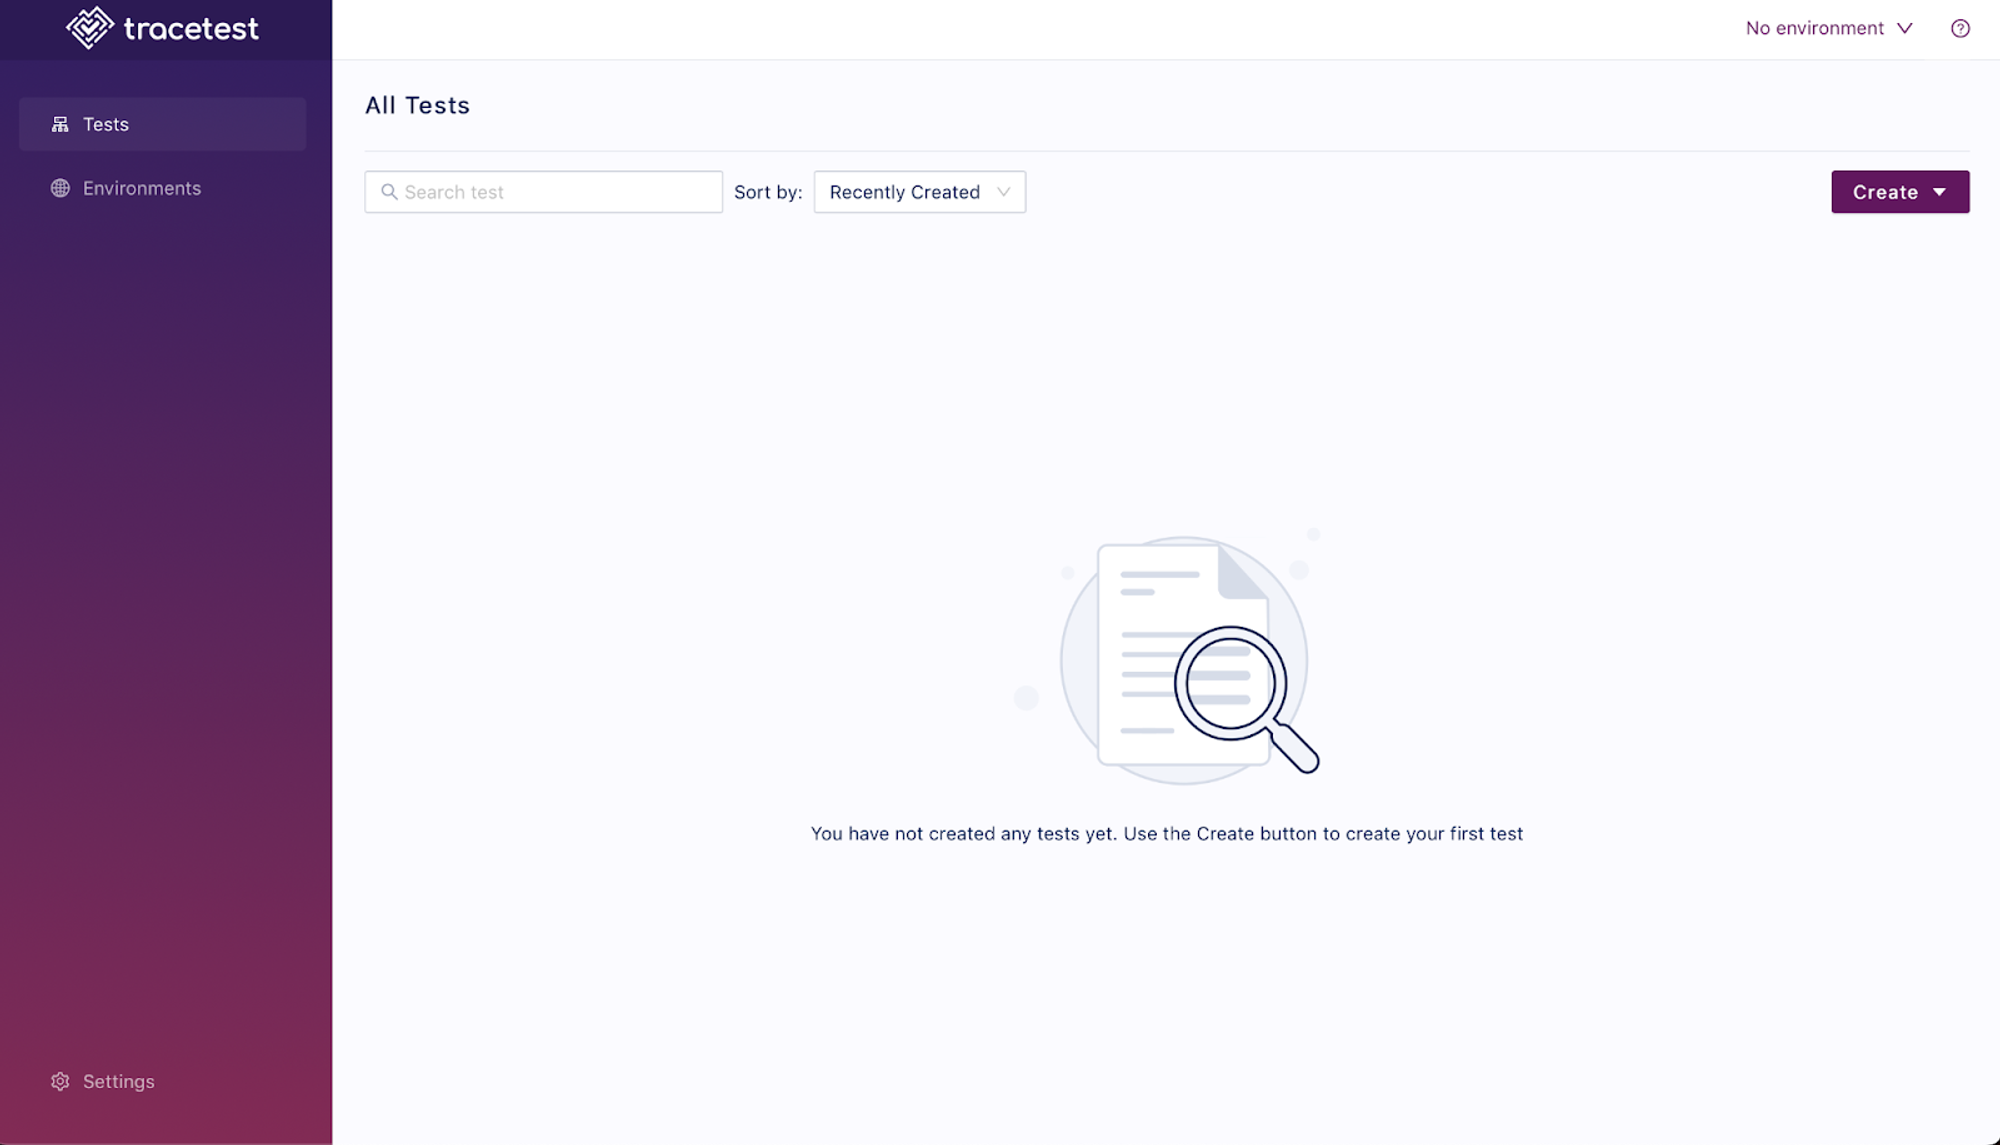
You should also be able to access the Tracetest UI at: [http://tracetest.localhost](http://tracetest.localhost/)
### Part 3: Creating & Running Tests in Tracetest
Now that we have the OTel Demo App and Tracetest up and running, we can finally create our tests in Tracetest!
### 1 - Install the Tracetest CLI
The Tracetest CLI allows you to interact with Tracetest programmatically. You can install the Tracetest CLI on Mac via Homebrew:
```bash
brew install kubeshop/tracetest/tracetest
```
For Windows and Linux, check out the instructions [here](https://docs.tracetest.io/getting-started/installation#install-the-tracetest-cli).
Let’s make sure that the CLI is installed properly:
```bash
tracetest version
```
Sample output:
```bash
v0.9.1
```
### 2 - Configure the Tracetest CLI
Now that the CLI is installed, let’s configure the Tracetest CLI so that it knows what Tracetest installation it needs to talk to. Make sure that you’re still in the [nomad-conversions](https://github.com/avillela/nomad-conversions) root directory, and then run:
```bash
cd tracetest
tracetest configure
```
This will create a file called `config.yaml` in the directory from which you ran `tracetest configure`.
When you run the above command, you will be prompted for the Tracetest server URL:
```bash
Enter your Tracetest server URL [http://tracetest.localhost]:
```
Notice that it’s already pre-populated with `http://tracetest.localhost`. This is because there’s already a `config.yaml` file in our `tracetest` directory. If you don’t type anything in and hit return, the CLI will just use the value already in `config.yaml`. If you want to use a different URL, make sure that you prefix that URL with `http://` (or `https://` if you’re hosting a secure instance).
Next, you’ll be prompted on whether or not you wish to enable analytics:
```bash
Enable analytics? [Y/n]:
```
If you hit return here, it will enable analytics by default. Type `n` to disable analytics.
Now, let’s open up `config.yaml`:
```bash
cat config.yaml
```
Sample output:
```bash
scheme: http
endpoint: tracetest.localhost
analyticsEnabled: false
```
### 3 - Create a Trace-based test in Tracetest
Now we’re ready to create a test! We can do this in one of two ways:
- Using the UI (check out the Tracetest docs [here](https://docs.tracetest.io/web-ui/creating-tests) for details)
- From a YAML file
I’m a big fan of doing things programmatically, so let’s create our test from a YAML file. [Per the Tracetest docs](https://docs.tracetest.io/web-ui/creating-tests), you can create tests from HTTP requests, [gRPC](https://grpc.io/) requests, [cURL](https://curl.se/) commands, and more. In our case, we’re creating our tests from a gRPC request, so our Tracetest test definition file YAML looks like this:
```yaml
## NOTE: Must set static port for recommendationservice jobspec for this to work
type: Test
spec:
id: <test_id>
name: <test_name>
description: <test_description>
trigger:
type: grpc
grpc:
protobufFile: |
<protobuf_file_contents_here>
address: <grpc_endpoint_address>
method: <grpc_method_name>
specs:
- selector: span[tracetest.span.type="general" name="<operation_name>"]
assertions:
- attr:<attribute_name> <operator> <value>
```
Where:
- `<test_id>` is a unique test identifier. If you create your test via the UI, a unique ID is assigned. If you create a test from a YAML file, you can assign your own ID. For this example, let's name our ID `tt-recsvc-01`. As long as it's unique, you should be good.
- `<test_name>` is the name of your test. Use something short and meaningful.
- `<test_description>` is short description of your test.
- `trigger.type` is `grpc`, since we’re creating a test from a gRPC request.
- `trigger.grpc.protobufFile` should be the ***complete contents*** of your [protobuf file](https://en.wikipedia.org/wiki/Protocol_Buffers). In our case, we’re going to embed the contents of [OTel Demo App](https://github.com/open-telemetry/opentelemetry-demo)’s [demo.proto](https://github.com/open-telemetry/opentelemetry-demo/blob/v1.1.0/pb/demo.proto) file in this field.
- `<grpc_endpoint_address>` is the address at which the gRPC endpoint is served. In this case, we’re using [Consul DNS](https://developer.hashicorp.com/consul/docs/discovery/dns) to expose the service’s address. If we look at the [Recommendation Service’s Nomad jobspec](https://github.com/avillela/nomad-conversions/blob/main/otel-demo-app/jobspec/recommendationservice.nomad), you’ll see that the name of the gRPC service is `recommendationservice`. So when we query it in [Consul](https://consul.io/), it should be accessible at this address `recommendationservice.service.consul`. We can test this by logging into the HashiQube image. Do this by going to the root directory of HashiQube repo, and typing `vagrant ssh`. Once you’re in the HashiQube Vagrant box, run this command:
```yaml
dig +short recommendationservice.service.consul
```
Expected result:
```yaml
172.17.0.2
```
We get the port number from the Recommendation Service jobspec’s [port definition stanza](https://github.com/avillela/nomad-conversions/blob/ed7b383ab743e279e4b658d3b6bdf036be3dc46f/otel-demo-app/jobspec/recommendationservice.nomad#L18). In our case, the port number is [9001](https://github.com/avillela/nomad-conversions/blob/ed7b383ab743e279e4b658d3b6bdf036be3dc46f/otel-demo-app/jobspec/recommendationservice.nomad#L18). Note that we need to use a static port number in order for this setup to work.
- `<grpc_method_name>` is the name of the gRPC method that we’re testing. It follows the naming convention `<package_name>.<service_name>.<method_name>`. Where `<package_name>` is [hipstershop](https://github.com/open-telemetry/opentelemetry-demo/blob/9a66c3a7e490dc0a30c738b92d931d04ce42f479/pb/demo.proto#L19), `<service_name>` is [RecommendationService](https://github.com/open-telemetry/opentelemetry-demo/blob/9a66c3a7e490dc0a30c738b92d931d04ce42f479/pb/demo.proto#L58), and `<method_name>` is [ListRecommendations](https://github.com/open-telemetry/opentelemetry-demo/blob/9a66c3a7e490dc0a30c738b92d931d04ce42f479/pb/demo.proto#L59).
- `spec` is where we define our test assertions. We need to first select our target Span(s), and then we define what assertions to apply to the Span(s). In our case, we are selecting a span named `get_product_list`, and we’re asserting that the value of the attribute `app.filtered_products.count` is set to `9`.
With all that in mind, our YAML should now look like this:
```yaml
type: Test
spec:
id: tt-recsvc-01
name: RecommendationService test
description: Sample test file for the OTel Demo App RecommendationService
trigger:
type: grpc
grpc:
protobufFile: |
// Copyright 2020 Google LLC
//
// Licensed under the Apache License, Version 2.0 (the "License");
// you may not use this file except in compliance with the License.
// You may obtain a copy of the License at
//
// http://www.apache.org/licenses/LICENSE-2.0
//
// Unless required by applicable law or agreed to in writing, software
// distributed under the License is distributed on an "AS IS" BASIS,
// WITHOUT WARRANTIES OR CONDITIONS OF ANY KIND, either express or implied.
// See the License for the specific language governing permissions and
// limitations under the License.
syntax = "proto3";
import "google/protobuf/timestamp.proto";
package hipstershop;
option go_package = "genproto/hipstershop";
// -----------------Cart service-----------------
service CartService {
rpc AddItem(AddItemRequest) returns (Empty) {}
rpc GetCart(GetCartRequest) returns (Cart) {}
rpc EmptyCart(EmptyCartRequest) returns (Empty) {}
}
message CartItem {
string product_id = 1;
int32 quantity = 2;
}
message AddItemRequest {
string user_id = 1;
CartItem item = 2;
}
message EmptyCartRequest {
string user_id = 1;
}
message GetCartRequest {
string user_id = 1;
}
message Cart {
string user_id = 1;
repeated CartItem items = 2;
}
message Empty {}
// ---------------Recommendation service----------
service RecommendationService {
rpc ListRecommendations(ListRecommendationsRequest) returns (ListRecommendationsResponse){}
}
message ListRecommendationsRequest {
string user_id = 1;
repeated string product_ids = 2;
}
message ListRecommendationsResponse {
repeated string product_ids = 1;
}
// ---------------Product Catalog----------------
service ProductCatalogService {
rpc ListProducts(Empty) returns (ListProductsResponse) {}
rpc GetProduct(GetProductRequest) returns (Product) {}
rpc SearchProducts(SearchProductsRequest) returns (SearchProductsResponse) {}
}
message Product {
string id = 1;
string name = 2;
string description = 3;
string picture = 4;
Money price_usd = 5;
// Categories such as "clothing" or "kitchen" that can be used to look up
// other related products.
repeated string categories = 6;
}
message ListProductsResponse {
repeated Product products = 1;
}
message GetProductRequest {
string id = 1;
}
message SearchProductsRequest {
string query = 1;
}
message SearchProductsResponse {
repeated Product results = 1;
}
// ---------------Shipping Service----------
service ShippingService {
rpc GetQuote(GetQuoteRequest) returns (GetQuoteResponse) {}
rpc ShipOrder(ShipOrderRequest) returns (ShipOrderResponse) {}
}
message GetQuoteRequest {
Address address = 1;
repeated CartItem items = 2;
}
message GetQuoteResponse {
Money cost_usd = 1;
}
message ShipOrderRequest {
Address address = 1;
repeated CartItem items = 2;
}
message ShipOrderResponse {
string tracking_id = 1;
}
message Address {
string street_address = 1;
string city = 2;
string state = 3;
string country = 4;
string zip_code = 5;
}
// -----------------Currency service-----------------
service CurrencyService {
rpc GetSupportedCurrencies(Empty) returns (GetSupportedCurrenciesResponse) {}
rpc Convert(CurrencyConversionRequest) returns (Money) {}
}
// Represents an amount of money with its currency type.
message Money {
// The 3-letter currency code defined in ISO 4217.
string currency_code = 1;
// The whole units of the amount.
// For example if `currencyCode` is `"USD"`, then 1 unit is one US dollar.
int64 units = 2;
// Number of nano (10^-9) units of the amount.
// The value must be between -999,999,999 and +999,999,999 inclusive.
// If `units` is positive, `nanos` must be positive or zero.
// If `units` is zero, `nanos` can be positive, zero, or negative.
// If `units` is negative, `nanos` must be negative or zero.
// For example $-1.75 is represented as `units`=-1 and `nanos`=-750,000,000.
int32 nanos = 3;
}
message GetSupportedCurrenciesResponse {
// The 3-letter currency code defined in ISO 4217.
repeated string currency_codes = 1;
}
message CurrencyConversionRequest {
Money from = 1;
// The 3-letter currency code defined in ISO 4217.
string to_code = 2;
}
// -------------Payment service-----------------
service PaymentService {
rpc Charge(ChargeRequest) returns (ChargeResponse) {}
}
message CreditCardInfo {
string credit_card_number = 1;
int32 credit_card_cvv = 2;
int32 credit_card_expiration_year = 3;
int32 credit_card_expiration_month = 4;
}
message ChargeRequest {
Money amount = 1;
CreditCardInfo credit_card = 2;
}
message ChargeResponse {
string transaction_id = 1;
}
// -------------Email service-----------------
service EmailService {
rpc SendOrderConfirmation(SendOrderConfirmationRequest) returns (Empty) {}
}
message OrderItem {
CartItem item = 1;
Money cost = 2;
}
message OrderResult {
string order_id = 1;
string shipping_tracking_id = 2;
Money shipping_cost = 3;
Address shipping_address = 4;
repeated OrderItem items = 5;
}
message SendOrderConfirmationRequest {
string email = 1;
OrderResult order = 2;
}
// -------------Checkout service-----------------
service CheckoutService {
rpc PlaceOrder(PlaceOrderRequest) returns (PlaceOrderResponse) {}
}
message PlaceOrderRequest {
string user_id = 1;
string user_currency = 2;
Address address = 3;
string email = 5;
CreditCardInfo credit_card = 6;
}
message PlaceOrderResponse {
OrderResult order = 1;
}
// ------------Ad service------------------
service AdService {
rpc GetAds(AdRequest) returns (AdResponse) {}
}
message AdRequest {
// List of important key words from the current page describing the context.
repeated string context_keys = 1;
}
message AdResponse {
repeated Ad ads = 1;
}
message Ad {
// url to redirect to when an ad is clicked.
string redirect_url = 1;
// short advertisement text to display.
string text = 2;
}
// ------------Feature flag service------------------
service FeatureFlagService {
rpc GetFlag(GetFlagRequest) returns (GetFlagResponse) {}
rpc CreateFlag(CreateFlagRequest) returns (CreateFlagResponse) {}
rpc UpdateFlag(UpdateFlagRequest) returns (UpdateFlagResponse) {}
rpc ListFlags(ListFlagsRequest) returns (ListFlagsResponse) {}
rpc DeleteFlag(DeleteFlagRequest) returns (DeleteFlagResponse) {}
}
message Flag {
string name = 1;
string description = 2;
bool enabled = 3;
google.protobuf.Timestamp created_at = 4;
google.protobuf.Timestamp updated_at = 5;
}
message GetFlagRequest {
string name = 1;
}
message GetFlagResponse {
Flag flag = 1;
}
message CreateFlagRequest {
string name = 1;
string description = 2;
bool enabled = 3;
}
message CreateFlagResponse {
Flag flag = 1;
}
message UpdateFlagRequest {
string name = 1;
bool enabled = 2;
}
message UpdateFlagResponse {}
message ListFlagsRequest {}
message ListFlagsResponse {
repeated Flag flag = 1;
}
message DeleteFlagRequest {
string name = 1;
}
message DeleteFlagResponse {}
address: recommendationservice.service.consul:9001
method: hipstershop.RecommendationService.ListRecommendations
specs:
- selector: span[name="get_product_list"]
assertions:
- attr:app.filtered_products.count = 9
```
Save this file as `recsvc-test.yml` in the [tracetest/tests](https://github.com/avillela/nomad-conversions/tree/main/tracetest/tests) directory of [nomad-conversions](https://github.com/avillela/nomad-conversions).
### 4 - Run the Trace-based test
With our test YAML in hand, we can run our test! Make sure that you’re running this from [tracetest](https://github.com/avillela/nomad-conversions/tree/main/tracetest) directory of [nomad-conversions](https://github.com/avillela/nomad-conversions):
```yaml
tracetest test run --definition tests/recsvc-test.yml
```
Sample output:
```yaml
✔ RecommendationService test (http://tracetest.localhost/test/avtest4567/run/1/test)
```
Now let’s check out our test in the Tracetest UI by going to [http://tracetest.localhost](http://tracetest.localhost/):
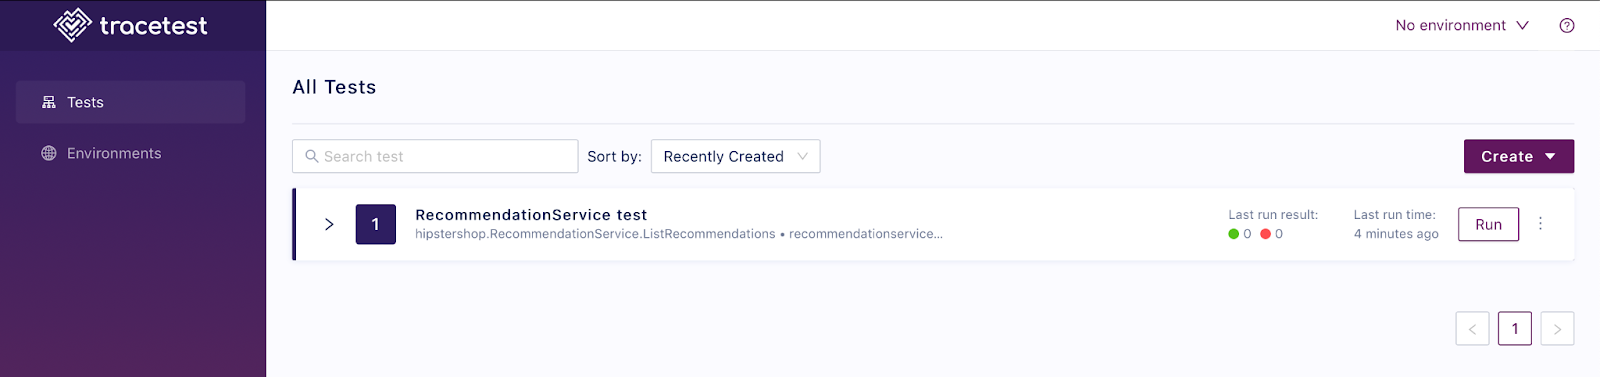
Let’s click on the `>` next to the test definition to expand it:
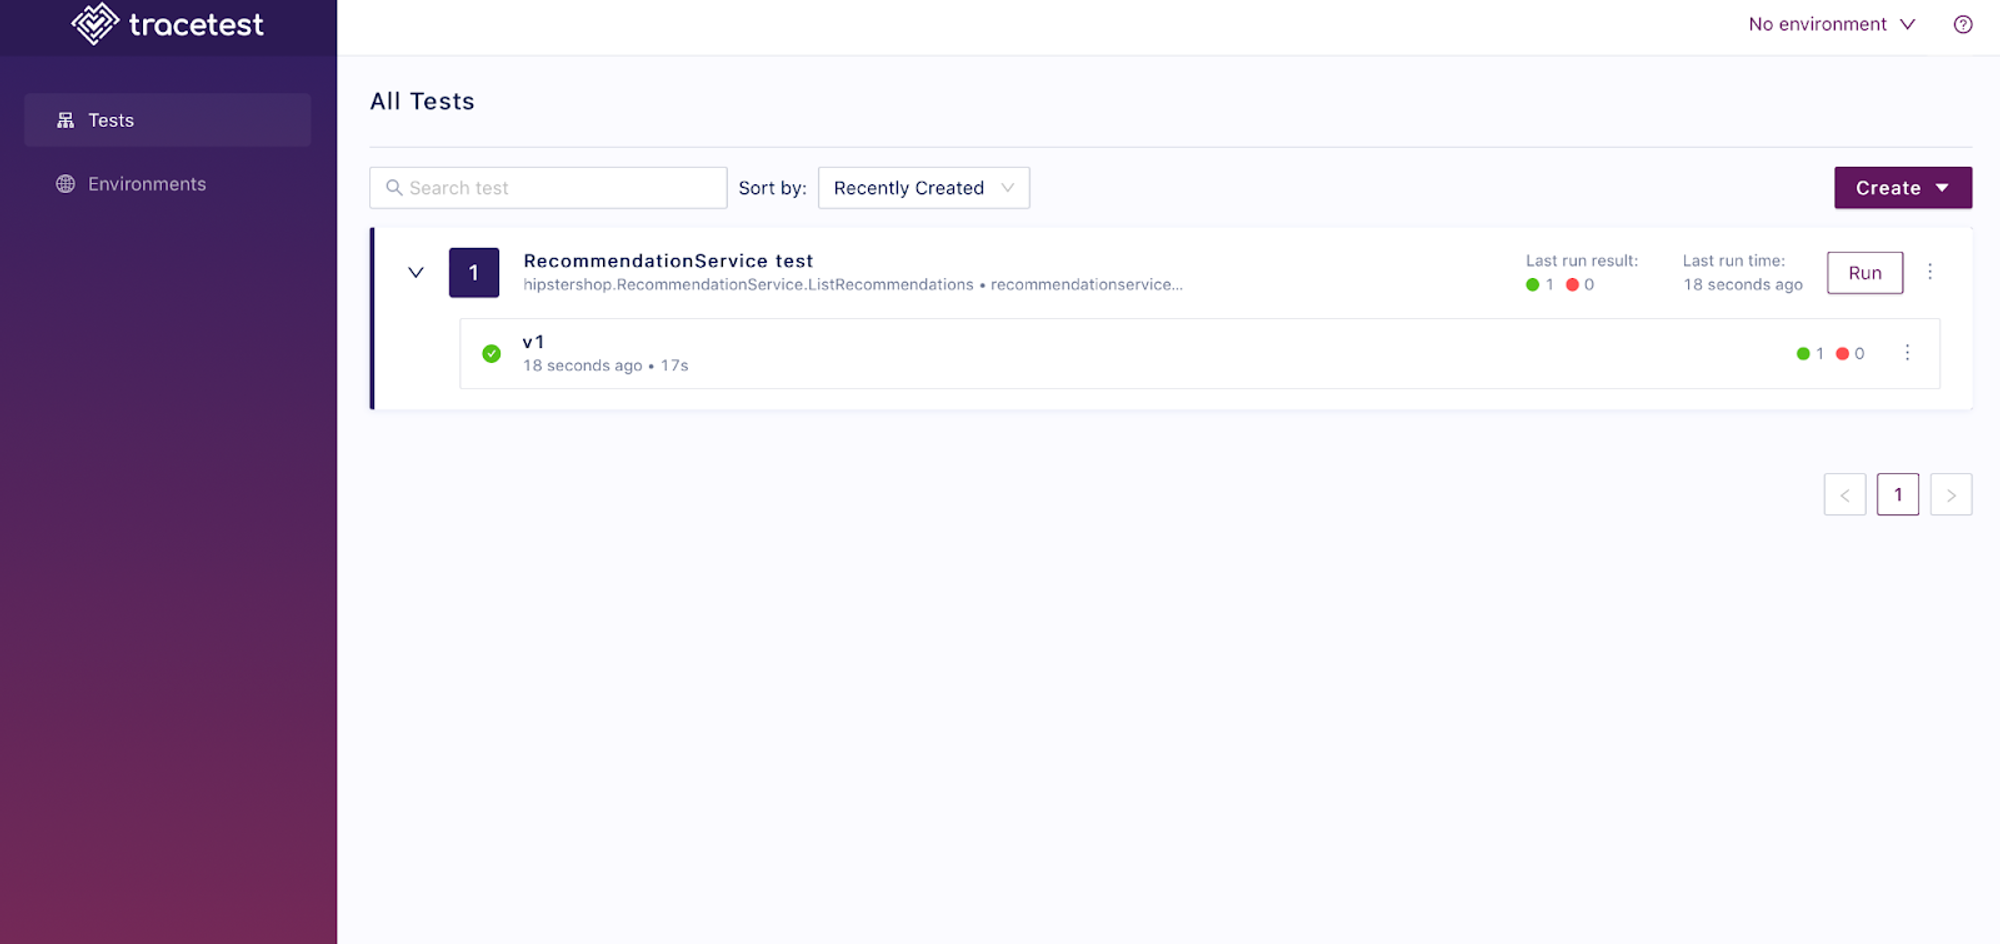
Note that the UI shows that it ran v1 of the test. If we make any changes to the test definition, Tracetest bumps the test version; however, if we were to change only the test ID and re-run the file, it would show up as an entirely different test in Tracetest, and not a different version of the same test.
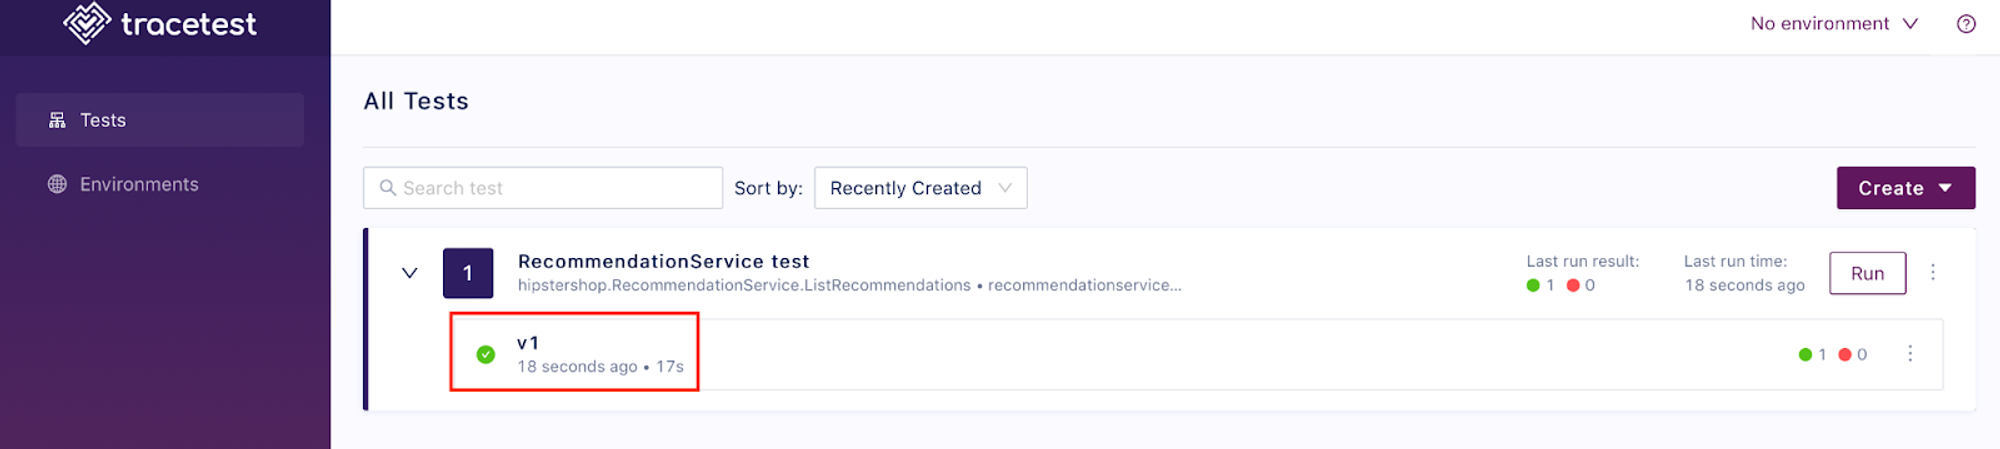
Let’s explore our test definition in the UI, by clicking in the area highlighted below:
Will take us to the test trigger definition screen:
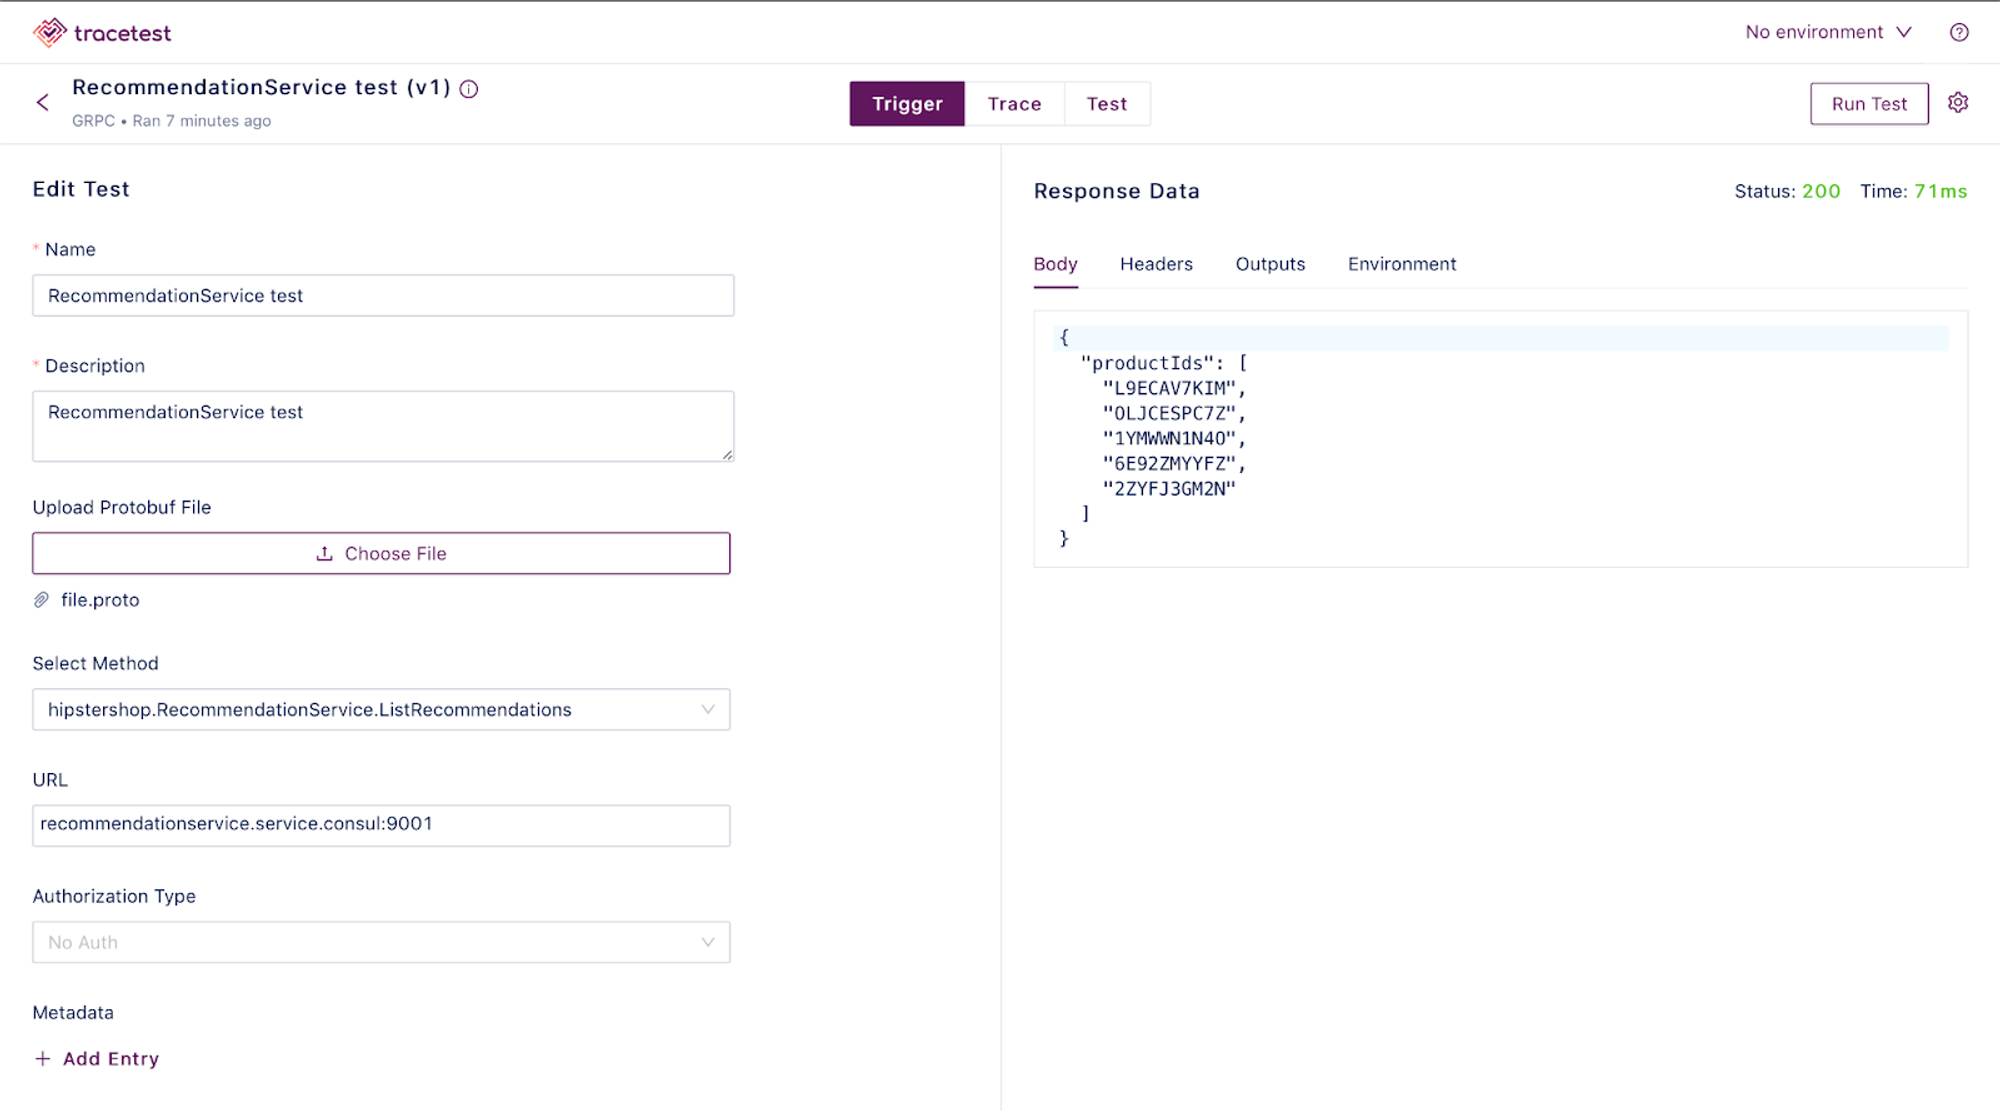
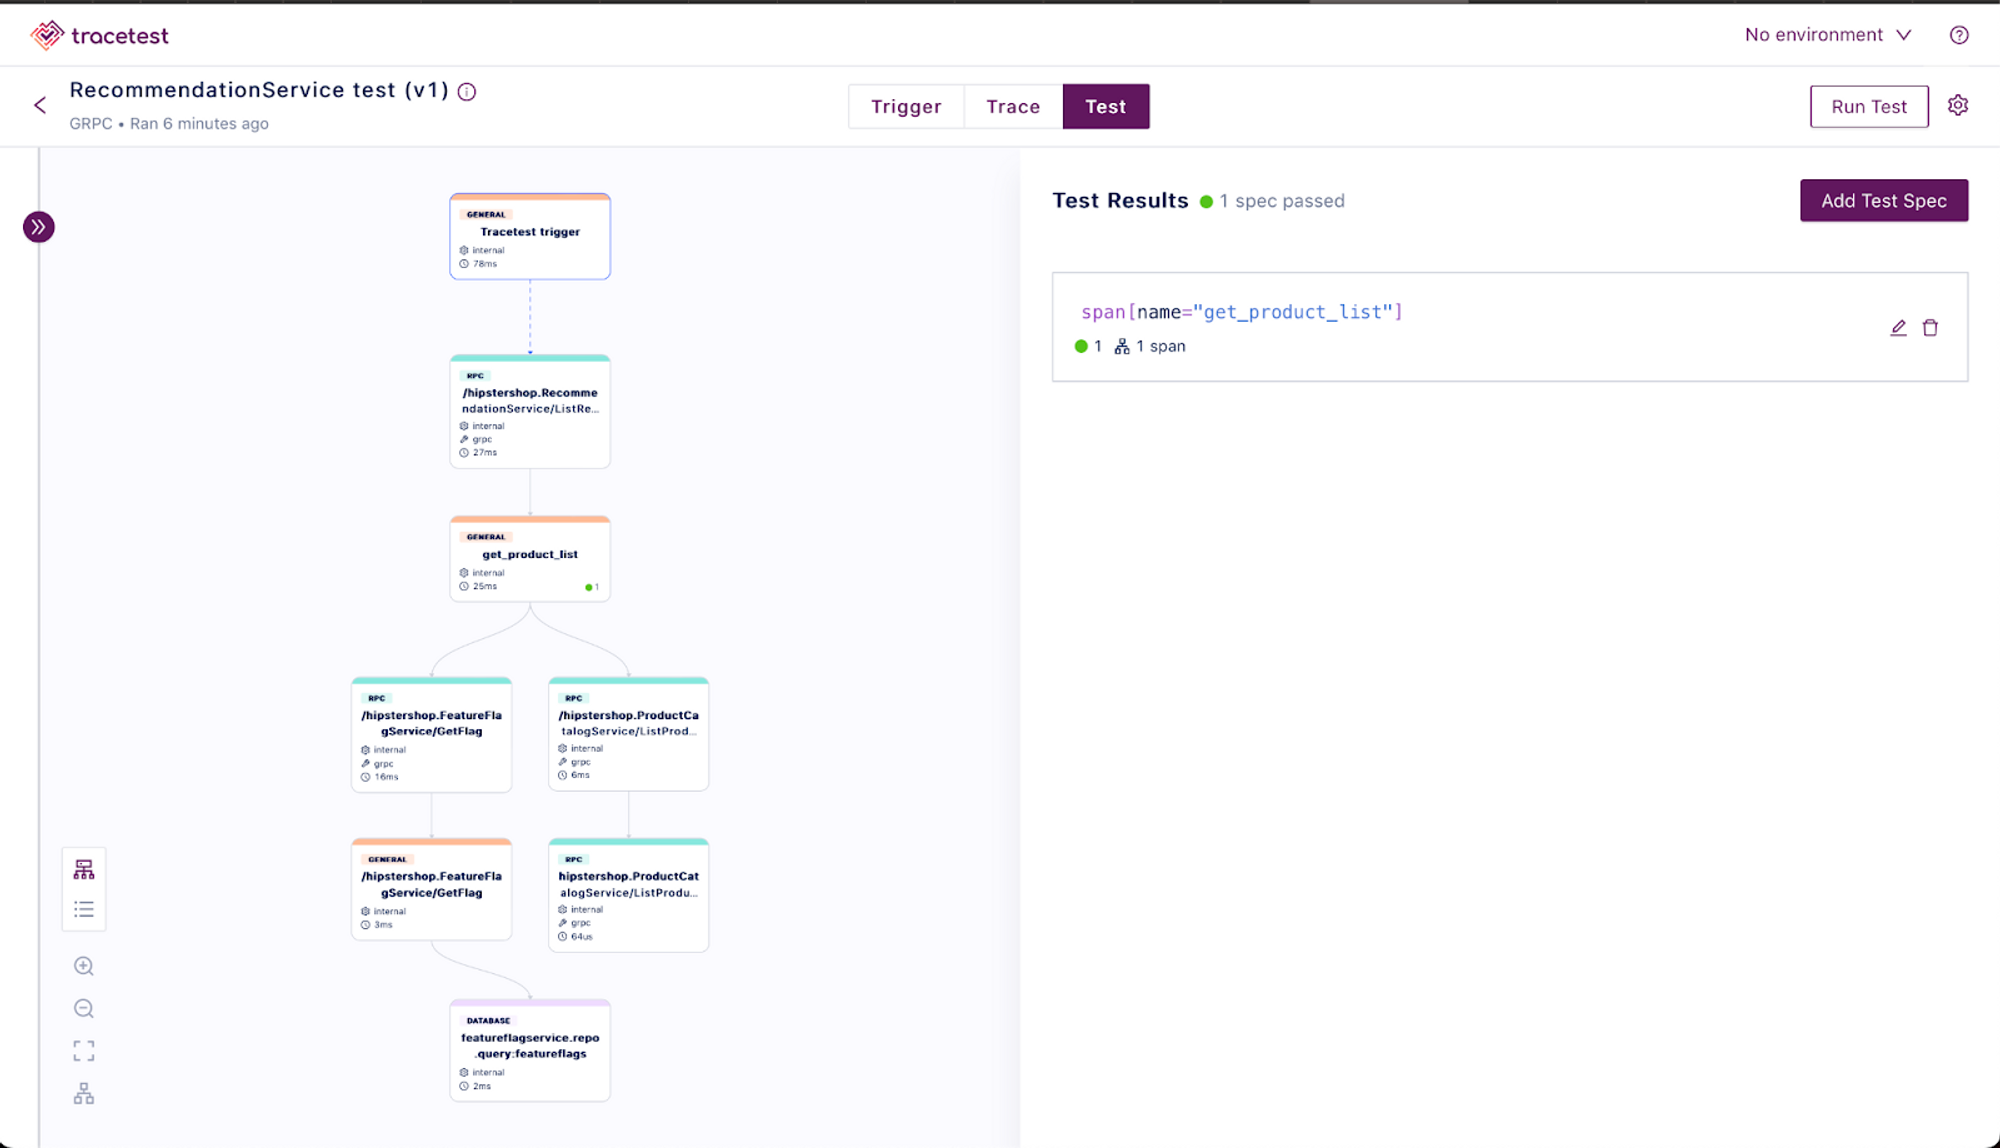
This might seem familiar - it’s the information that we entered in our test YAML. Tracetest runs the API endpoint and then checks to see if there are any Traces associated with this with this endpoint, and lets you create tests against the traces. Test specs are defined in the `Test` tab, located at the top middle section of the screen:

Clicking on it brings us to the test spec definition screen:
Next, let’s head to the top left-hand side of the screen, and click on the purple circle with `>>`:
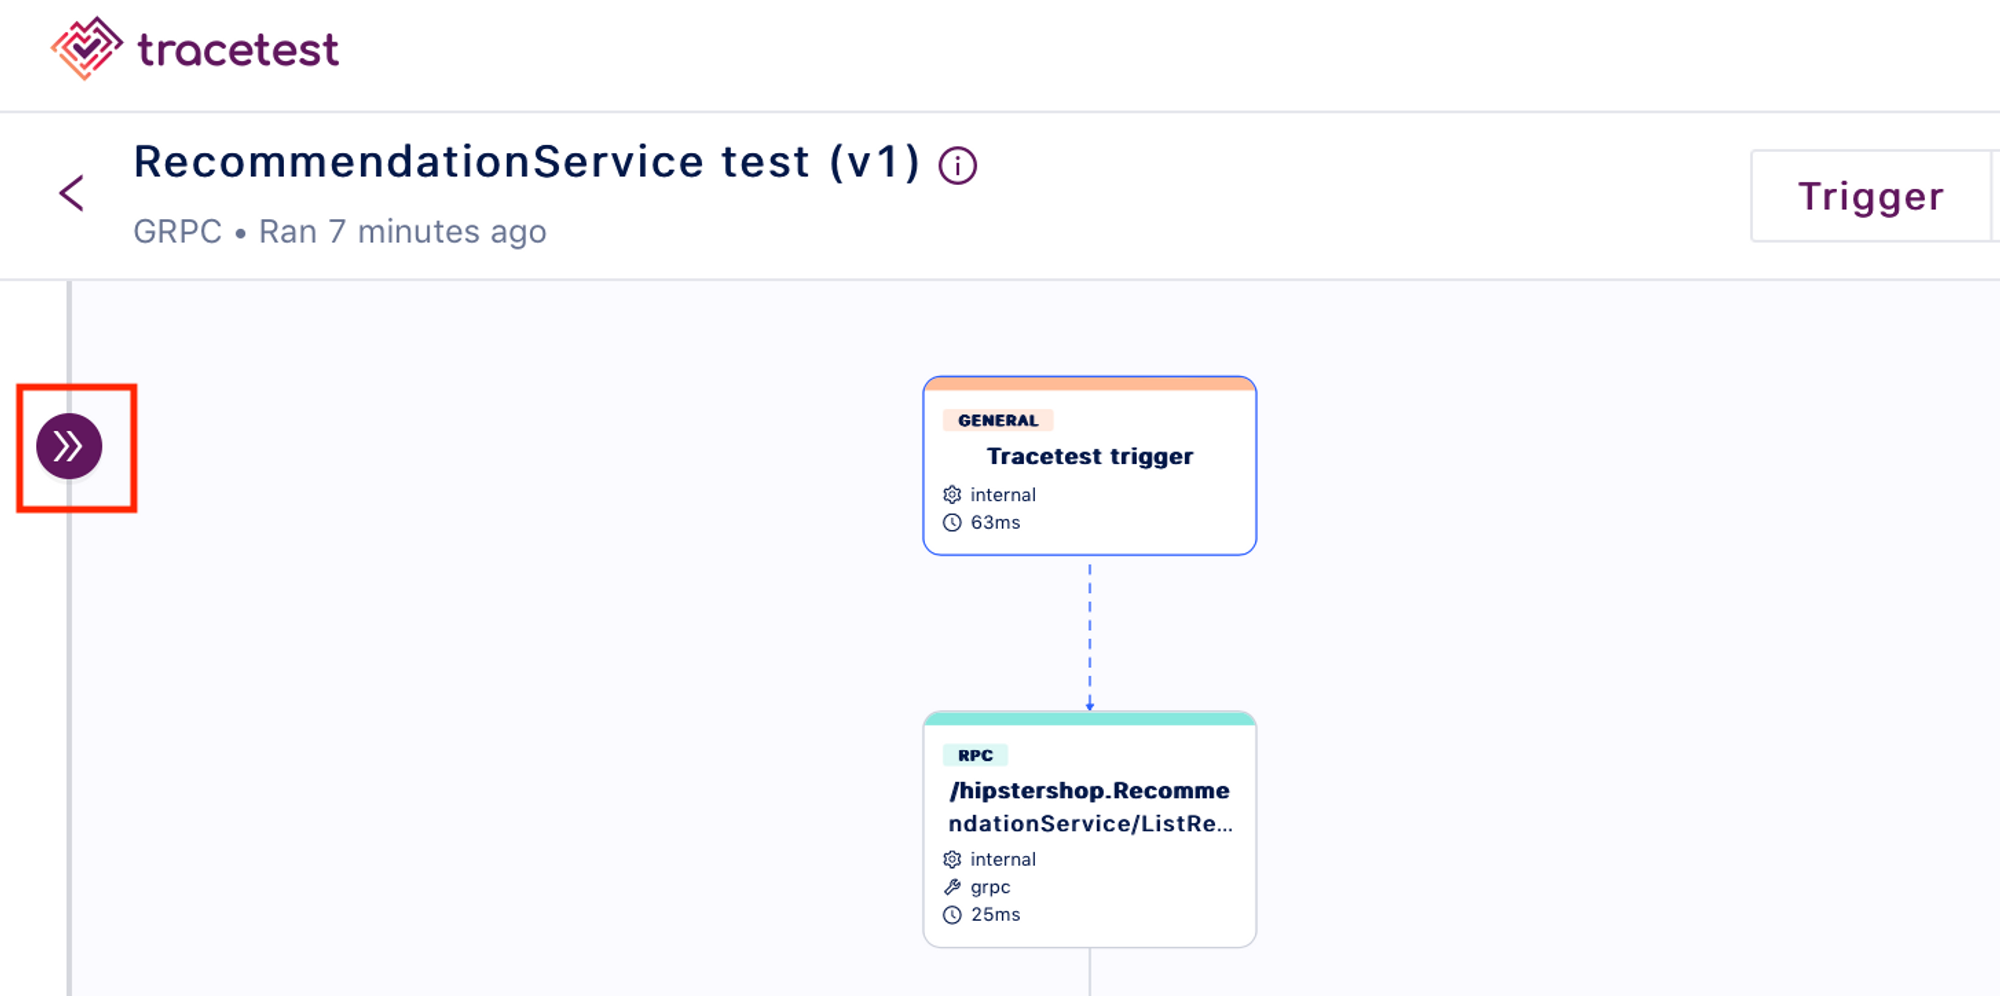
This reveals a side pane with all sorts of information about the selected Span. In our case, we’ve selected the `Tracetest trigger` Span (top box), so our screen looks something like this:
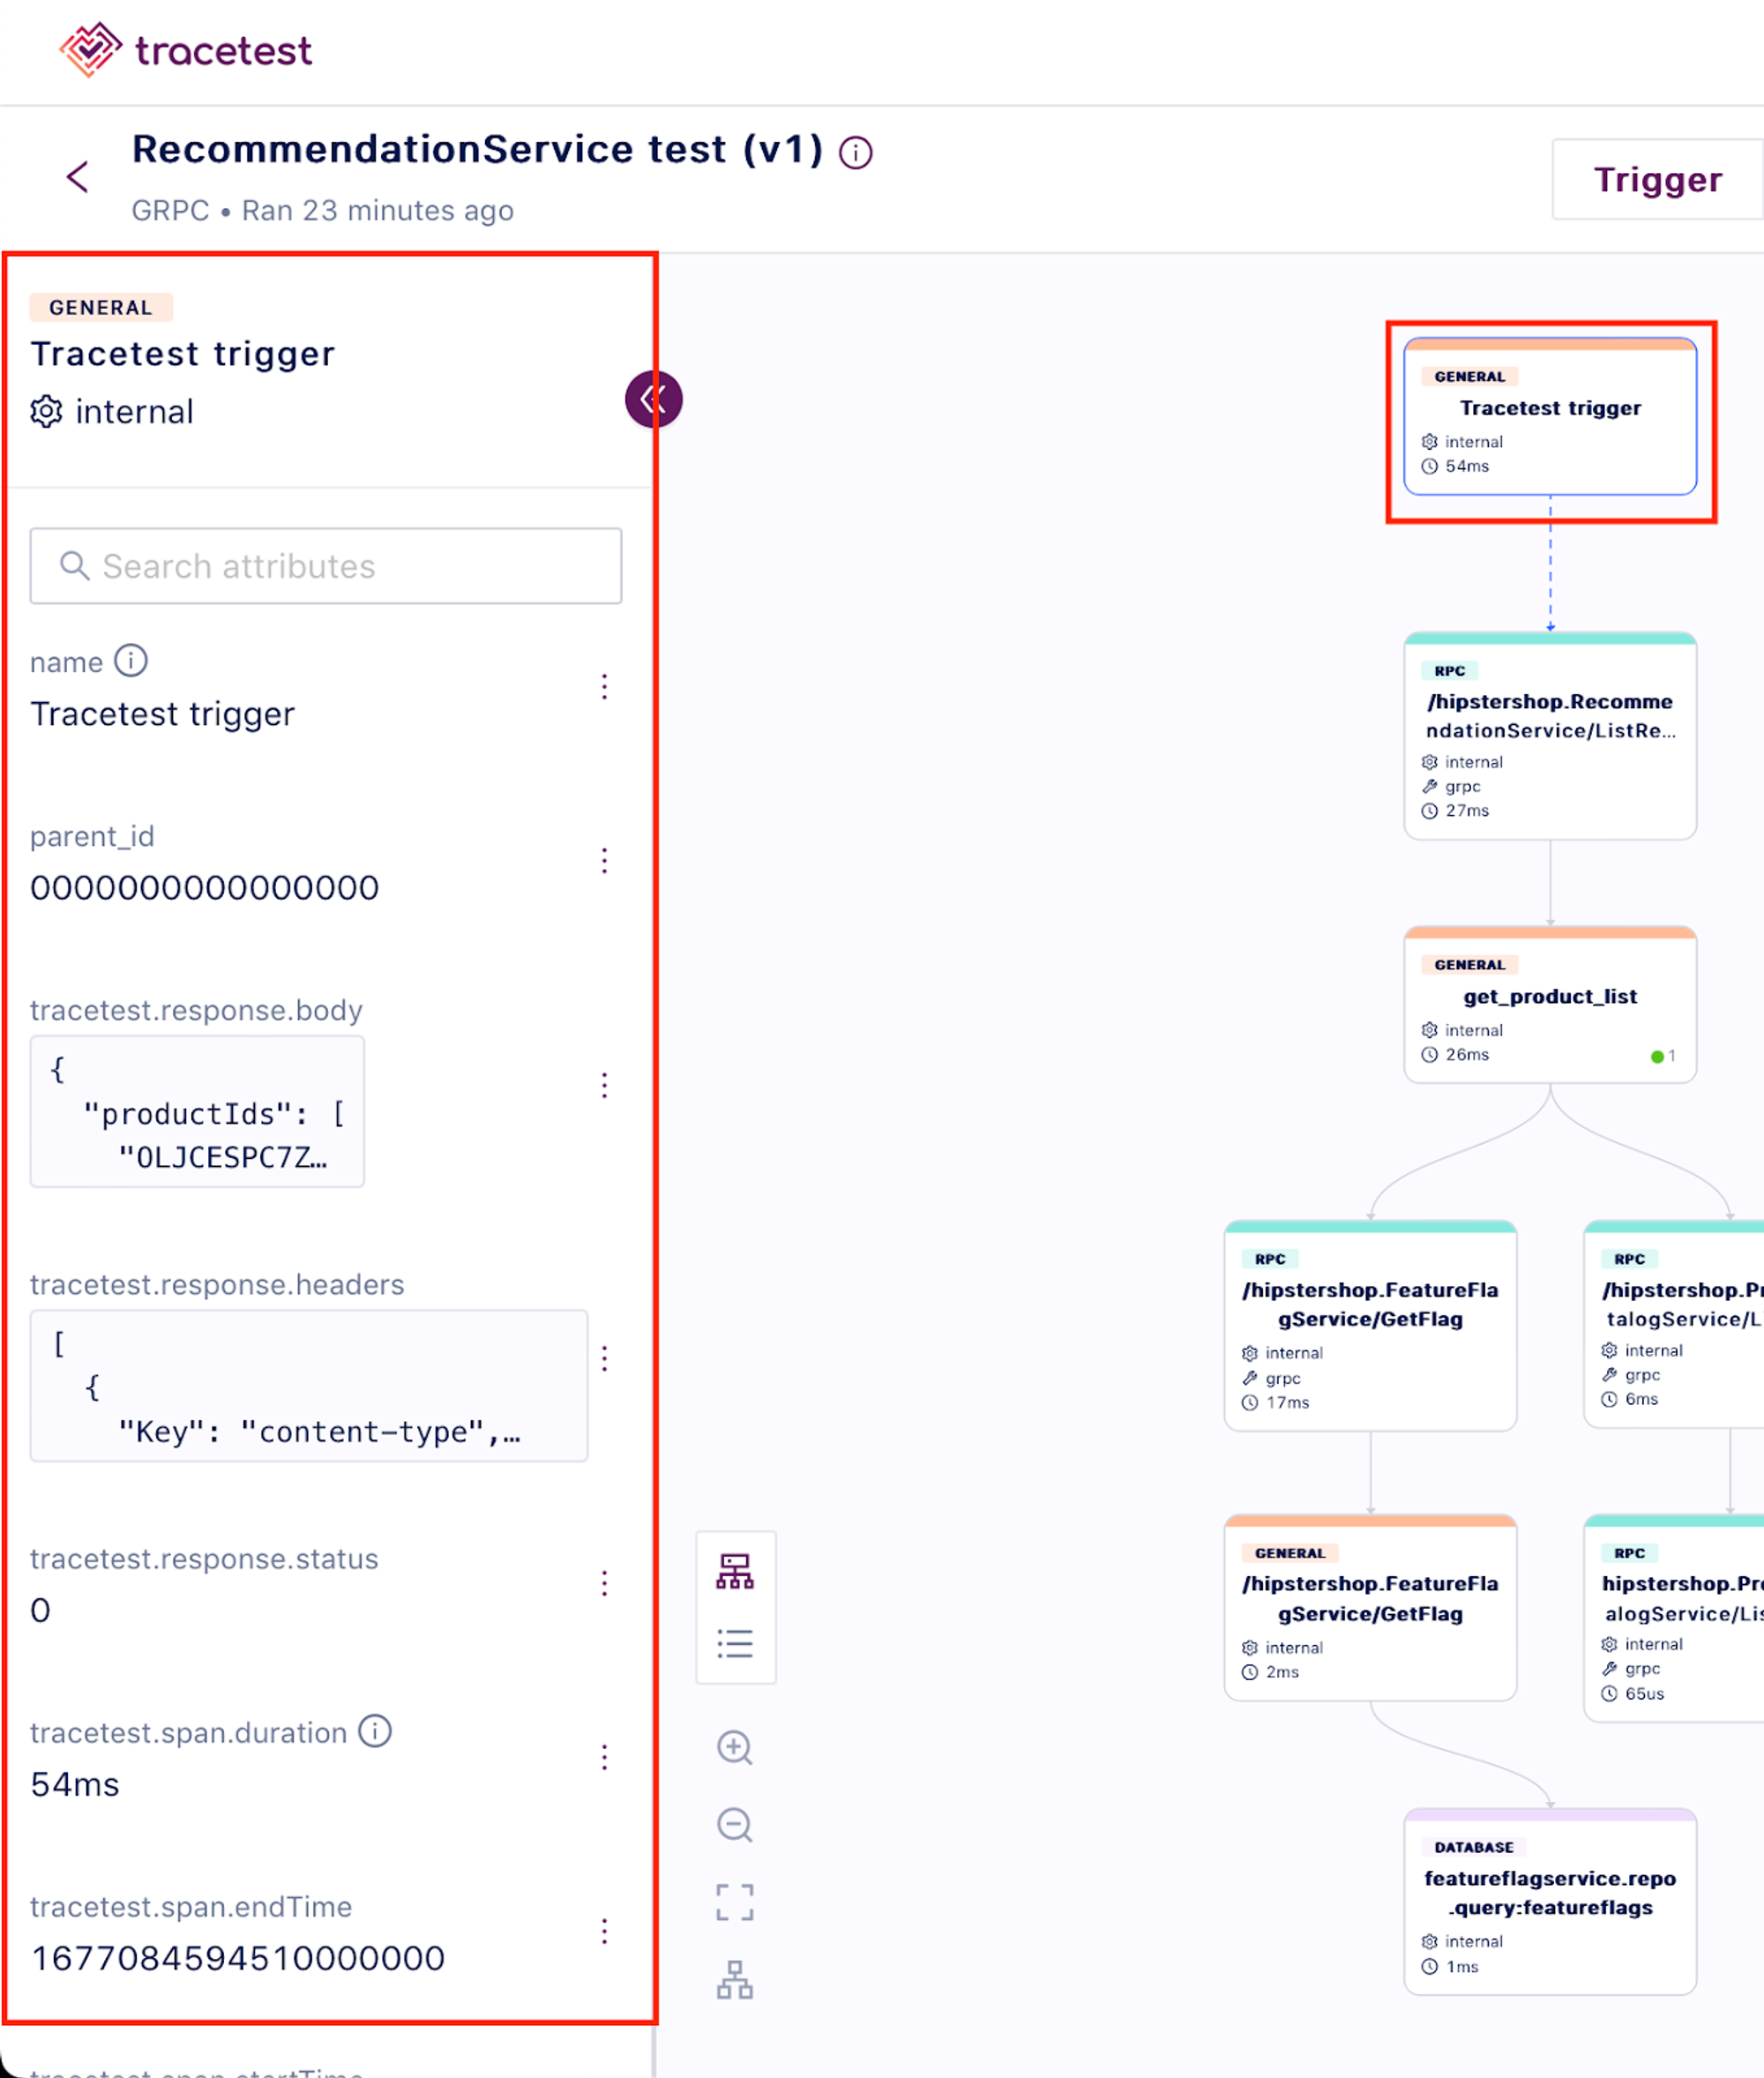
Notice how the `Tracetest trigger` box has a slight blue highlight. But we’re not interested in this [Span](https://opentelemetry.io/docs/concepts/observability-primer/#spans). We’re actually interested in the `get_product_list` [Span](https://opentelemetry.io/docs/concepts/observability-primer/#spans), so let’s click on that Span:
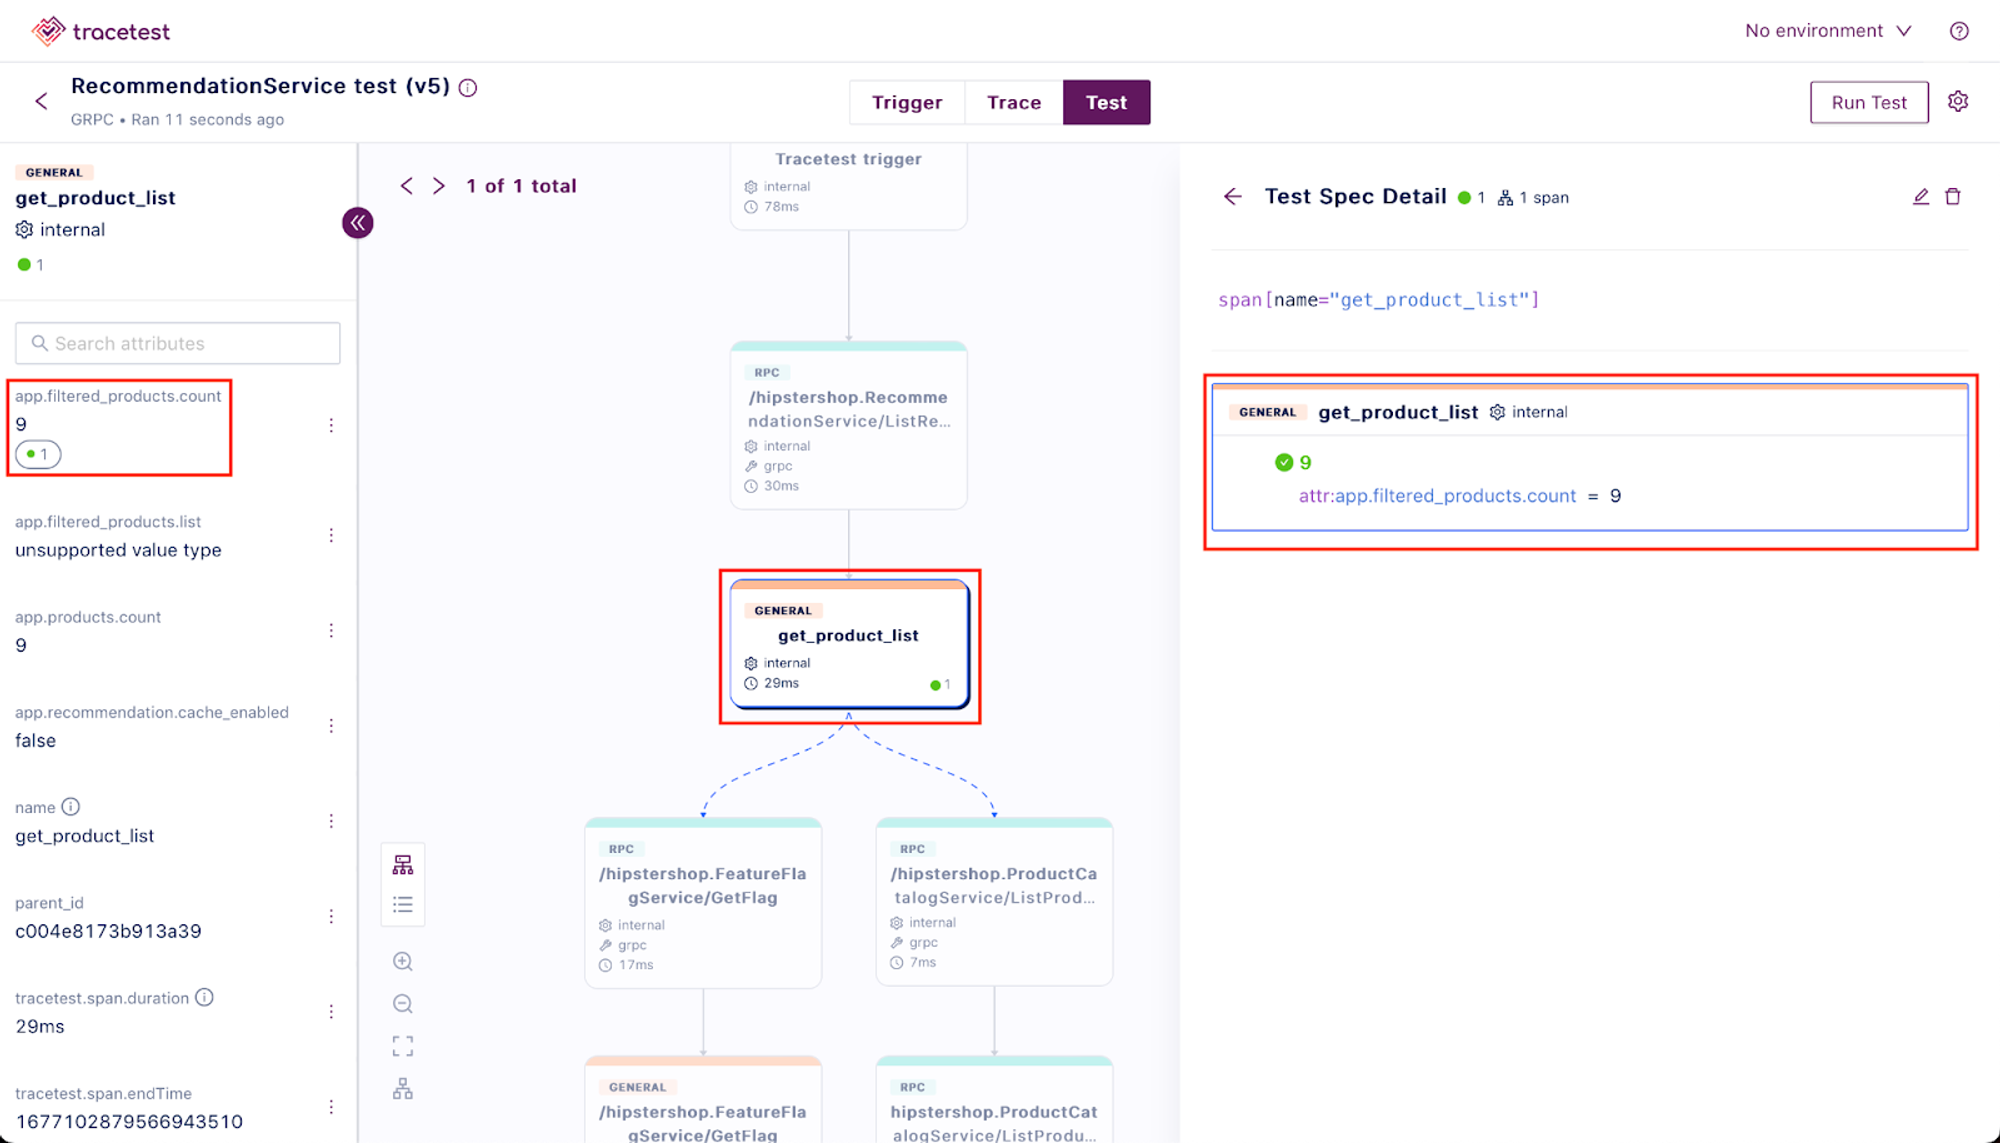
Notice how it has an attribute called `app.filtered_products.count`, and that its value is `9`…which is the value that we’re checking for in our assertion! Ta-da! 🎉
### Part 4: See it Lightstep!
Remember that our OTel Collector is configured to send Traces to both Tracetest and Lightstep, so we should see the same Trace data in both.
I went into my Lightstep account and created a [Notebook](https://docs.lightstep.com/docs/use-notebooks) that looked like this:
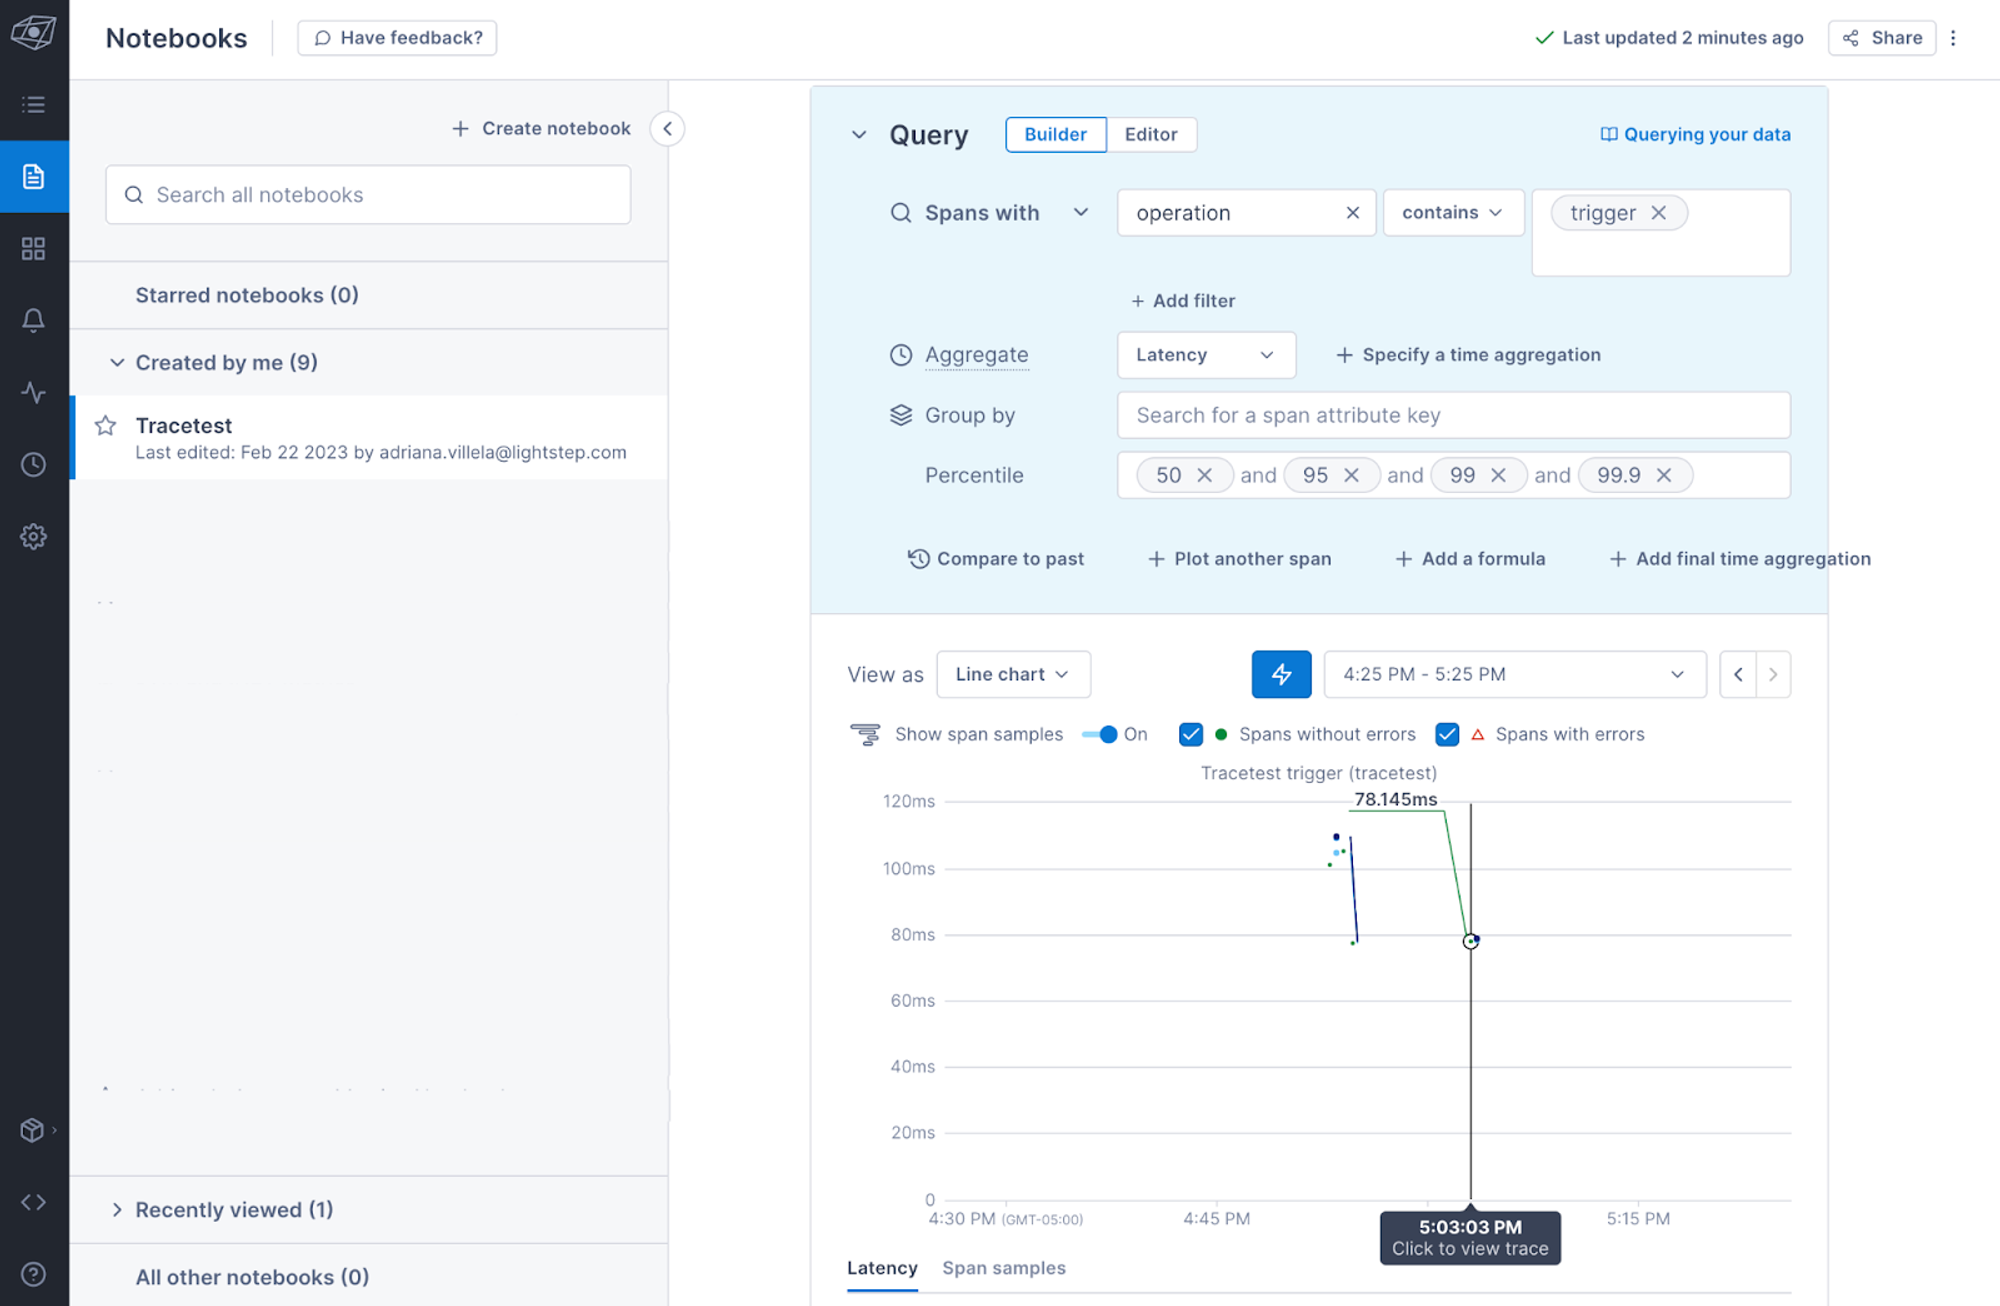
And clicked on one of the matching traces returned, which led me to the Trace diagram below:
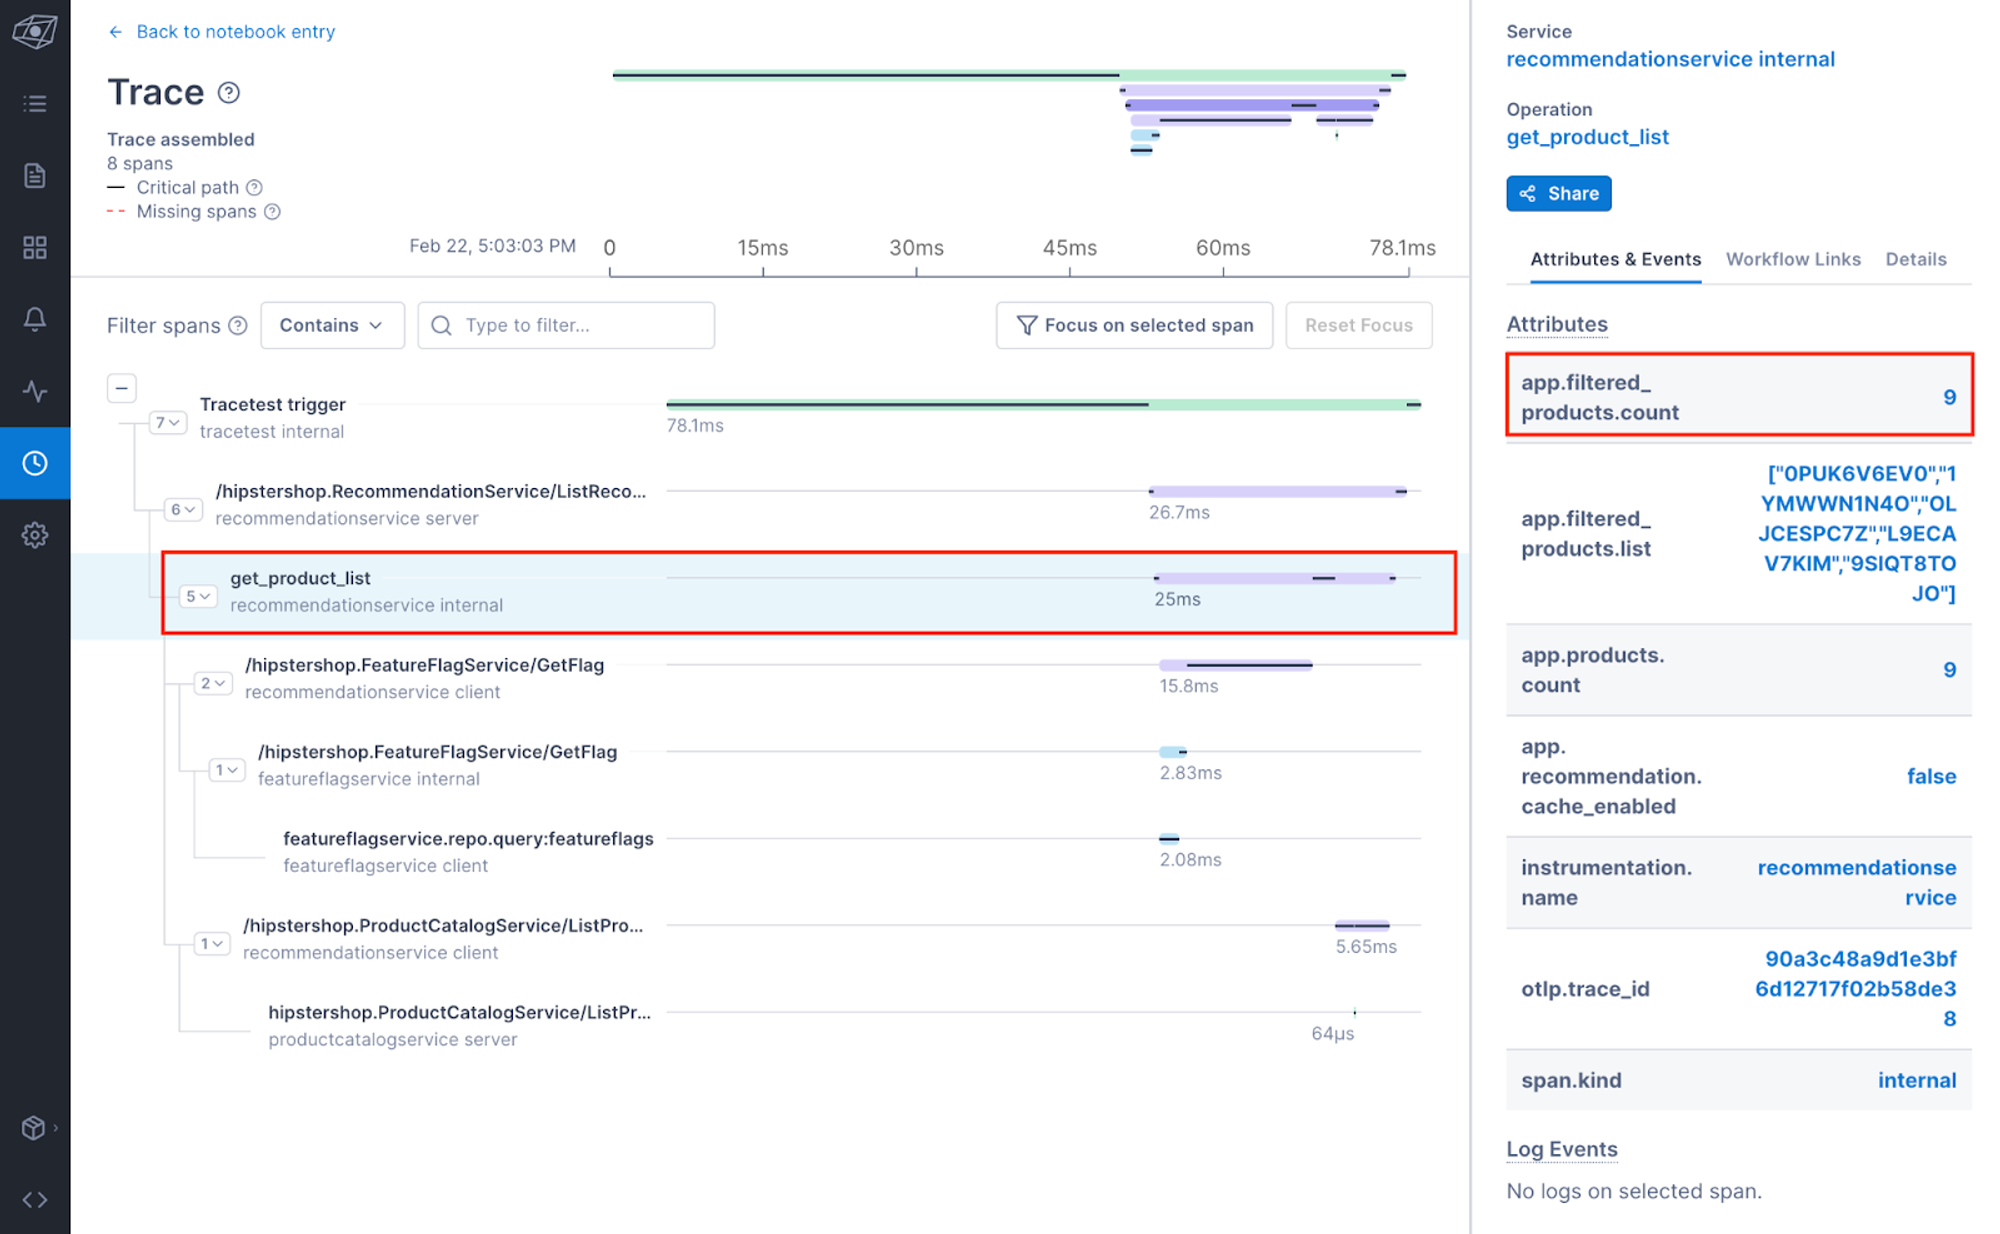
As you can see, we have our `get_product_list` trace, which has an attribute called `app.filtered_products.count` with a value of `9`. Yay!
## Final Thoughts
Tracetest is a great tool for unlocking the potential of Trace-based testing. Although the example in this tutorial was fairly simple, I hope that it gives you an appreciation for some of the cool stuff that Tracetest can do. I definitely plan to keep my eye out as this tool improves, and [I am excited to see where Trace-based testing takes us in 2023](https://thenewstack.io/our-2023-site-reliability-engineering-wish-list/)!
For more on the ins and outs of Tracetest, be sure to check out the official docs [here](https://docs.tracetest.io/). For you visual learners, I’ve put together a quick little four-minute video highlighting the main things covered in this post. Be sure to check it out [here](https://youtu.be/EBWf2aaR9wk).
That was definitely a lot to take in, so give yourself a pat on the back for getting through this! Now please enjoy this lovely photo of Mookie the rat being cradled in my husband’s arms.

Peace, love, and code!

Related Content
.jpg)
.jpg)
.jpg)
Stay in the Loop

Join the Tracetest Community in one of these channels:


— a first of its kind open source accelerator focused on the cloud native ecosystem


